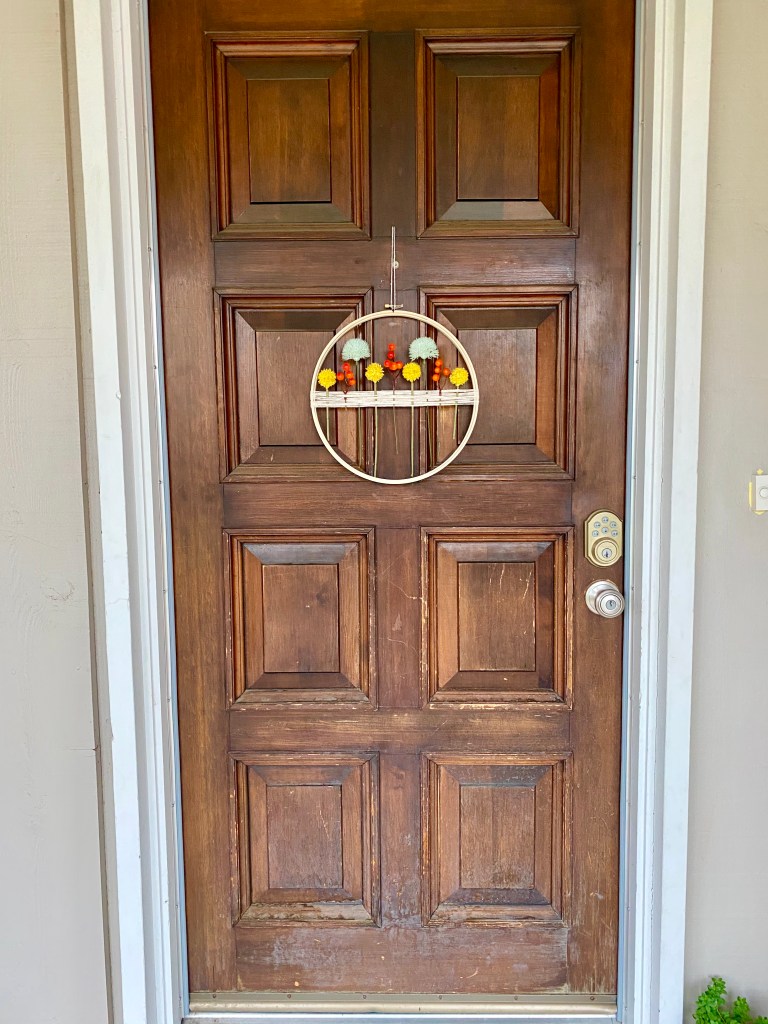
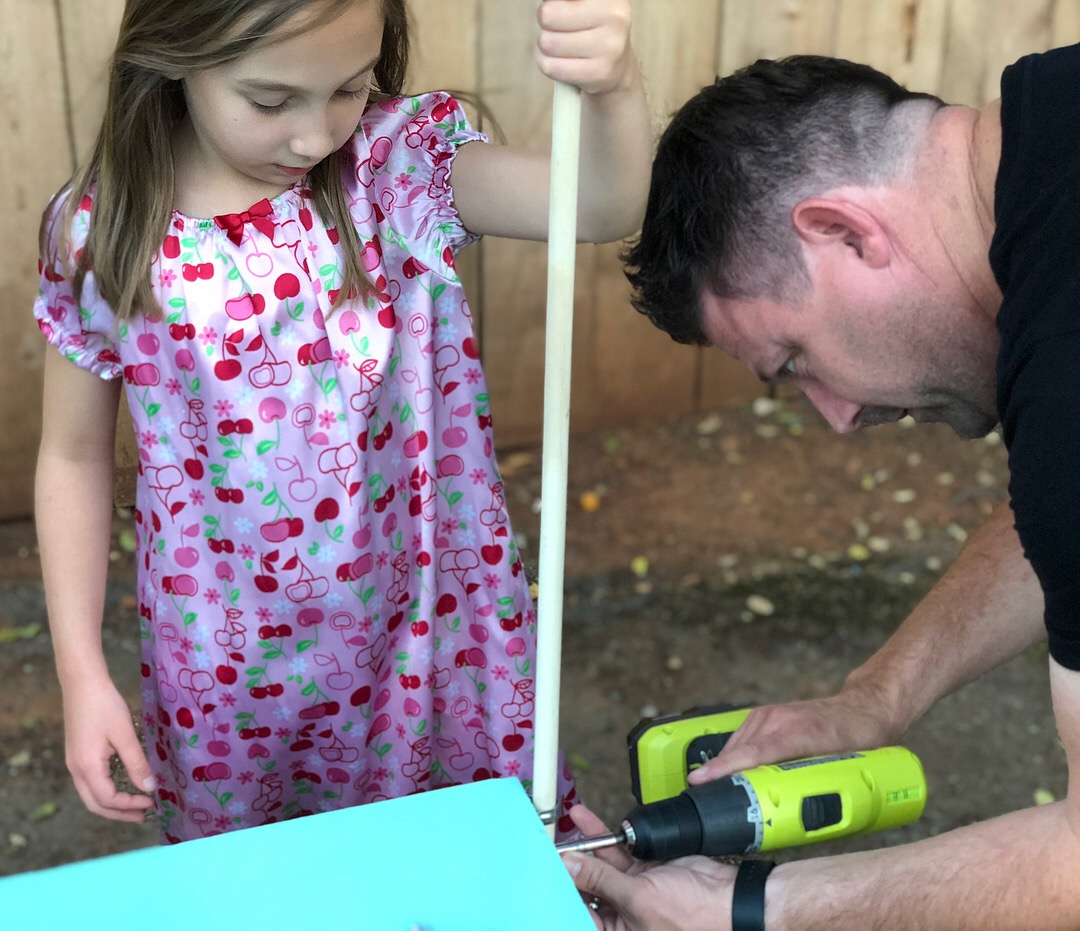
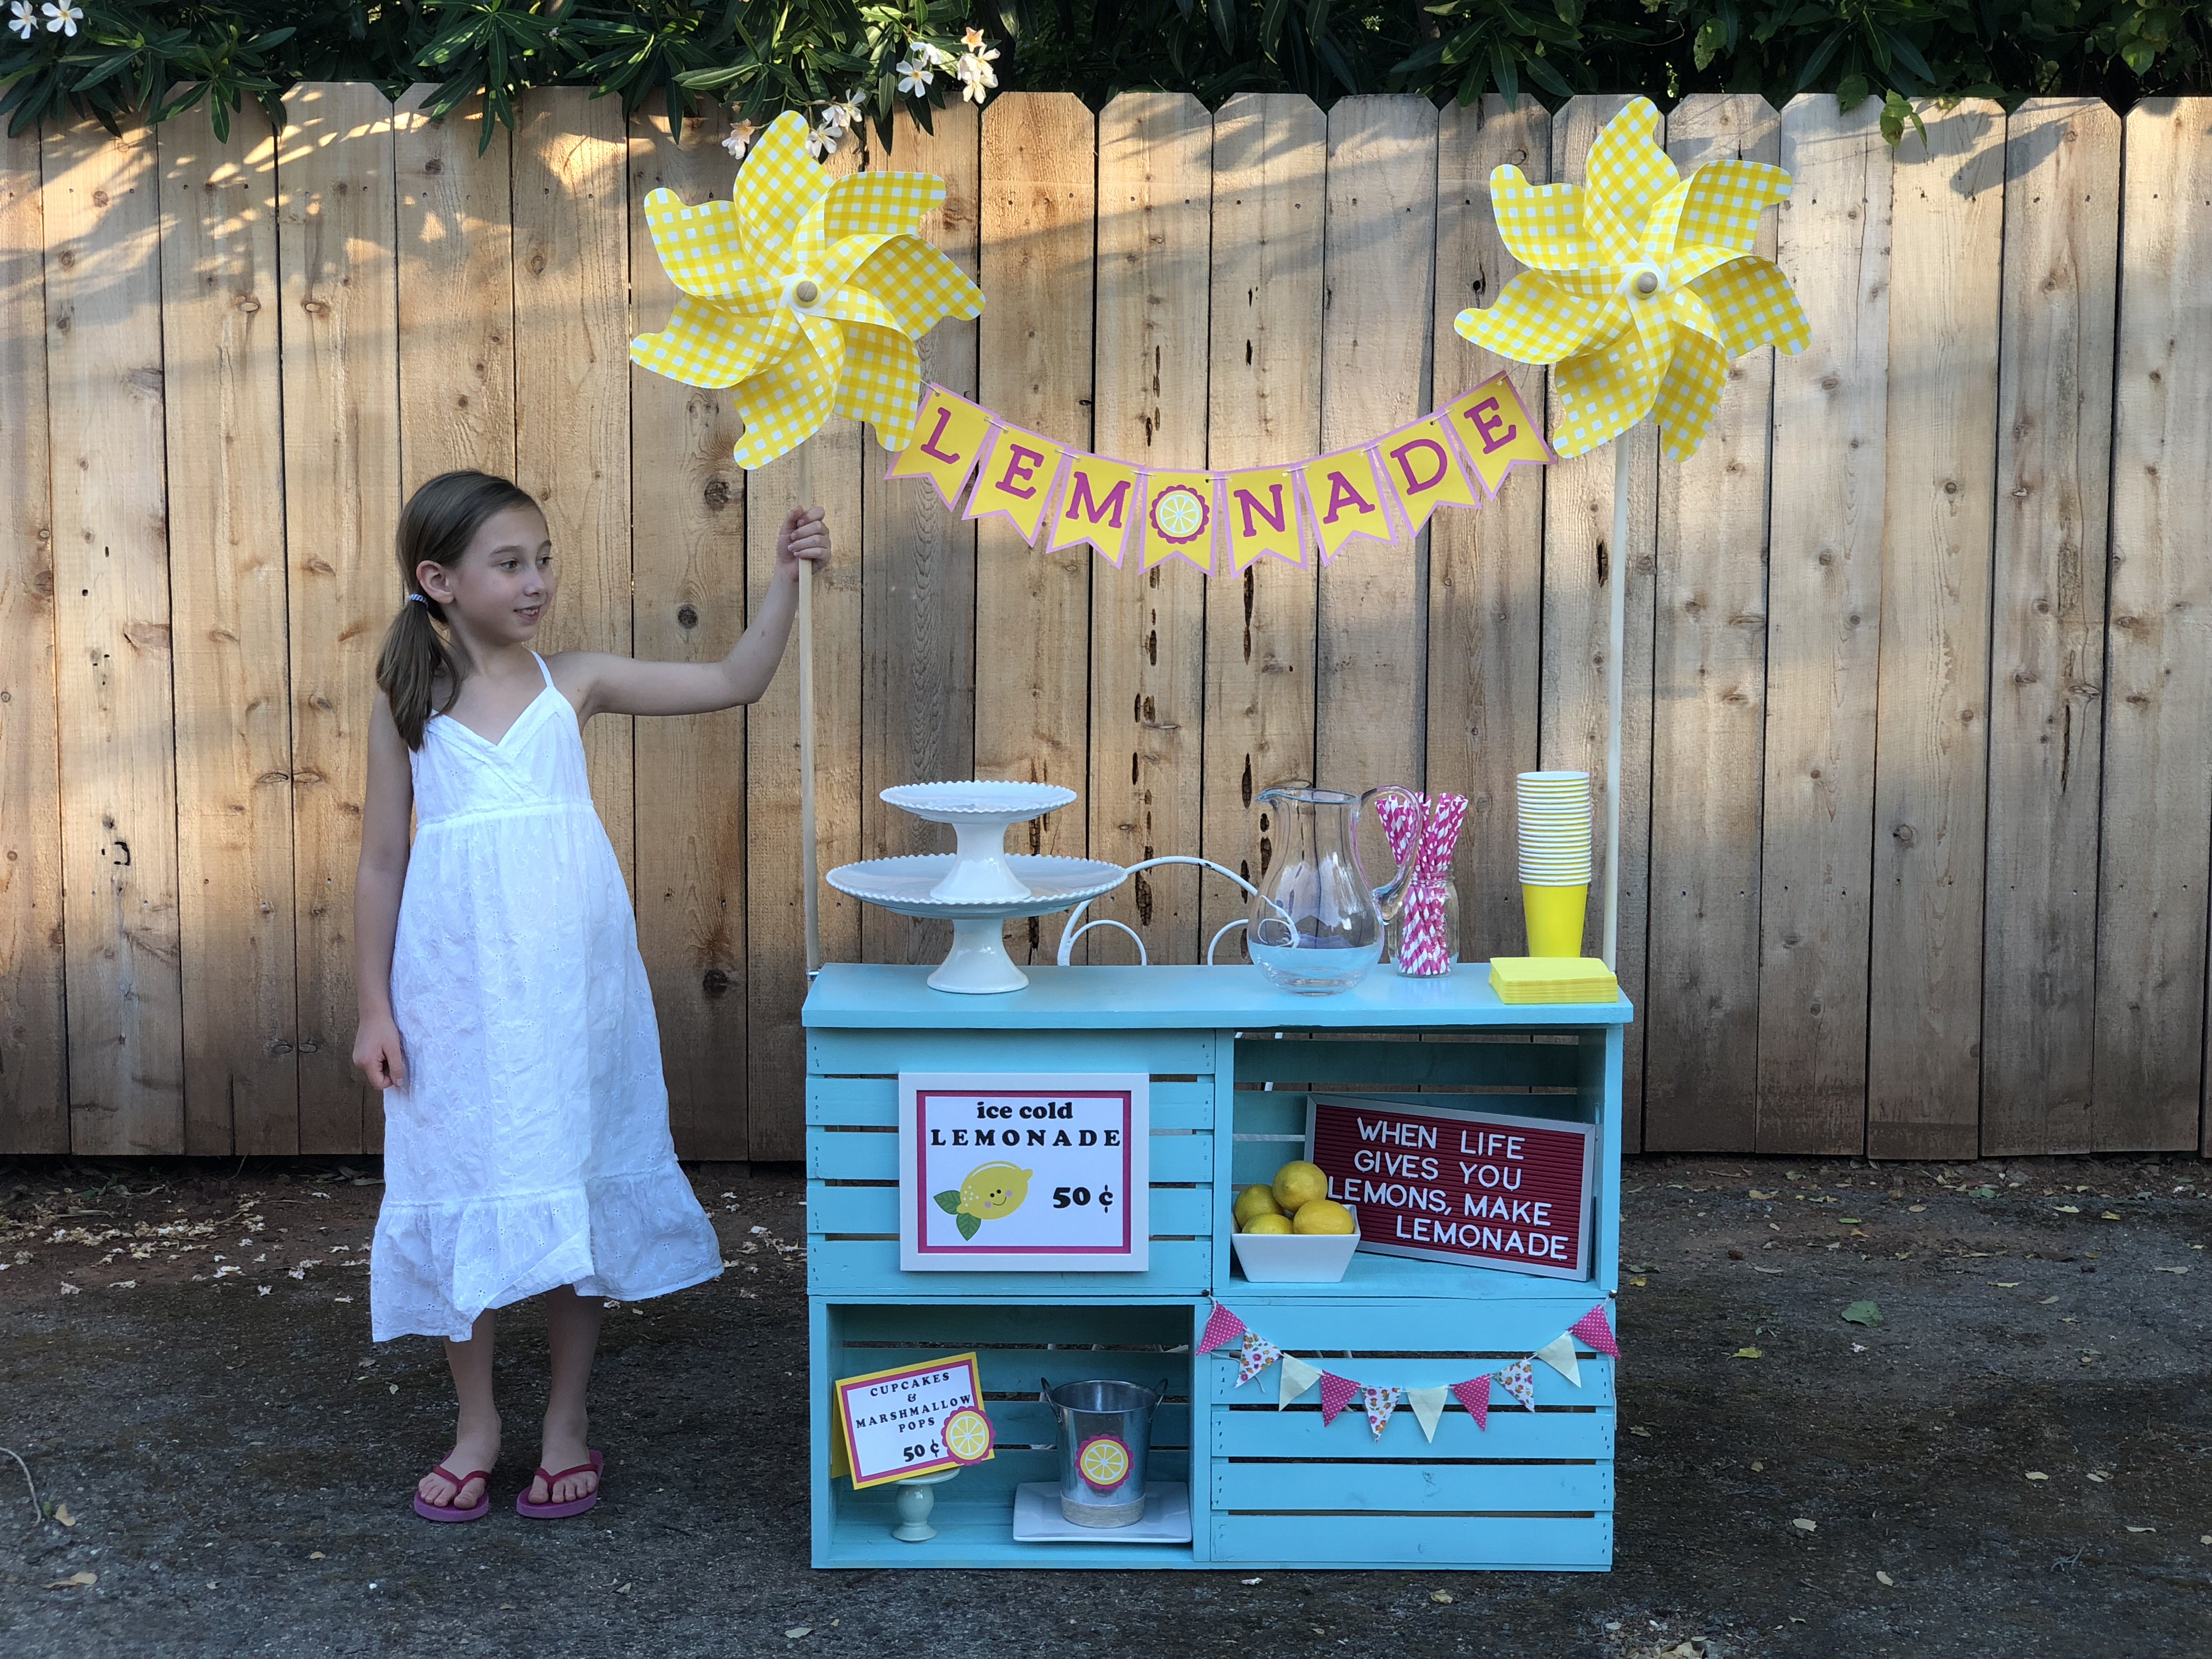
Valentine’s Day is just a week away and I have slowly been adding a few pops of pink and red to my mantel. I decided that I was lacking something tall to balance out all of the little nicknacks I picked up here and there. After looking at several different stores, I realized I wasn’t finding what I wanted. I already had planned to purchase some wooden X’s and O’s to paint pink and red, but inspiration struck when I saw a bag of little wooden hearts. I knew that I had an old frame somewhere in the garage that would be perfect for my project, so I went home ready for a fun Friday night of crafting…and the best part is that I only spent $4.50. #CommissionsEarned
I pulled out some pink, red, and white acrylic paints, sanded down the frame, mixed up several different shades of pink, cut a piece of white poster board as the backing, and went to work on this super simple, but adorable wooden hearts craft. The only glitch was that I should have sanded the frame a bit more, because it took about 15 coats of paint to cover the old ugly brown stain. Other than that small annoyance, the project was actually quite simple and I am thrilled with how it turned out. It’s the perfect addition to complete my Valentine collection on our mantel, and I plan to use it for years to come.
This is a little trick I used to keep all of the hearts lined up straight, and the clear tacky glue worked perfectly for securing the little wooden hearts to the poster board. #ComissionsEarned
My daughter said that she wanted to pop them off and eat them because they look like Brach’s Conversation Hearts.
For more Valentine fun check out the following blogposts:
Axolotls are the most adorable little creatures. These endangered amphibians are in the salamander family and have gained popularity recently due to being added to Minecraft. My daughter has been a fan of axolotls for the last several years, and she even has a big pink stuffed animal axolotl that her brother got her for her 11th birthday.
My daughter tends to pick the most obscure costumes that cannot be found anywhere in stores. Last Halloween she asked me to make her Appa from Avatar The Last Airbender. For “dress like your favorite book character” (Spirit Day) at school, she chose to be Kinkajou, the pink and yellow dragon from Wings of Fire, and this year, for Halloween, she wanted to be an axolotl.
I began to brainstorm about how to make her dream a reality, and started out by purchasing a pair of pink joggers and a matching hoodie to use as the base. I have found that felt is an inexpensive and easy material to use for creating costumes, and I already had some dark pink felt left over from the dragon wings I recently made, so I used it for the external gills and to add some details to the tail. #CommissionsEarned
I used a piece of poster board to make a template for the gills that measured 2 inches wide and 6.5 inches long. Fold the material and cut around three sides, leaving the fold uncut. Repeat so you have 6 dark pink gills. Sew around the cut edges, turn right side out, and fill with batting. Have your child try on the hoodie to determine the placement of the eyes and gills. I made my gills 3/4 inches apart. Pin the gills in place and then one by one, hand stitch them to the hood. You may have to adjust the batting to get them to stand up. (tip: overfill the gills with batting so that you have enough to move down to the base once they are sewn to the hood)
Cut two oval shaped eyes out of black felt and some white highlights to make the eyes even cuter. Clear Gel Tacky Glue worked great for attaching the highlights to the eyes and for securing the eyes to the hoodie. Axolotl’s eyes are wide set, so be sure to leave a good amount of space between the eyes. I put a piece of poster board inside of the hood to catch any glue that may have leaked through.
For the tail, I made another template that measured 4.5″ wide by 27.5″ long. I cut two pieces out of light pink felt. Then I cut some dark pink accents. Sew the accent pieces together to make them thicker. Place both accents in between the two light pink tail pieces and sew together. Now turn right side out and your tail is complete.
My daughter wanted to be able to wear the pink joggers again, so we safety pinned the tail to the back of the pants.
I was pretty pleased with the way the whole axolotl costume came together. It was super comfy and I love that it is something that she can wear again even when it’s not Halloween.
Each year, I try to incorporate some type of Christmas craft into our Advent activities. When my kids were younger, we would often take nature walks and collect all sorts of natural treasures. My kids are older now, and nature walks are a distant memory, but this remains one of my favorite DIY Christmas crafts that we made together.
This simple and inexpensive Christmas Tree Banner will add a rustic touch to your holiday decor and kids will have so much fun collecting sticks and twigs to use for their creations. You will need to pre-cut white or off white card stock in rectangles or pendants and purchase some wooden stars, gold paint, twine, and glue. Before your nature walk, take a few minutes to paint your wooden stars with the gold paint. #CommissionsEarned
Bundle up, grab a bag, and go on a stick hunt. Look for sticks in a variety of lengths, but try to find ones in a similar width around. Once you get home, hand each child a piece of the pre-cut banner and let them sort through the sticks, breaking pieces off to for their Christmas Tree, and working their way from bottom to top, while leaving a bit of room for a star.
Glue the sticks in place, including a vertical twig for the trunk and add one of your gold stars to the top of each twig tree. Once all of your banner pieces have dried and you have hole punched the top, thread your twine through and find the perfect place to hang your rustic Christmas Tree Banner.
For more fun Christmas ideas check out the following blogposts:
It was always my plan to update our front room when we moved into our home 6 years ago, but life is busy and something else always took priority. I finally decided to go with something bold and paint the room navy blue, knowing that the color would really pop against the white shutters and white built-ins. I chose Naval by Valspar in an eggshell finish and the color is exactly what I pictured. My sweet girl offered to help me paint the room, so we tackled it together.
Around that same time we were binge watching the show “Making It” and I saw a quick clip of a board and batten feature wall that was done by one of the contestants on the show. I told my husband that we had to create a similar wall in our front room and thankfully he was on board. I am the visionary in the family for these types of projects, but oftentimes, he is the one to carry out the little details to make it happen. I drew a sketch of what I wanted the wall to look like with rough measurements, and then we took a trip to Lowes to see what we could find to make it happen. I’ll include my sketch so that you can use it as a template to create your own. The middle fold is where the wall meets because my boards cover two walls.
Our unfinished boards measure 1 1/2″ x 3/4″ and were 8 ft long, but you can go with a different size depending on the design you choose. I did have to go back at one point for a couple more boards, so I think we ended up using about 15 total. Because the room was already painted navy, my next step was to add a coat of paint to all of the unfinished boards.
While we waited for the paint to dry, we grabbed our level, a ruler, and a roll of painters tape to map out the placement of the boards along the wall. #CommissionsEarned
The measuring and cutting was definitely the trickiest part. This is where my husband came in with his mathematical mind and precision to detail. He used his compound miter saw for all of the cuts. As you can see from the photo, my rough sketch on paper made it easier to bring my vision to life with the painters tape. My husband used a nail gun to attach the boards to the wall. We started off with the outline along the sides and top, then moved on to the longest ones in the center and went out from there, measuring and cutting each board along the way. #CommissionsEarned
Once all of the boards were up, I added another two coats of paint to make sure all of the nail holes were covered up and to give this “feature wall” a finished look. Our DIY board & batten wall was a worthwhile weekend project that ended up costing us under $75 and it has added so much warmth and texture to our front room.
Because navy is such a dark color, I wanted to make sure to add plenty of contrast, so I created a large gallery wall of photos of our family on the other side of the room and I updated the decor on our built-ins. You can find similar matts and frames on Amazon, and Shutterfly is a great place for oversized black and white prints. I love that this is the first glimpse people get when they enter our home and I am thrilled with the way our Christmas decorations look in here as well. This room has definitely become my favorite in our entire house. #CommissionsEarned
My daughter has been asking to have a lemonade stand since last summer, so it was a must on our 2018 Summer Bucket List. I saw some cute DIY ideas using wooden crates and thought that we would give it a go. I found the best deal for wooden crates at our local Michael’s Store. My husband had a 36″ x 10″ board cut at The Home Depot. I purchased two different sizes of nails, 1-1/4 inches for the thicker parts and 3/4 inches for the thinner wood slats, and went to work. You can watch my video tutorial for more details on the building process. #CommissionsEarned
Hobby Lobby recently had a huge clearance on their summer stock, so I was able to get two giant yellow pinwheels for just $4 each. They made the cutest sides to hang a LEMONADE banner on. I used my Cricut Expression 2 to cut out the letters for the banner and hung it with twine. A few material scraps cut into triangles made for a mini pennant banner to hang along one of the crates. I created an “Ice Cold Lemonade” sign, a price list for some treats that we made, and lemon cupcake toppers that you can print off here Lemonade Stand Printables PDF
My daughter loves to dance, and every summer her dance studio holds a week long dance camp. We decided that selling lemonade & treats would be a great way for her to earn the $125 tuition for camp. On a Friday evening, we made a batch of cupcakes and marshmallow pops. I have included the lemon template I used for the candy melt lemons. Lemon Template pdf (See some of my marshmallow pop videos for instructions on how to create themed mallow pops)
On Saturday and Sunday, my girl held lemonade stands in our driveway, and not only did she have the best time selling lemonade and sweet treats, she earned $129 in two mornings thanks to the generosity and support of our amazing friends and neighbors. I will never forget the joy on her face when she walked into the dance studio on that Monday morning and paid her entire tuition in full with money she had earned herself. Lemonade stand success!!!
I am so pleased with the way our DIY Lemonade Stand turned out, and have been thinking of other uses for it. Of course she can always use it for imaginary play, but I’m sure we will also use it for birthday parties in the future, bake sales, donuts and juice during our garage sale, and of course, many many more lemonade stands.
School starts next week and we are so not ready! Summer seems like it has flown by and we are savoring these precious last days of sleeping in, staying in pajamas well into the afternoon, swimming, and staying up late. This really is the first summer that all of my kids have slept in…and by sleeping in, I mean, not getting up until after 7:30. I am a night owl, so that extra hour and a half in the morning is glorious for this mama!
The last couple of weeks, I have been taking little steps to prepare for the upcoming school year, cleaning out clothes that are too small and shopping for new clothes and shoes. But I know that the hardest part for my kids will be the transition from lazy summer mornings to the “get up and go” school morning routine. So this week, I created this simple and inexpensive visual schedule to help my 7 year old daughter adjust to the new norm.
Watch my tutorial to learn how to create one of your own. I’m including the template that I used with the morning routine icons and the words that go with each. The video gives you step by step instructions. Here’s a list of what you will need…
Birthday parties are challenging for teen boys. The past couple of years my son Jacob has not wanted a theme or decorations, so we have just had a few friends over for movies and board games. But this year, for his 15th birthday, we decided to do something unique. The idea was sparked by a conversation we had about the youth group I attended as a teen and some of the fun events we got to do. My favorite was called “The Torture Rally,” a 24 hour car rally around our city with clues to solve and challenges, definitely one of the highlights of my teen years. I described it to Jacob as a sort of youth group Amazing Race, and the idea for pulling of a birthday party like this was birthed. We kept the party small and just had one team…so they were essentially competing against themselves, but they had so much fun and it was well worth all the hours of prep that I put in to plan all the clues and challenges.
Here is a list of what we did for Jacob’s AMAZING RACE PARTY!
PULL 50 MARBLES OUT OF A TUB OF ICE WATER USING ONLY YOUR TOES
2. MEMORIZE THIS POEM. FIND THE MAN IN RED ACROSS THE PARK AND RECITE IT PERFECTLY. IF YOU MESS UP, GO BACK AND TRY AGAIN
Spaghetti, spaghetti, all over the place, Up to my elbows – up to my face, Over the carpet and under the chairs, Into the hammock and wound round the stairs, Filling the bathtub and covering the desk, Making the sofa a mad mushy mess. The party is ruined, I’m terribly worried, The guests have all left (unless they’re all buried). I told them, “Bring presents.” I said, “Throw confetti.” I guess they heard wrong ’cause they all threw spaghetti! – Shel Silverstein
3. (set up in someones front yard) MEMORIZE THE ORDER Of THESE TRIBAL PRINTED CARDS. NOW RECREATE THIS EXACTLY IN THE BACKYARD. YOU MAY RETURN AS MANY TIMES AS NECESSARY BUT CANNOT BRING CARDS WITH YOU.
4. (part 1) WEAR CRAZY PARTY HATS AND MARDI GRAS NECKLACES IN PUBLIC (WALK ACROSS THE BRIDGE) (part 2) CHALLENGE…WITH STRING TIED TO YOUR WRISTS AND CONNECTED TO A PARTNER, FIND YOUR WAY APART (it’s actually quite simple but seems very complicated)
5. MAKE MARSHMALLOW SHOOTERS. NOW SHOOT MALLOWS INTO A BUCKET THAT IS HELD ON YOUR TEAMMATES HEAD (MAKE 5 MALLOWS EACH)
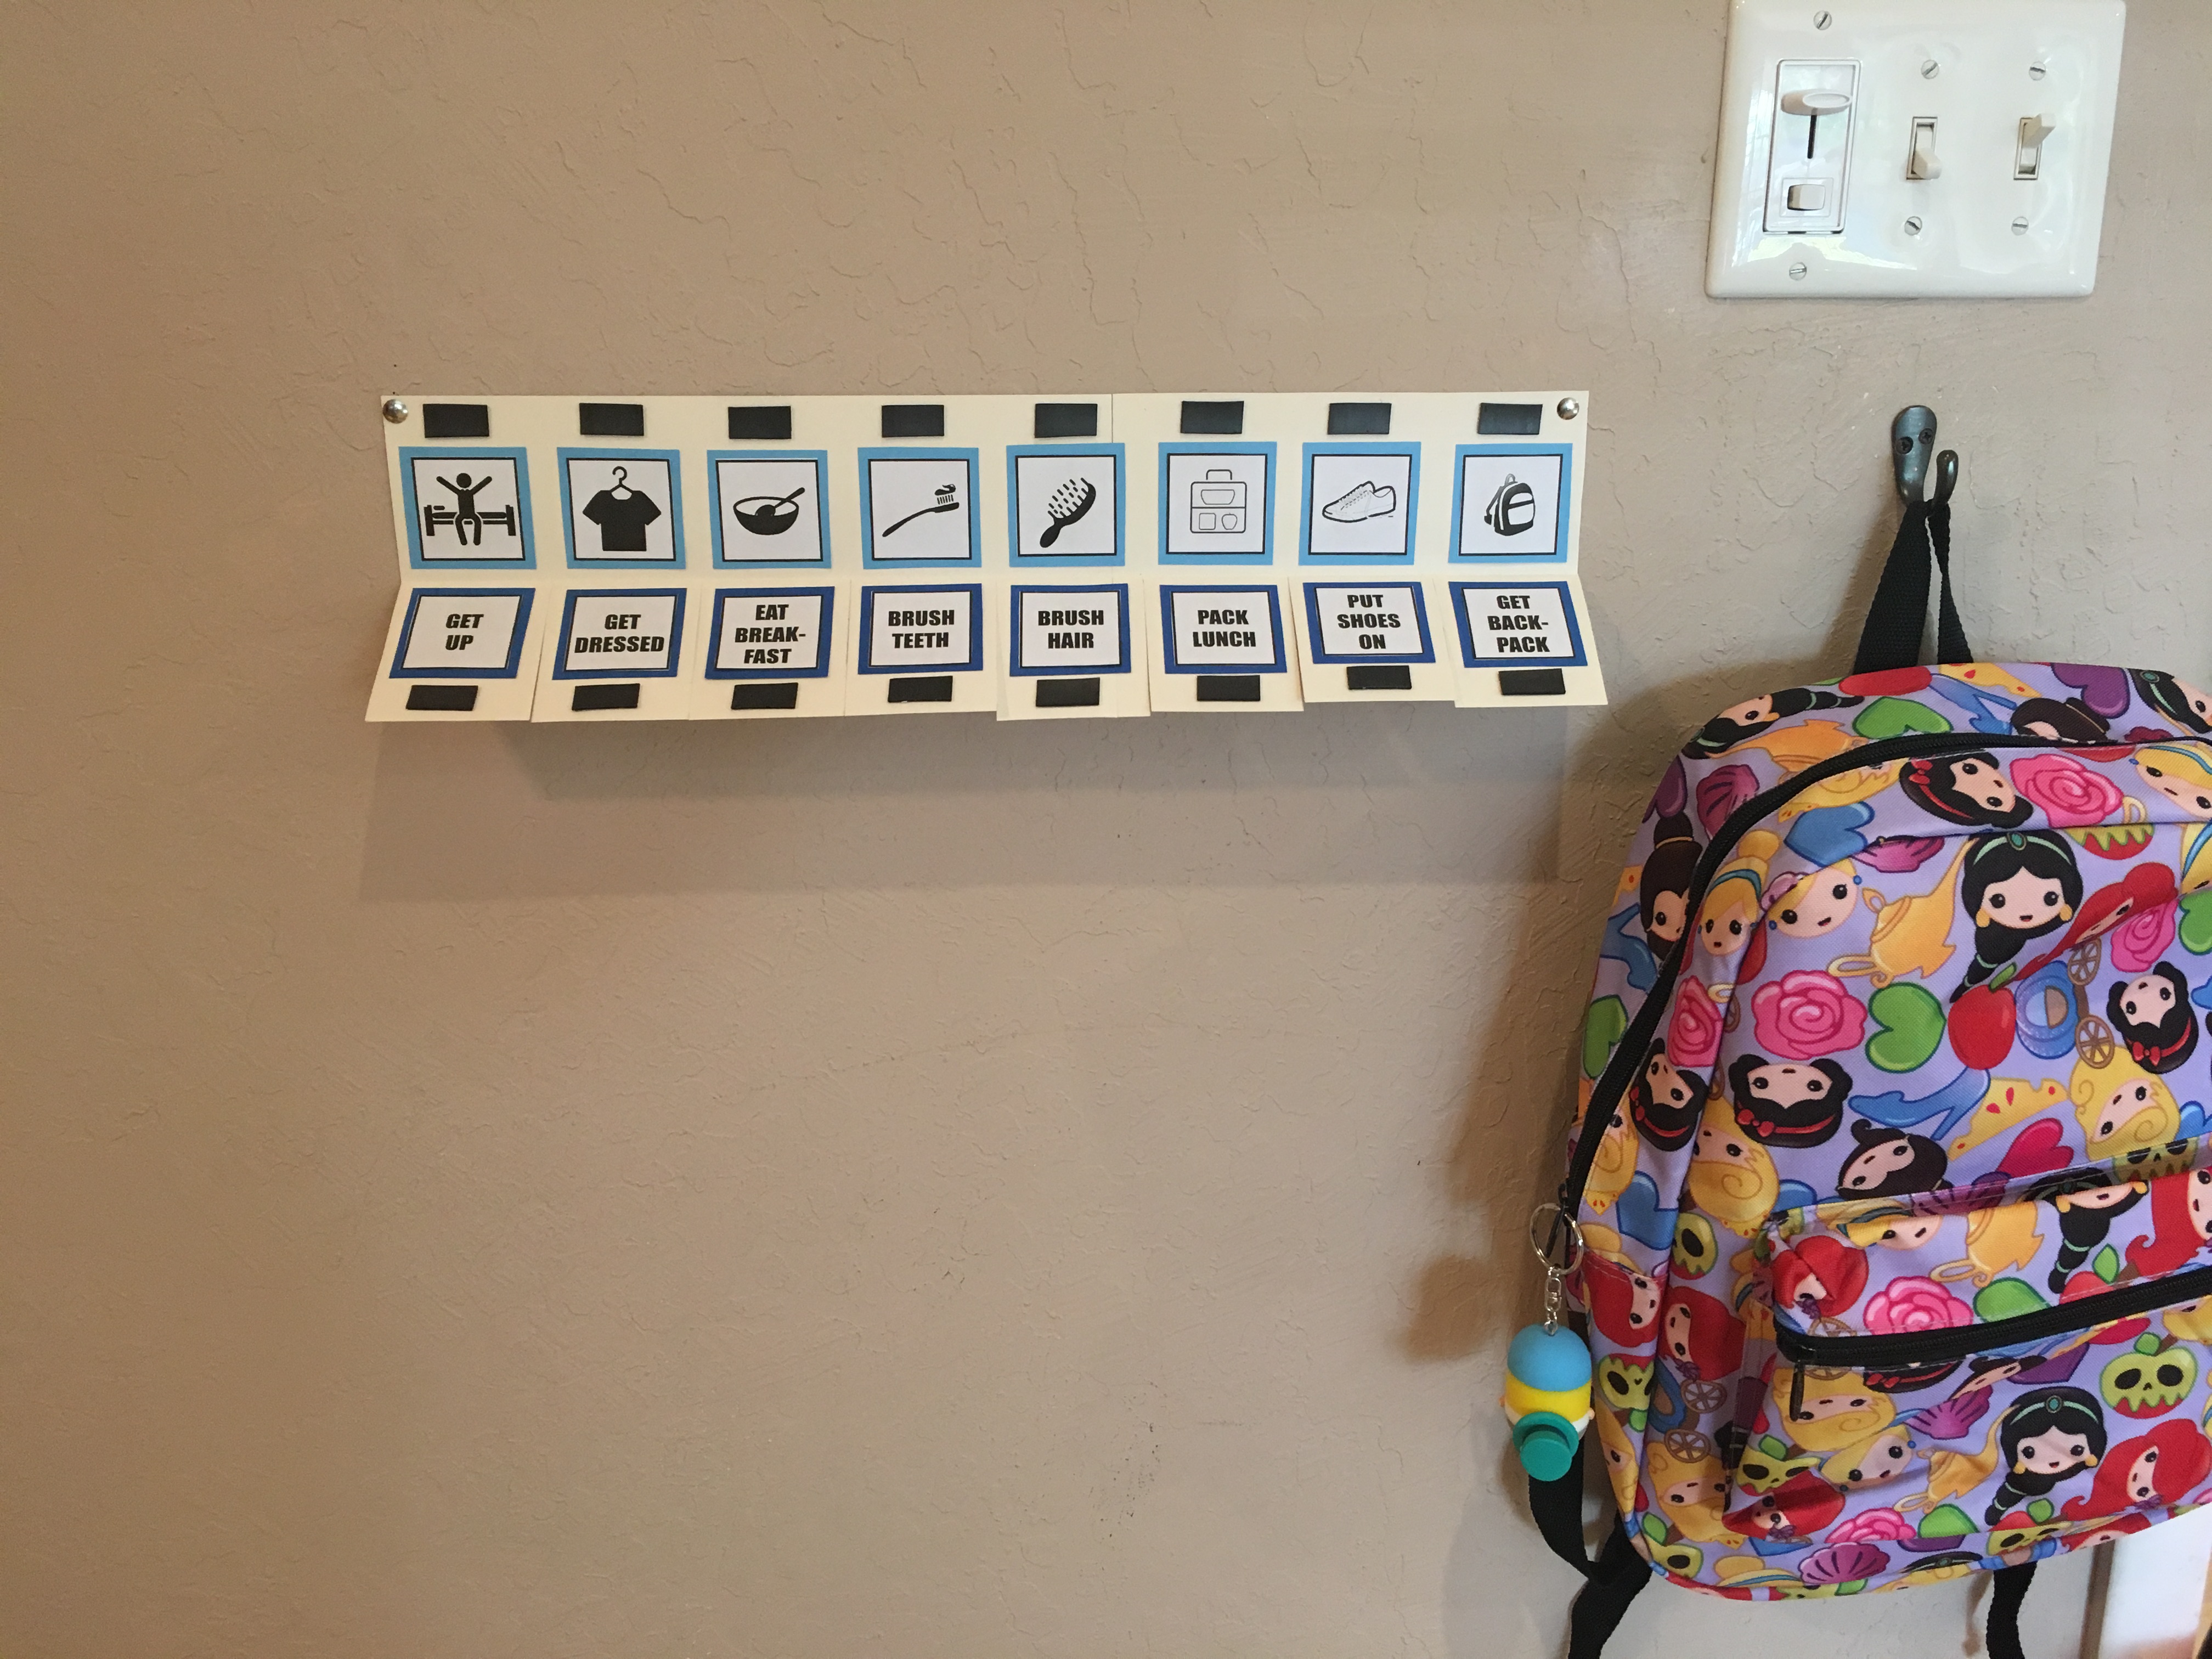
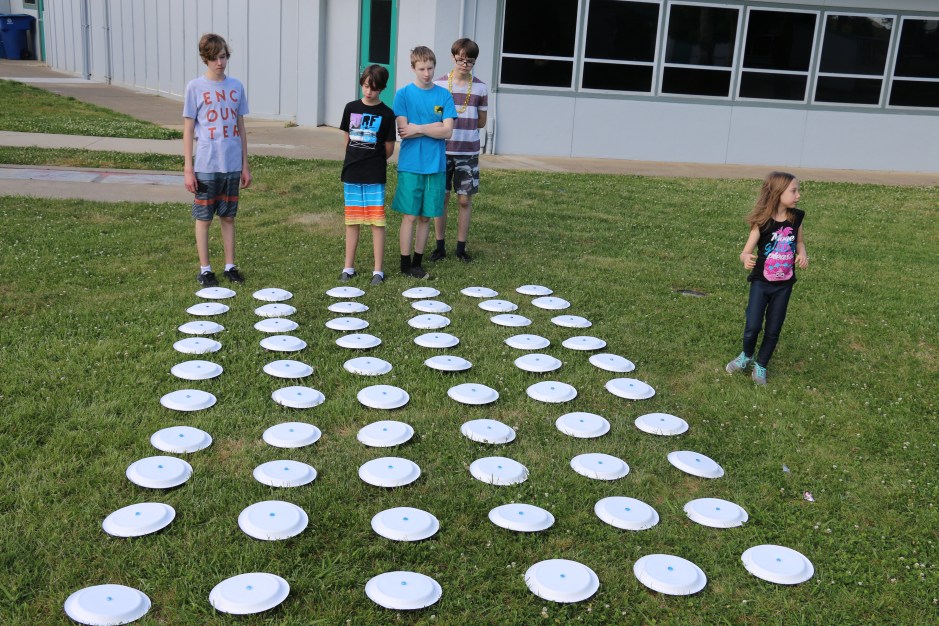
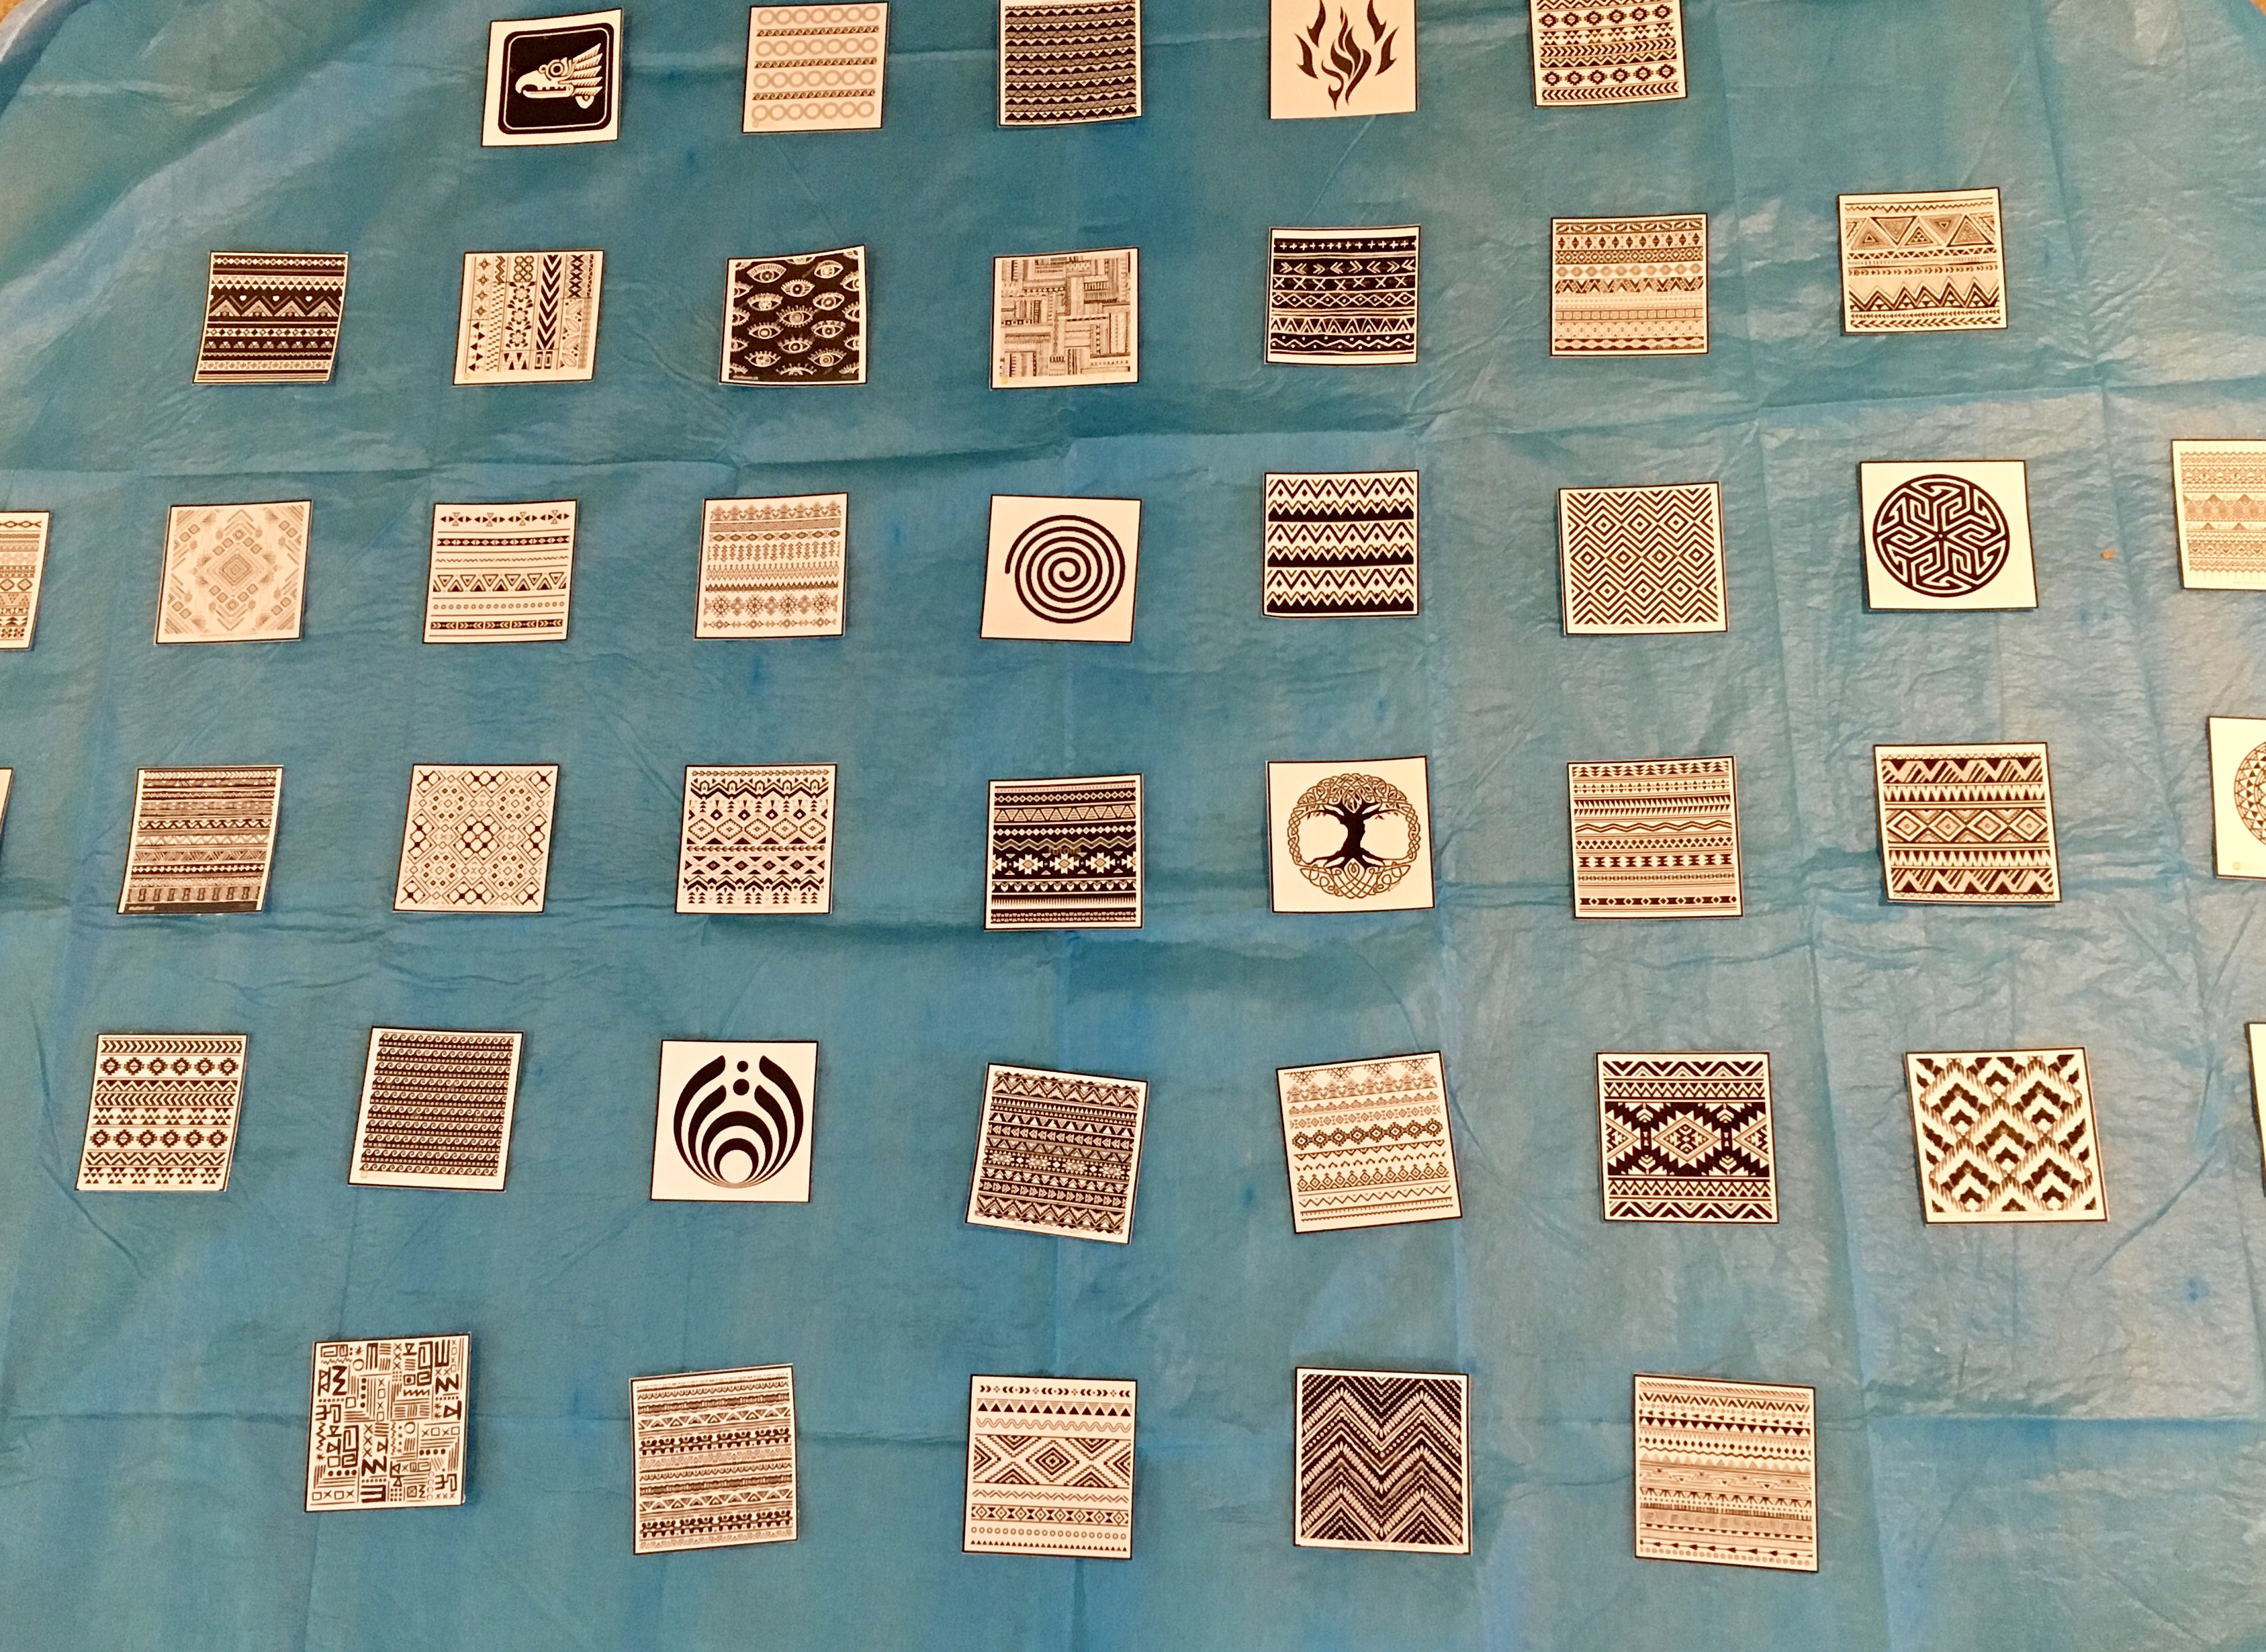
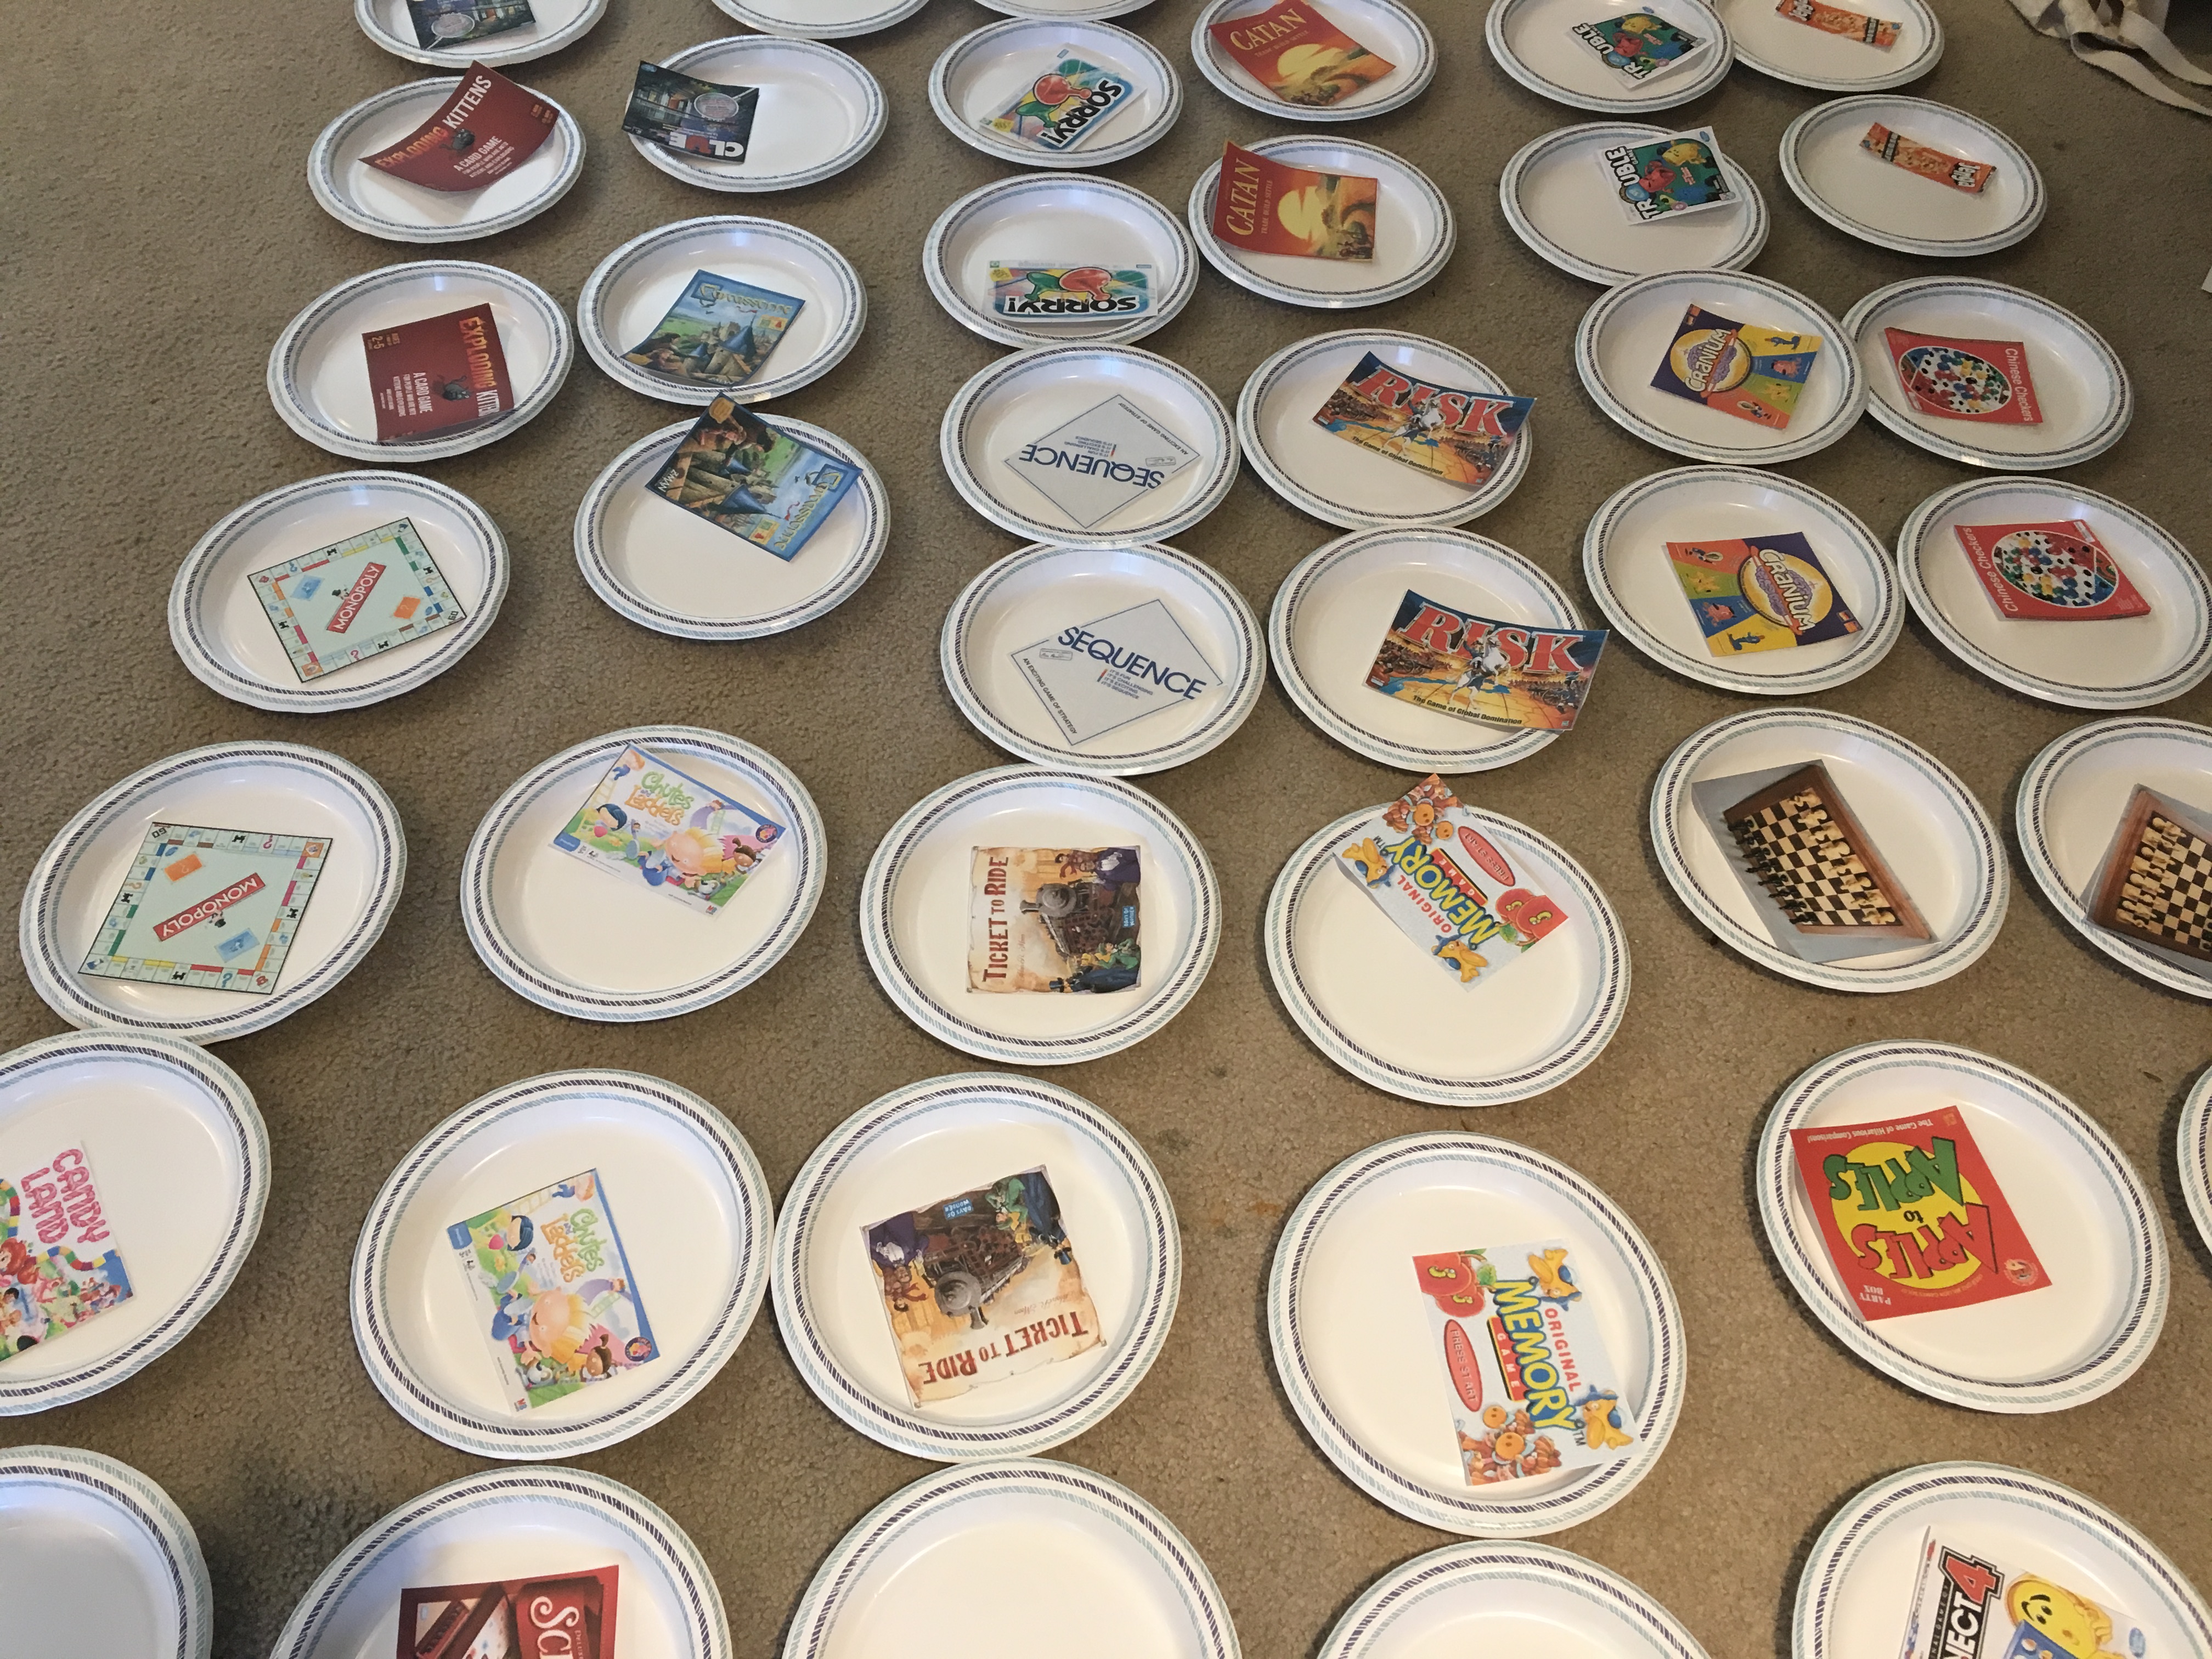
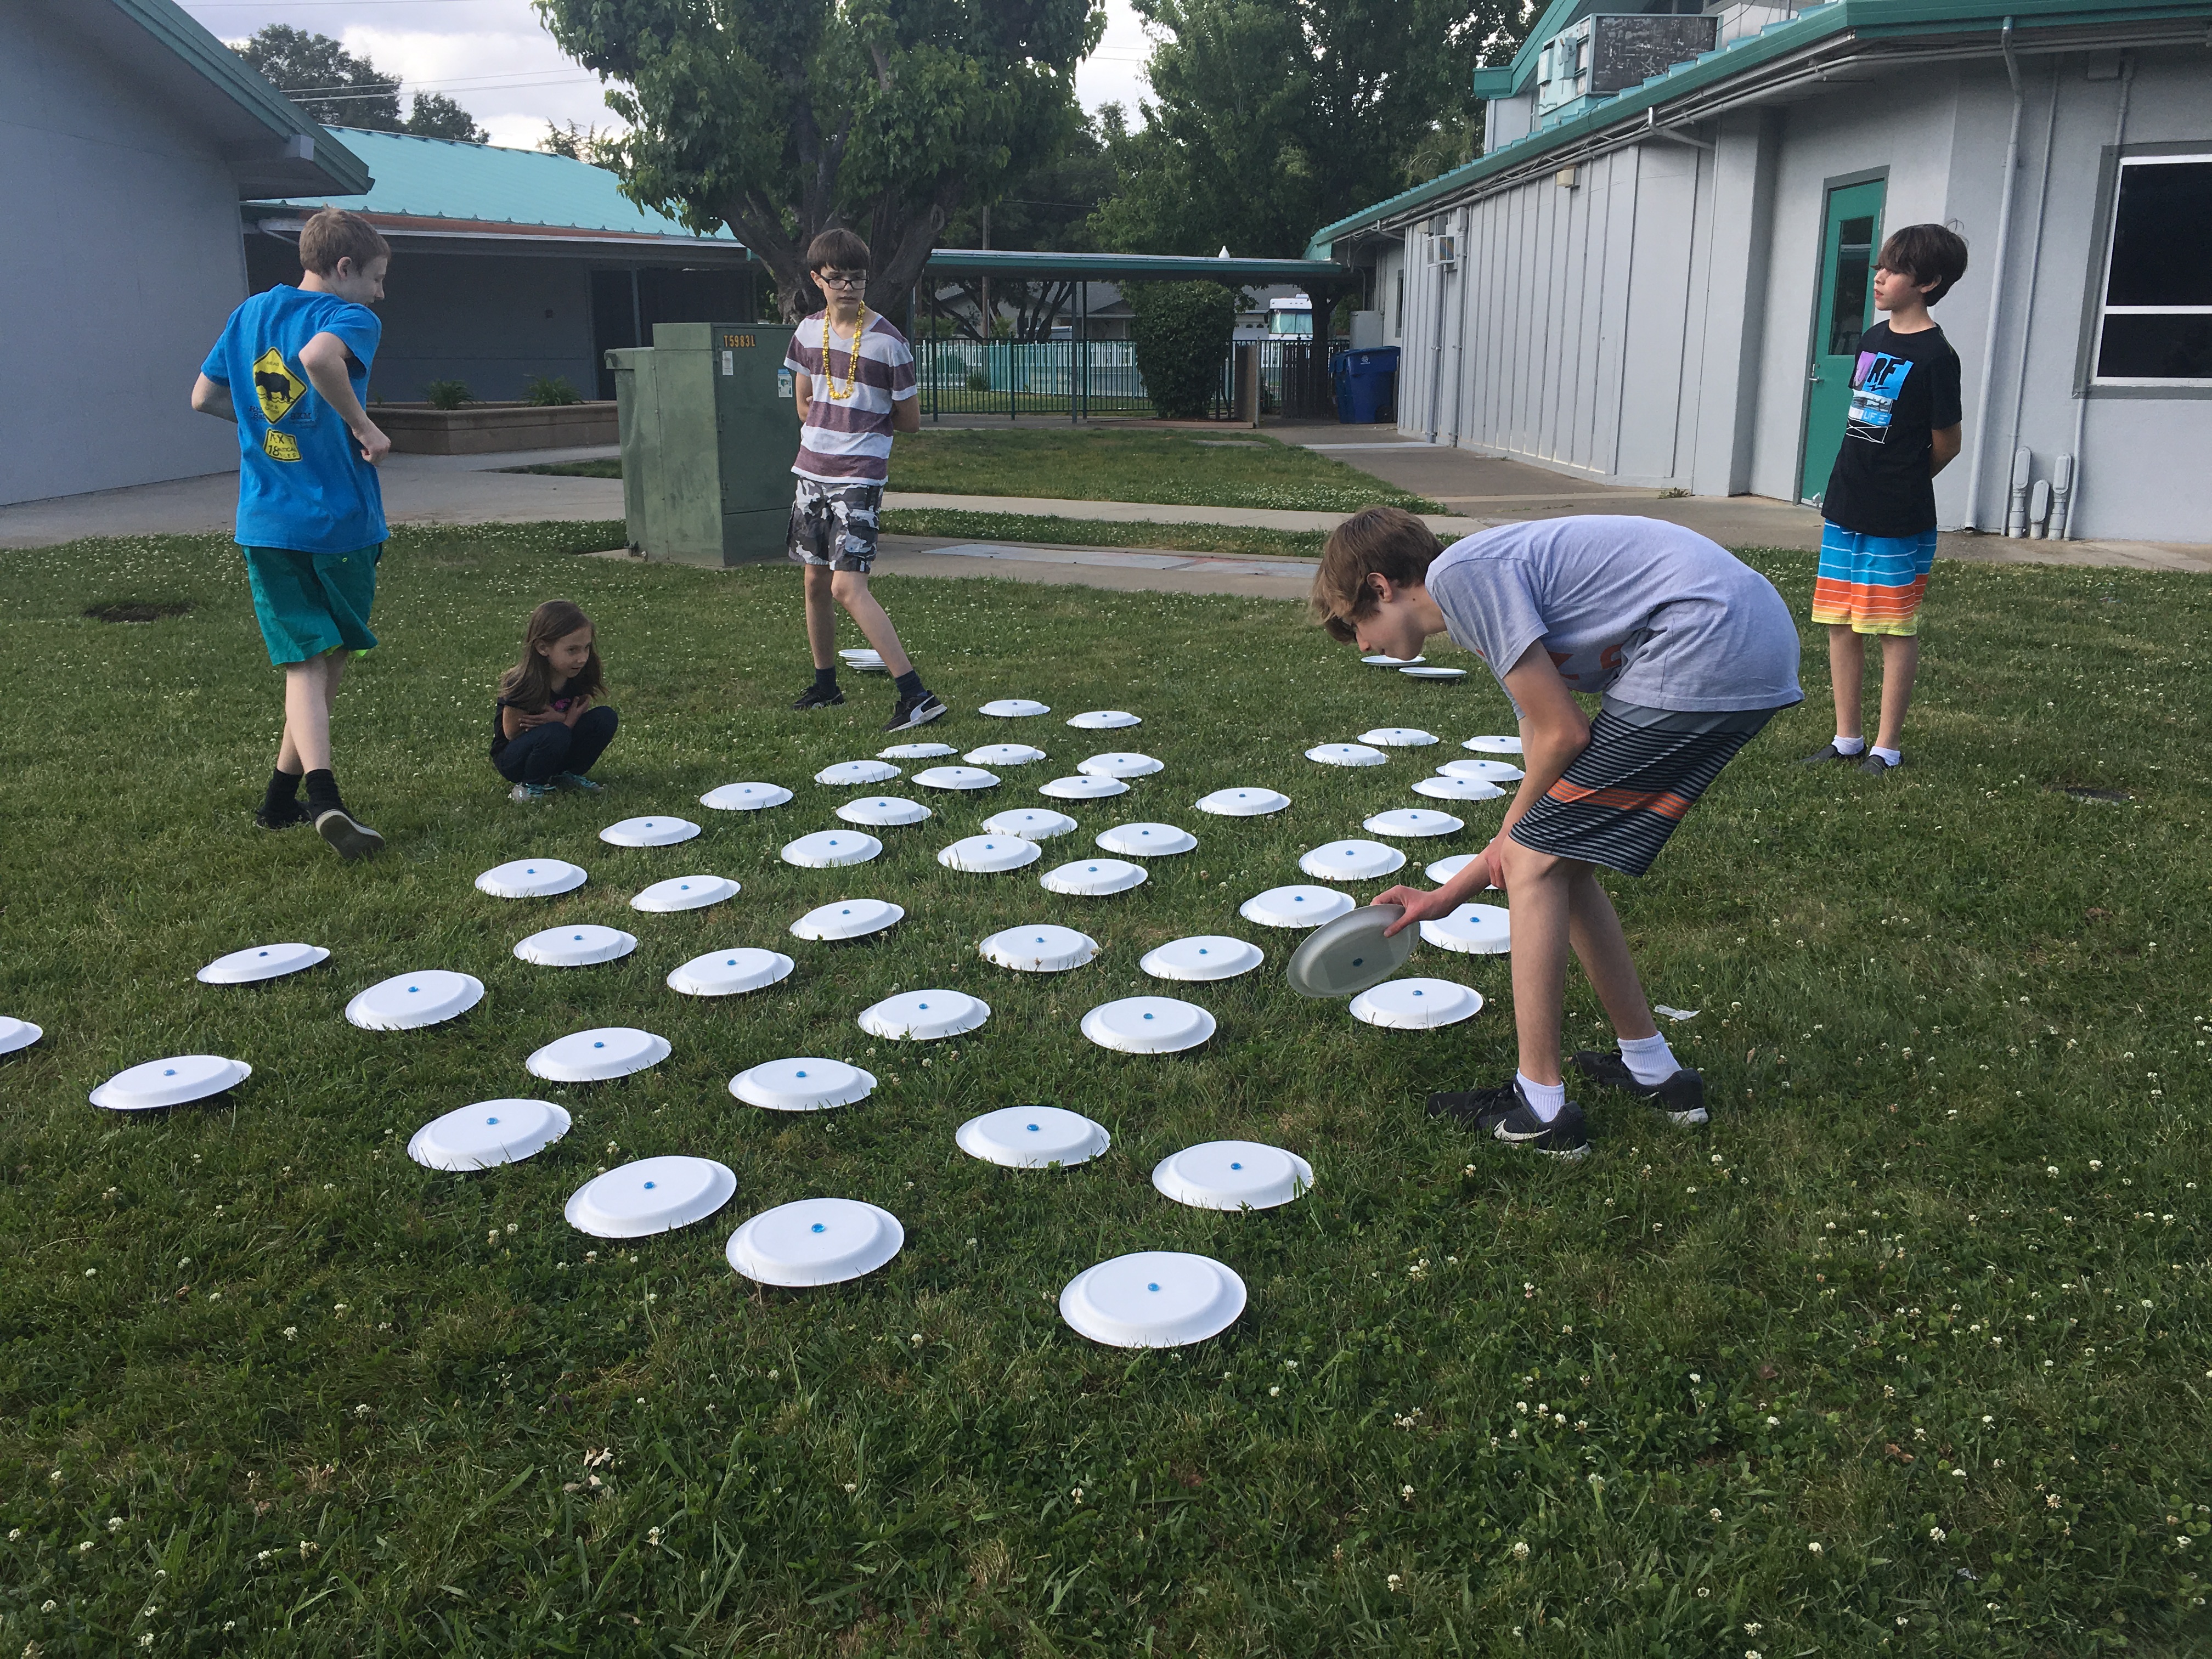
6. PLAY A GIANT GAME OF MEMORY: BOARD GAME STYLE (game made out of heavy paper plates, printed boardgame photos, and weighed down with flat marbles)
7. FIND THE PIECES OF THE WOODEN PUZZLE HIDDEN IN THE PLAY STRUCTURE. NOW PUT THE PUZZLE TOGETHER. (much more challenging than it looks)
8. GO TO BARNES AND NOBLE AND ANSWER THE FOLLOWING QUESTIONS…
HOW MANY BOOKS ARE THERE IN THE BIBLE?
WHAT IS THE TITLE OF A BOOK WRITTEN BY OUR PRESIDENT?
HOW MANY BOOKS ARE IN “THE DIARY OF A WHIMPY KID” SERIES?
NAME 3 “NON-BOOK” ITEMS YOU CAN PURCHASE HERE
FIND AND NAME 2 BOOKS BY THE CHILDREN’S AUTHOR ERIC CARLE
9. GO TO THE MALL. FIND THE PHOTO BOOTH. TAKE A PHOTO WITH YOUR WHOLE TEAM IN THE BOOTH AT THE SAME TIME.
10. USING SIDEWALK CHALK, DRAW AN ACCURATE DIAGRAM OF THE SOLAR SYSTEM, PLACING EACH PLANET IN ORDER STARTING WITH THE SUN
11. DIVE INTO THE POOL AND RETRIEVE THE GOLF BALLS AT THE BOTTOM. EACH HAS A LETTER WRITTEN ON IT. UNSCRAMBLE THE LETTERS TO DECODE THE MESSAGE
FINISH THE NIGHT WITH PIZZA AND CUPCAKES AND OF COURSE AN EPISODE OF THE AMAZING RACE!!!
The Amazing Race Birthday Party lasted for about 5 hours total (the race itself was 4 of those hours which included a “pit stop” for snacks about half way through). Be sure to come prepared with bottles of water to keep everyone hydrated, especially during the summer. For more Amazing Race Birthday Party footage check out this fun video of the highlights from Jacob’s party and you can find more race style party products on Amazon! #CommissionsEarned
For another fun birthday party idea for teen boys, check out my latest blogpost:
I love setting up sensory bins for my kids. Over the years, we have done white rice, beans, popcorn kernels, shaving cream, salt, and more, but we have never made rainbow colored rice. I was pleasantly surprised at how easy it was to make!
This week, my kids are on Spring Break and the weather forecasted several rainy days. Since we were staying home this week, I decided that I’d plan a couple of fun activities to keep us busy. I picked up a large package of inexpensive white rice and some Wilton’s Gel Food Colors at Target and began looking at recipes for colored rice. Some recipes called for rubbing alcohol, but I wanted to make ours without, so I found that vinegar was a great alternative for setting the colors without the alcohol.
My daughter and I had so much fun making this rice! She actually made it almost all by herself! We created this little video tutorial (below) as part of her kid’s series “Craft Time With Karis.”
In the past couple of days, “Colored (rainbow) Rice” has provided hours of sensory and imaginary play. Karis added some little bunnies and plastic eggs for Easter play. She put plastic dolphins and other animals in too, and yesterday we included some cardboard with holes cut out and a funnel for pouring rice. This inspired Karis to create an imaginary town called “Flowerville” while she played with her animals and rainbow rice.
Watch our tutorial to learn how to make some “Colored (rainbow) Rice” with your kids!
This past Monday was the first day of Spring, and boy am I ready for some sunshine! This weekend, in anticipation of the arrival of the new season, I made this simple “Book Page Banner” and I absolutely love the way it turned out! Book Page Banners are great, because they are so inexpensive to make and you can modify them to fit any occasion.
For this Bunny Rabbit and Carrot Banner you will need…
pages out of an old book (I got mine from the dollar store)
bunny & carrot template (google bunny silhouette & carrot silhouette to find ones you like and size them to fit your book pages)
white, orange, and green card stock
scissors
ruler
pencil
paper cutter
glue stick
scotch tape
twine
Watch my tutorial above to make your own Spring Book Page Banner.
My son Micah is that kid who is always trying to figure out “how things work.” He absorbs information like no one I know and often amuses us with the most off the wall, interesting facts that he “read somewhere in a book.” He also loves science and technology. We always say that he’s going to be a famous inventor someday!
For the last couple of years, Micah would often say, “Mom, I wish I had a workshop of my very own! I wish I had a place that I could just go and build stuff.” Whenever he said this, I was left feeling like I didn’t even know where to begin, so I’d look up a project on Pinterest or try to get him engaged in a creative activity. I never really thought it would be possible to make his dream a reality.
Recently, I started talking to Micah about what he wanted for his 11th birthday. He didn’t have a specific gift in mind. Then inspiration struck! I started dreaming about how we could make a special workshop just for Micah in our house. We have this random, small utility room between our living room and garage that had basically become a storage space for all kinds of random things. I realized that this could become a perfect tinkering space for Micah.
I knew that I wanted to start with large pegboard on one wall, so we took a trip to Lowe’s to see what we could find. In a matter of days, Micah’s workshop came together, and I was very pleased that we were able to keep the cost down to under $60 by using a bunch of thing we already had in our garage and in our house.
I put together this little video (below) of “The Making of Micah’s Tinkering Workshop” which includes a cost breakdown and a few fun moments with Micah too! Micah is thoroughly enjoying his “place to go build stuff.” The first day it was finished, he spent over 4 hours in there working on building a robotic arm that was given to him by a friend.
BEFORE
AFTER
We would love to hear from you! If you know of any cool building projects for kids or ideas of what Micah could do in his workshop, leave us a comment and let us know!