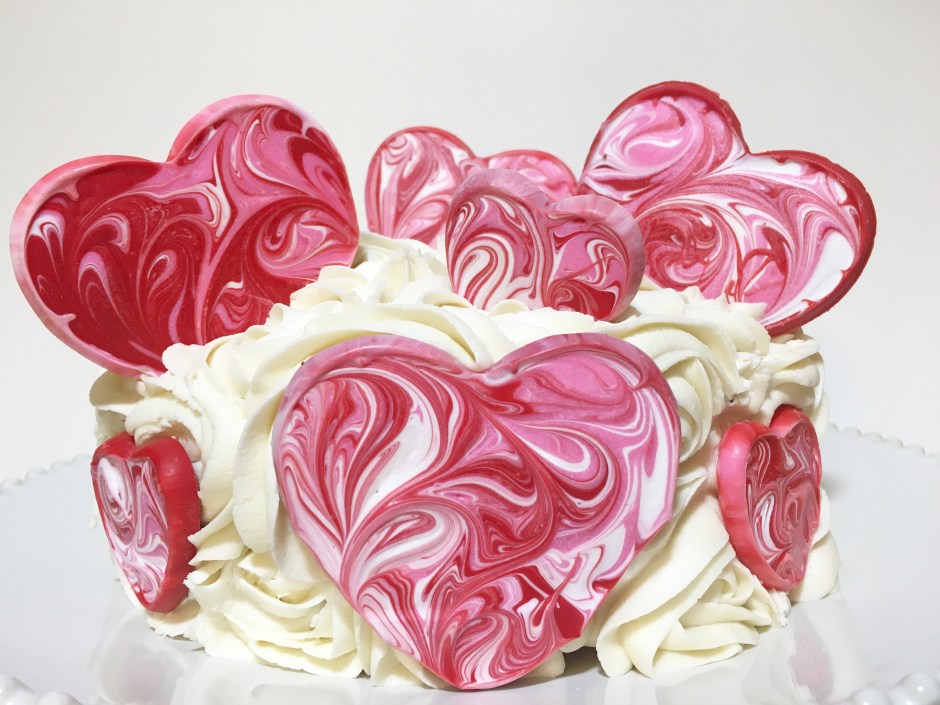
Wilton’s Candy Melts are one of my favorite gems to use for fun holiday treats. Last year I used them to make a batch of yummy Valentine Marshmallow Pops. This year I picked up three bags from Michael’s in red, pink, and white to use for Valentine’s Day, and got to work creating these fun and festive swirly heart cake toppers for our family Valentine Cake. I love how they turned out, and my family (kids especially) loved eating the oversized candy hearts! Check out my simple tutorial to learn how to make these cuties using cookie cutters as templates. I’m excited to try them for other holidays too. Imagine green 4 Leaf Clovers for St. Patrick’s Day, pastel eggs for Easter, patriotic colored stars for the 4th of July. The possibilities are endless! You can use them to top a cake like I did, make smaller ones for cupcakes and cookies, or even top a cup of fruit with whipped cream for a healthier version.
For more Valentine Fun, check out these other links:
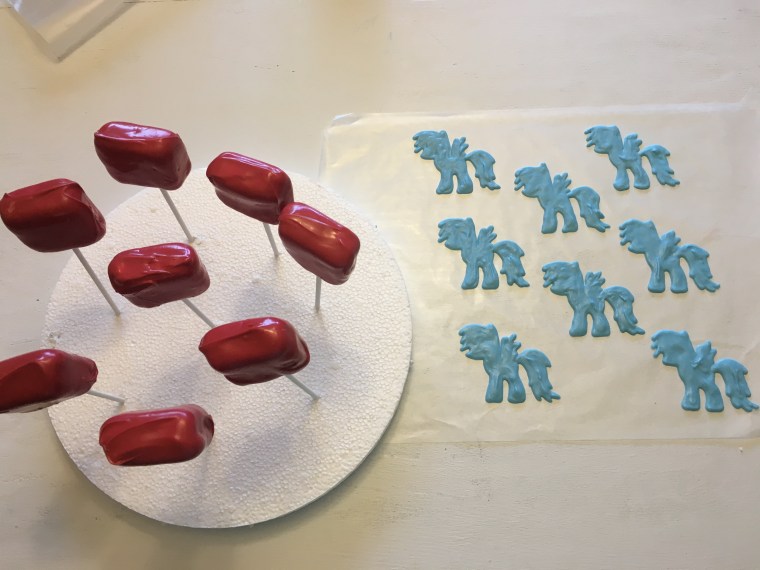
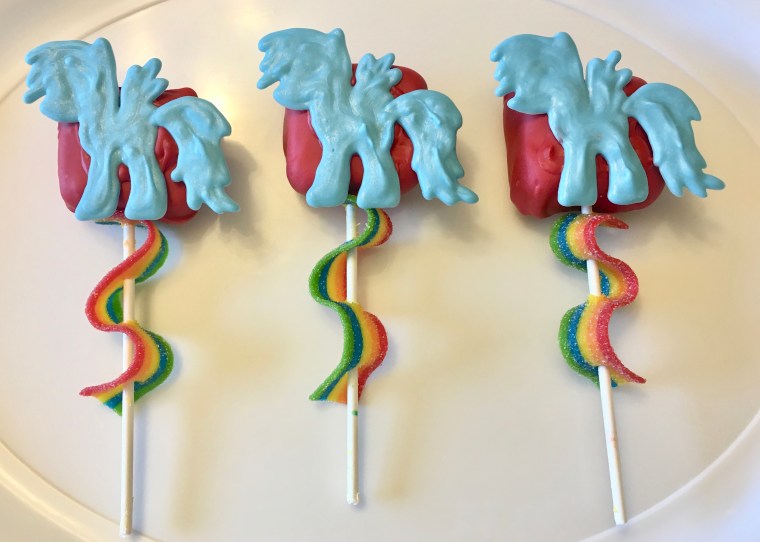
This week, the much anticipate My Little Pony movie comes out in theaters. My girl and I have been waiting for this day ever since we saw the preview several months ago. To celebrate, I created these fun My Little Pony Rainbow Dash Marshmallow Pops, which according to my kids, are delicious! Whether you are planning a My Little Pony party or just want to make a fun treat on movie day, these Rainbow Dash pops are sure to be a huge hit!
I’ve included my video tutorial, above, with step by step instructions on how to make these tasty mallow pops, and below you will find the free printable Rainbow Dash template for the candy pony silhouettes. I’ve also added Rainbow Dash’s cutie mark in case you’d like to make some for your own pops. You will need white, blue, yellow, and red candy melts and four Wilton’s squeeze bottles to create the cloud and rainbow lightning bolt cutie marks. Square marshmallows are the perfect size for these pops and the rainbow Airhead Extremes are the perfect addition to represent her rainbow tail. Don’t forget to grab a package of lollipop sticks and you will have all that you need to make your own Rainbow Dash mallow pops. #CommissionsEarned
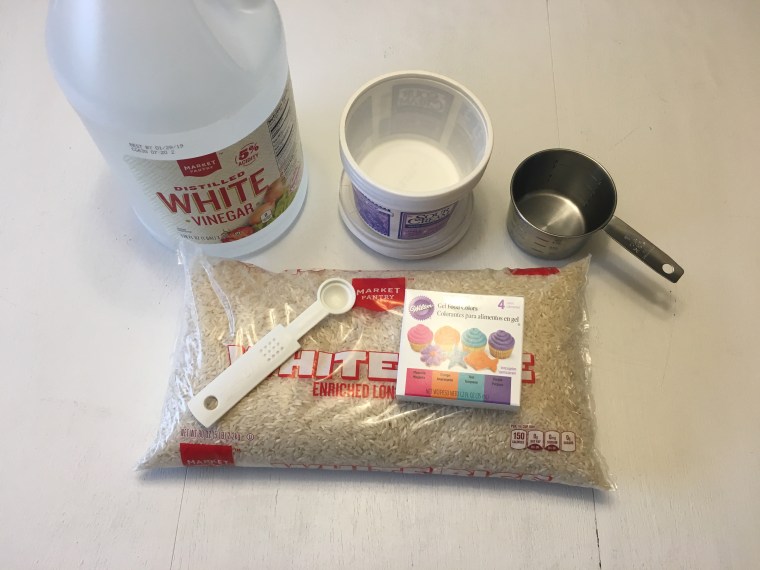
I love setting up sensory bins for my kids. Over the years, we have done white rice, beans, popcorn kernels, shaving cream, salt, and more, but we have never made rainbow colored rice. I was pleasantly surprised at how easy it was to make!
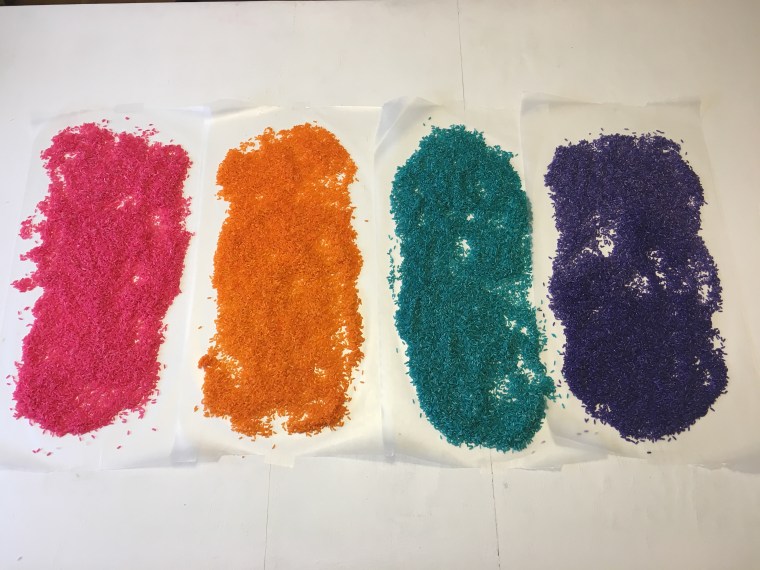
This week, my kids are on Spring Break and the weather forecasted several rainy days. Since we were staying home this week, I decided that I’d plan a couple of fun activities to keep us busy. I picked up a large package of inexpensive white rice and some Wilton’s Gel Food Colors at Target and began looking at recipes for colored rice. Some recipes called for rubbing alcohol, but I wanted to make ours without, so I found that vinegar was a great alternative for setting the colors without the alcohol.
My daughter and I had so much fun making this rice! She actually made it almost all by herself! We created this little video tutorial (below) as part of her kid’s series “Craft Time With Karis.”
In the past couple of days, “Colored (rainbow) Rice” has provided hours of sensory and imaginary play. Karis added some little bunnies and plastic eggs for Easter play. She put plastic dolphins and other animals in too, and yesterday we included some cardboard with holes cut out and a funnel for pouring rice. This inspired Karis to create an imaginary town called “Flowerville” while she played with her animals and rainbow rice.
Watch our tutorial to learn how to make some “Colored (rainbow) Rice” with your kids!
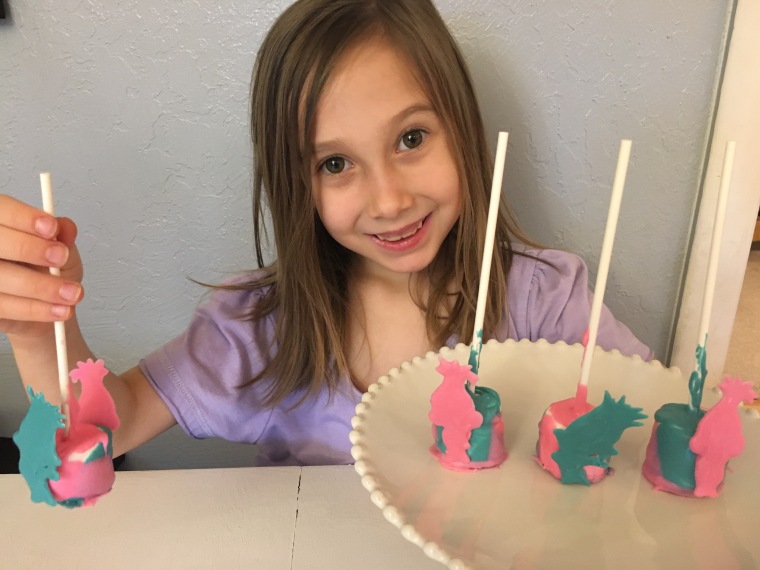
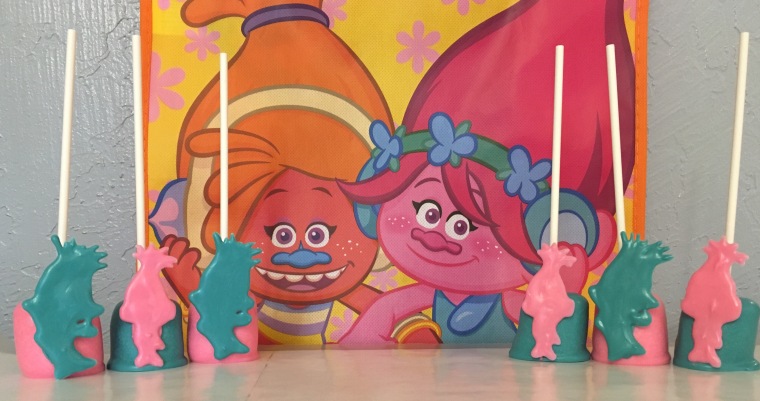
We are a bit “Trolls Obsessed” in our house! The CD currently plays on repeat in my car and my daughter likes to sing the songs at the top of her lungs… which might embarrass her big brothers a bit! Let’s just be thankful that the soundtrack is seriously one of the best kid movie soundtracks ever!
I’ve been wanting to have a special mommy/daughter Trolls day for quite some time, so this week, we made it happen. I rented the movie from Redbox, planned a couple of Trolls crafts, and together, my daughter and I, made these super fun Poppy & Branch Marshmallow Pops. My sweet girl had so much fun…and so did her mama!
Watch our tutorial, above, to learn how to make these Marshmallow Pops for your own little Trolls fans. I’ve included the template that I used so you can print it off to make the candy Poppy & Branch silhouettes.
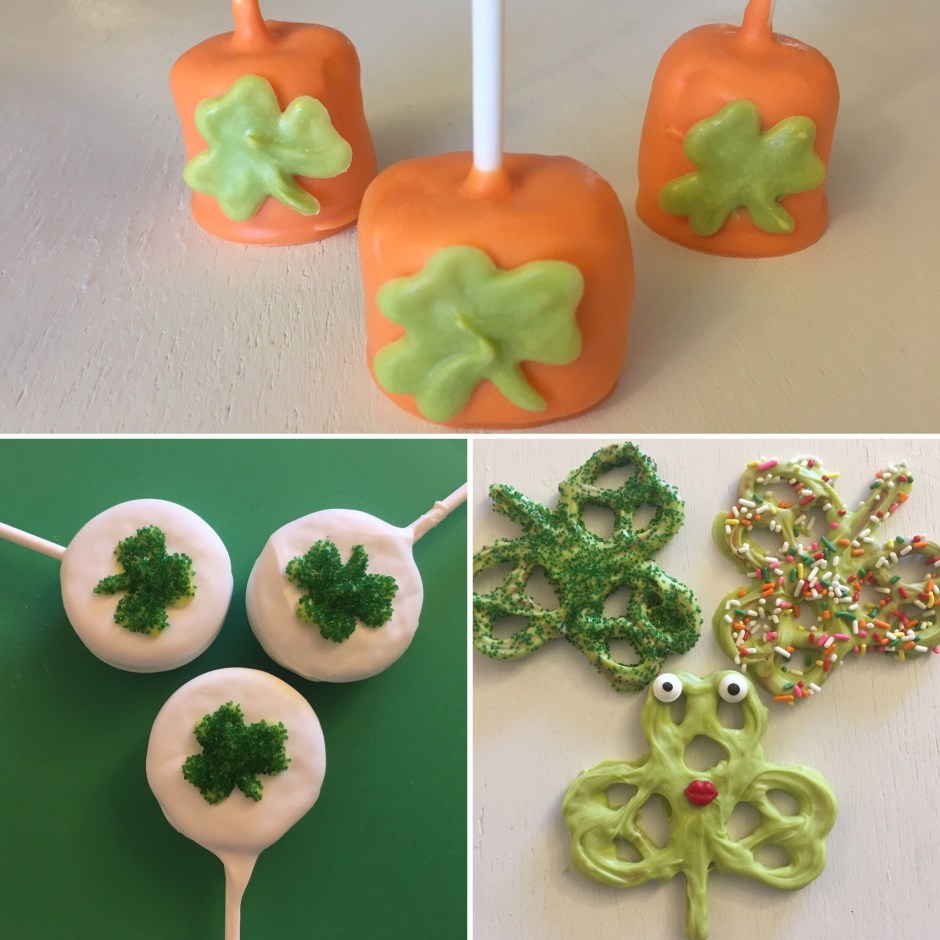
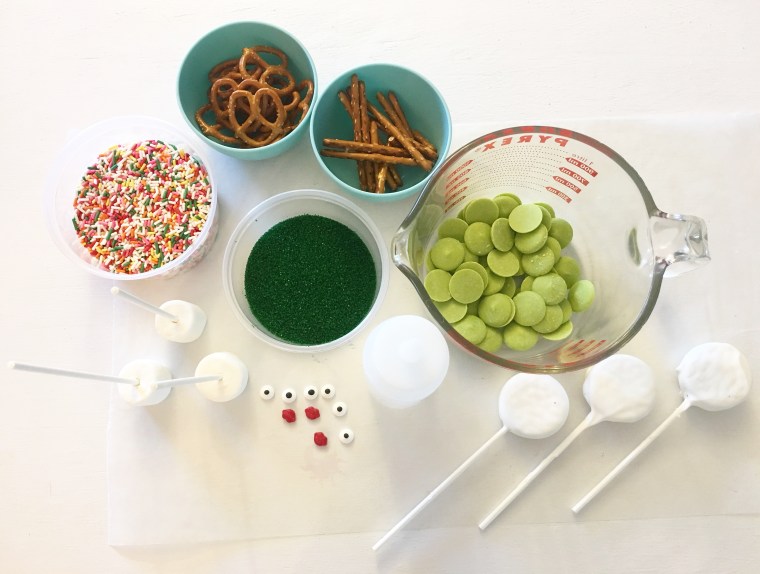
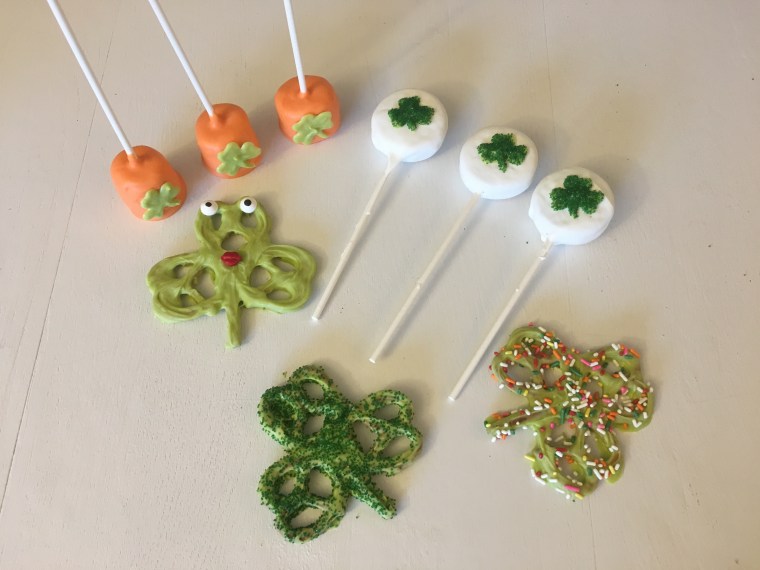
If you are planning on making some St. Patrick’s Day treats, here are 3 simple options for you… Pretzel Shamrocks, Shamrock Oreo Cookie Pops, and Shamrock Marshmallow Pops. All of these treats use Wilton’s Candy Melts, which you can find at crafts stores like Michael’s and JoAnn Fabrics. Watch my tutorial to learn how to make these tasty treats!
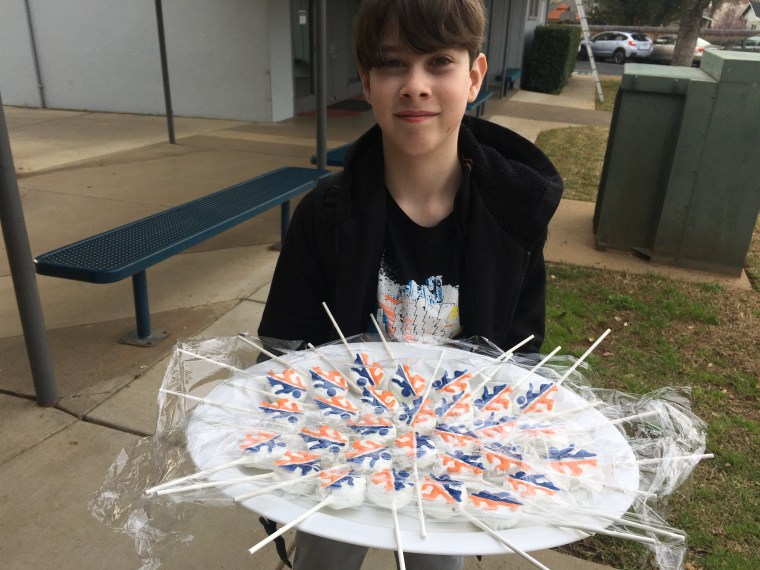
My son, Micah, is a huge fan of the video games Portal and Portal 2. So for his 11th birthday, he decided to have a Portal themed party. I wanted to send a special treat for Micah to bring to school on his big day, so I went to work making these super tasty Portal Cookie Pops. He was so thrilled to bring them to share with all of his friends! You can watch my tutorial above if you want to make some of your own Portal Cookie Pops!
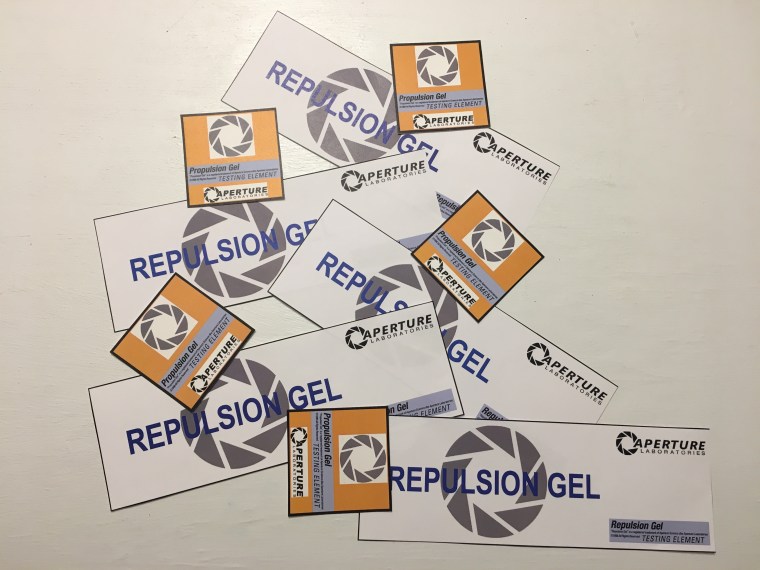
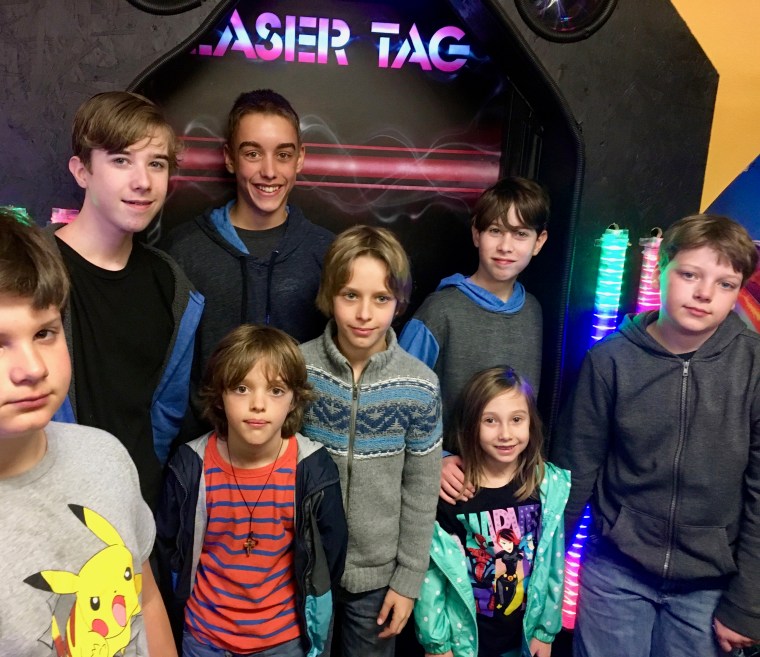
The party itself didn’t require a whole lot of preparation because Micah wanted to have it at a local “fun center” so that he and his buddies could play laser tag and ride go carts. I did want to add a couple of fun elements though, so I created these labels to make “Propulsion Gel” and “Repulsion Gel” to give to each of the kids.
According to theportalwiki.com , “Propulsion Gel is a bright orange substance that greatly reduces the friction of objects moving across the surface to which it is applied. Propulsion Gel also increases velocity, as objects covered in Propulsion Gel also have their friction reduced, causing them to slide around and be moved more easily. Repulsion Gel is a light blue substance that repels objects, and any player or object that hits a surface coated with Replusion Gel will bounce off.”
We used orange slime that we found in the dollar section at Target for the Propulsion Gel and blue Gatorades for the Repulsion Gel. It’s close to Easter, so we could only find orange slime in “carrot” containers. We transferred the slime into 4 0z extra small ziplock square containers with lids. These were the perfect size! I bought a 12 pack of 12 oz Gatorades, which were just the right amount for Micah’s party. #CommissionsEarned
Here are the printable templates I created for the Propulsion Gel and Repulsion Gel.
In Portal, there is also a specific cake that is talked about throughout the game. We definitely had to make a Real Portal Cake for Micah’s 11th birthday! Click here for my recent blogpost on How to Make a Real Portal Cake.
I would definitely have to say that Micah’s Portal Birthday Party was a huge success!
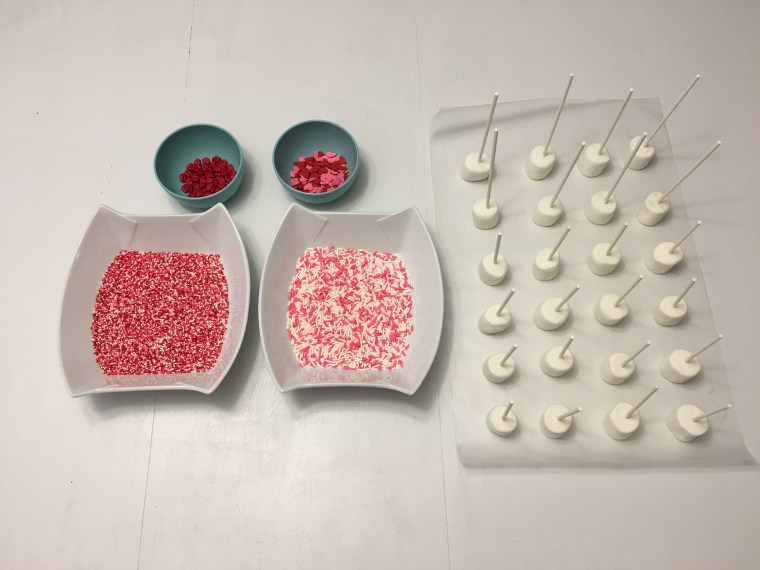
If you are looking for a cute and simple, no bake, Valentine Treat…look no further. These Valentine Marshmallow Pops are quick and easy to make and they taste delicious! They are perfect for taking to class parties or passing out to friends. You can even hole punch a small Valentine card or paper heart on the top and bottom, and weave it through the top of the lollipop stick, for personalized treats.
One bag of Wilton’s candy melts makes about 26 pops and the decorating possibilities are endless. Let your kids help you make these for a fun family activity and an opportunity for them to express their creativity.
For more helpful tips on making these adorable Valentine Pops, watch my tutorial! Happy Valentine’s Day!
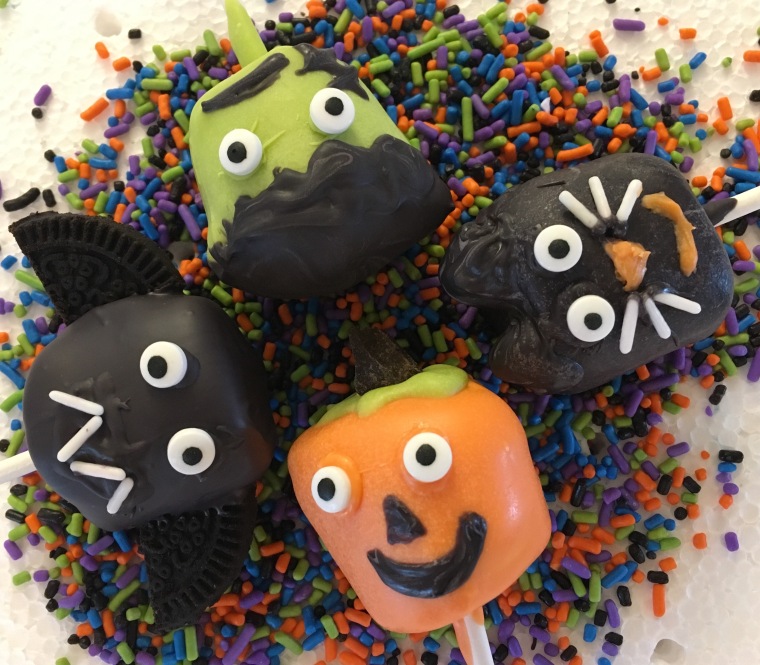
With Halloween just around the corner, I wanted to create something fun and festive. My kids have been asking for marshmallow pops recently, so I thought I’d make these delicious cuties for them to enjoy! Mallow pops are so easy and inexpensive to make and I love how how many variations can be made with just a few modifications. Even though I enjoyed putting these little guys together, I think next time, I will leave the decorating to my kids and see what “spooky” creations they come up with.
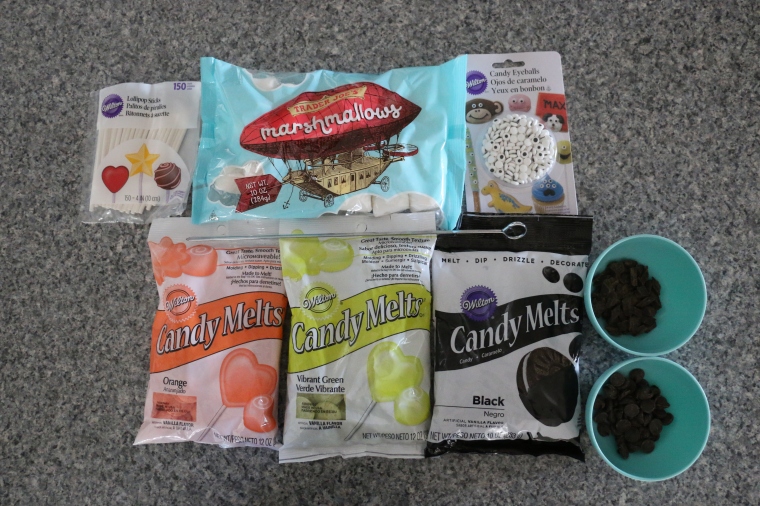
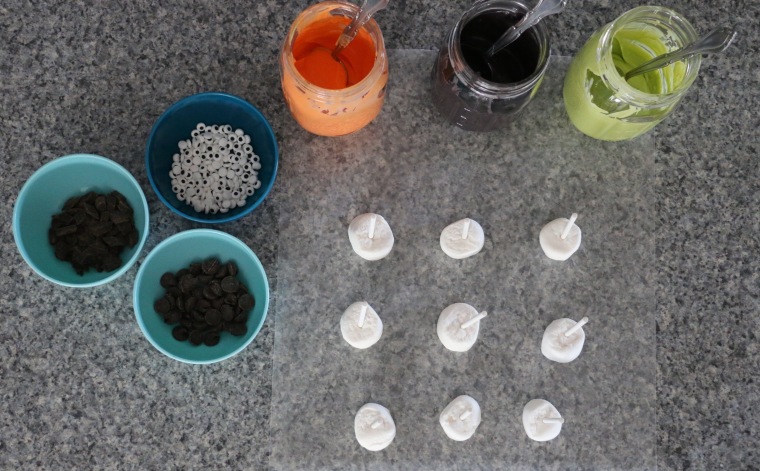
For these Halloween pops you will need the following items: a bag of large marshmallows, Wilton’s lollipop sticks, Wilton’s candy melts in several colors, candy eyeballs, chocolate chips (for the cat ears), chocolate chunks (for the pumpkin stems), oreo cookies (minus the filling, for the bat wings), a toothpick or kabob stick (for the little details like the noses and mouths), white sprinkles (for the cat whiskers and bat fangs)
In addition, it is helpful to have wax paper to place your marshmallows on before you dip and a piece of styrofoam to poke the lollipop sticks in after you dip them, while they dry. I bought an inexpensive styrofoam round at Michael’s that I have used over and over again for marshmallow and cake pops.I like to use mason jars to melt the candy in, but small bowls or coffee mugs work also. Just make sure whatever you use is microwaveable. It’s best to set everything up before melting so your all ready to begin dipping the marshmallows. Line your countertop with wax paper and push a lollipop stick into the center of each marshmallow. Get your candies and sprinkles all ready to go. Follow the directions on the back of the bag of candy melts. I have found it best to start with one minute in the microwave on 50% power. After that, stir, and then go an additional 30 seconds at a time until your candy is easy to stir and completely melted. *Do not over melt…sometimes as you stir, the candy will continue to melt, so give it a good stir each time.
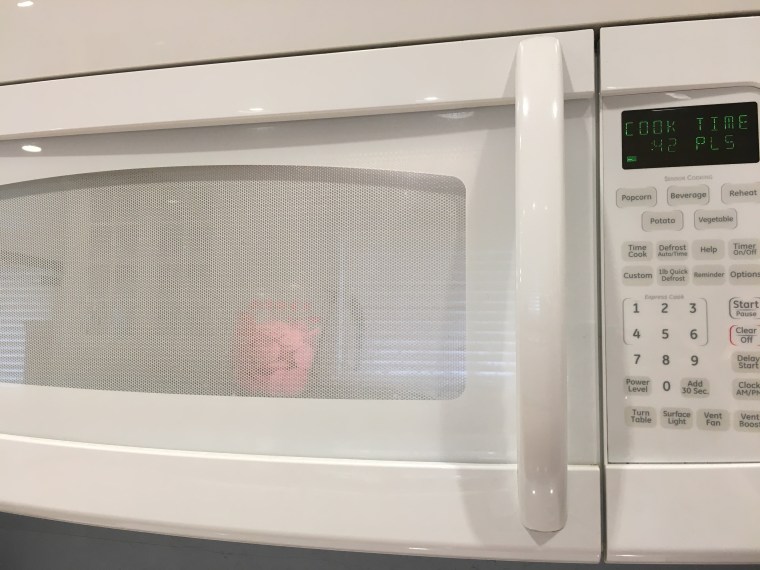
Helpful Tip: If your candy melts start to harden before you are finished dipping or decorating, no worries. Just pop them back in the microwave for 20-30 seconds and they will quickly melt again, so you can finish dipping and decorating.Now comes the fun part! You are ready to dip and decorate! Enjoy my tutorial on making Halloween Marshmallow Pops for more helpful tips!
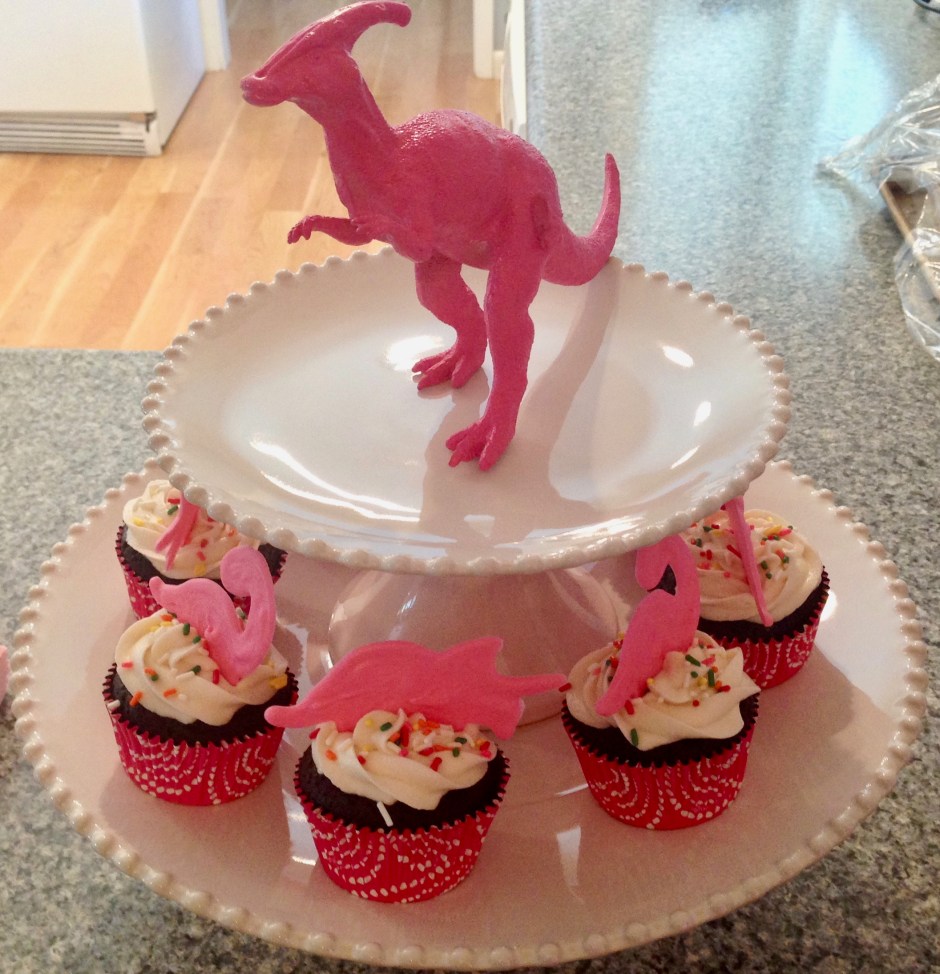
For my daughter’s 5th birthday, she wanted a pink dinosaur party. Not your common theme…dinosaurs, yes… pink ones, no! Dollar store and spray paint to the rescue! I found 7 good sized plastic dinosaurs at the Dollar Tree and spray painted them bright pink. You can find similar dinosaurs here and then use this spray paint that bonds to plastic. I used card stock in several shades of pink to create most of the other decorations. Did you know that you can sew paper? I discovered this recently, and have been making the cutest and most cost effective decorations even since. I used my Cricut machine to cut circles and flower shapes in the various colors and then sat in front of my sewing machine with little stacks of these cut outs. In no time at all, I had 6 paper garlands to hang as the backdrop for the food table. I also used larger flower shapes cut from my Cricut in shades of pink and patterned scrapbooking paper to create a festive birthday banner for my girl. I found the pink dinosaur by googling “pink dinosaur” images online. Pink ribbon tied into bows held each individual letter together. #CommissionsEarned
Edible cupcake toppers are one of my favorite things to create. You can pretty much make a topper for any theme simply by printing a silhouette of it from the internet. I used Wilton’s candy melts in pink for the dinosaur silhouette toppers and for the pink marshmallow pops as well. Check out my blogpost on My Little Pony (Rainbow Dash) Marshmallow Pops for an edible cupcake topper tutorial.
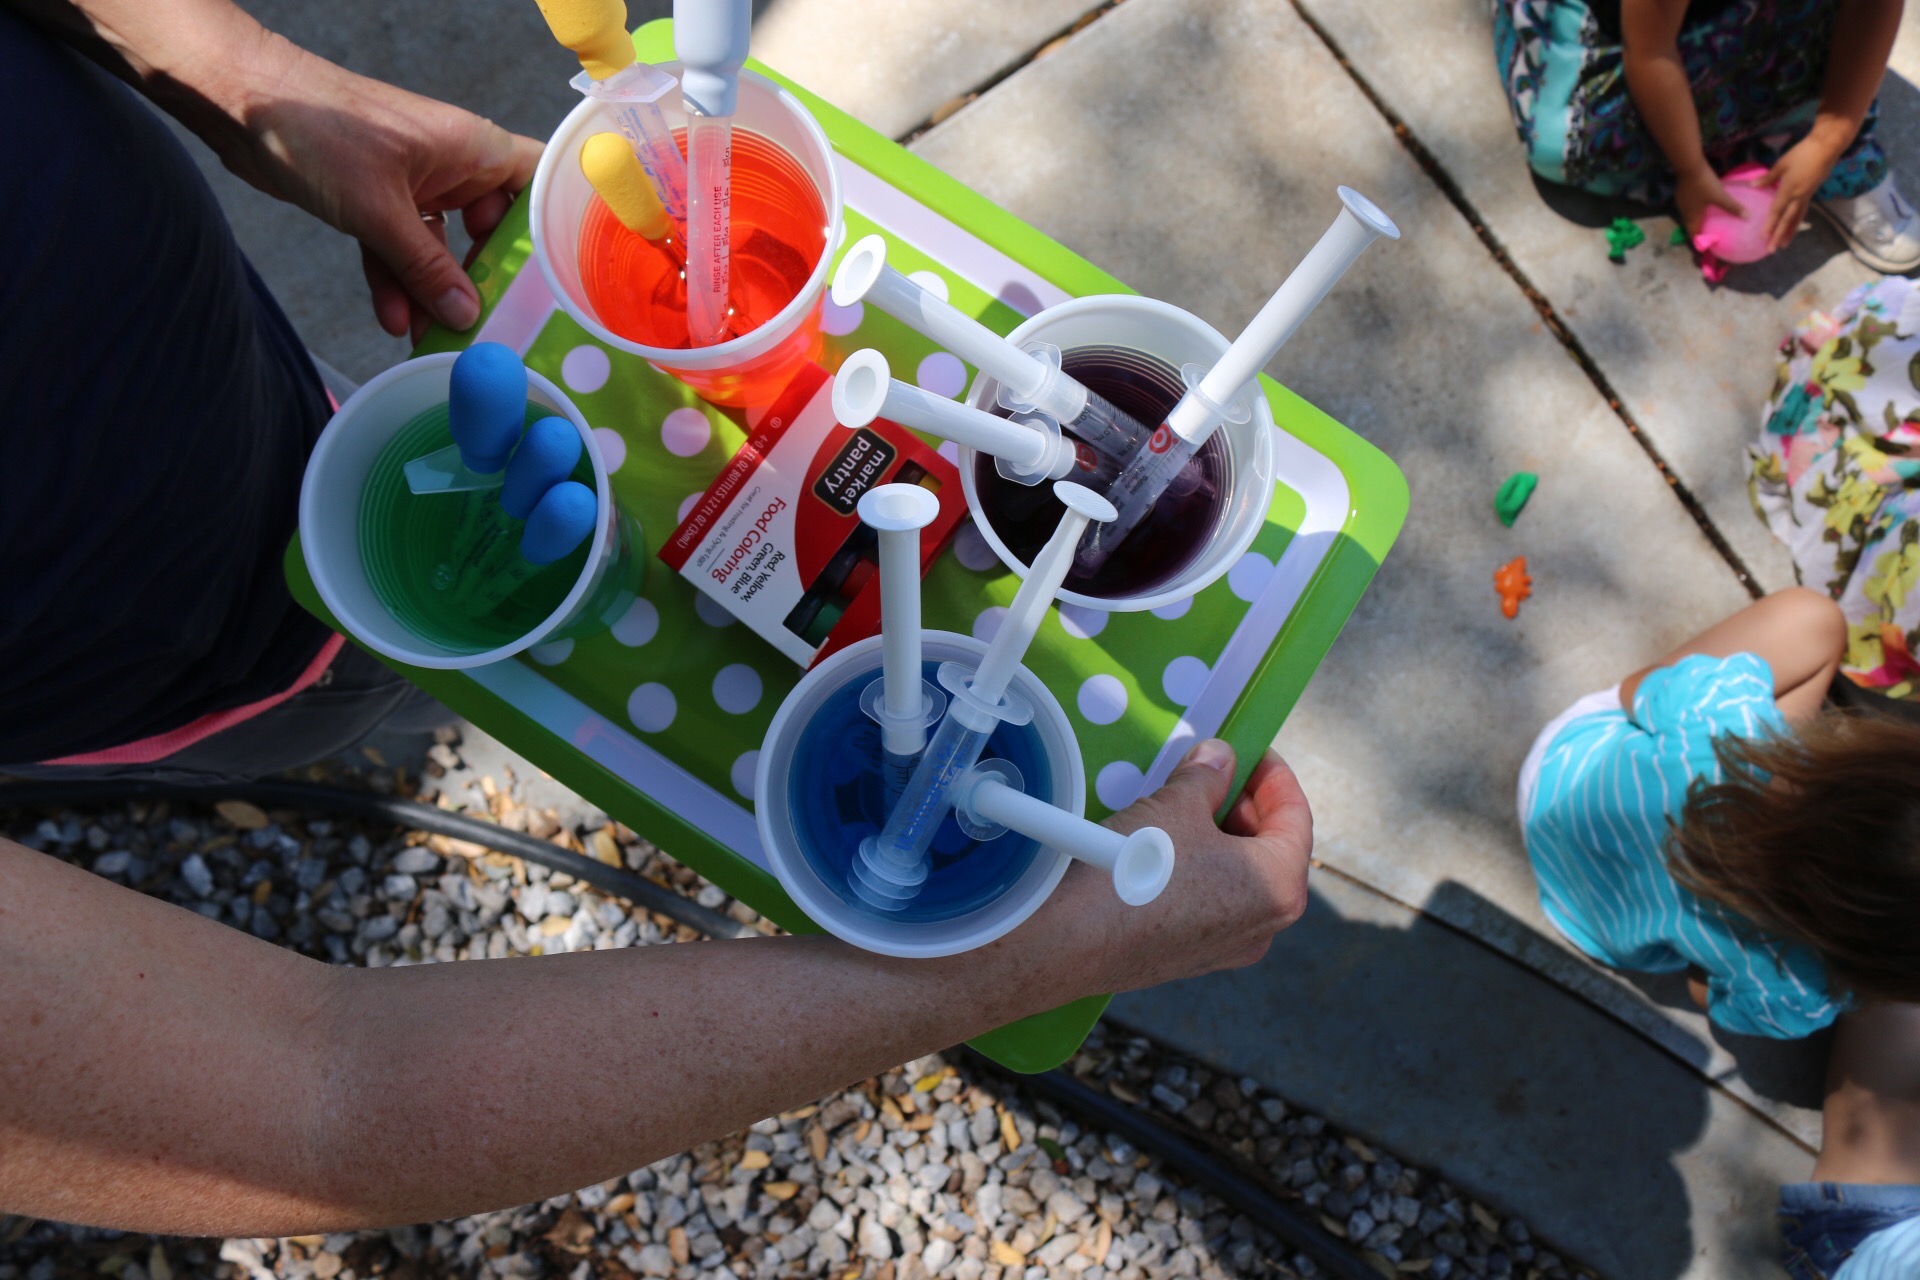
My daughter wanted to do some dinosaur activities at her party. Her number one request was “pin the horn on the dinosaur.” I used a projector to trace a cute pink dinosaur onto a piece of poster board. I colored it pink and cut out a stack of horns for the kids to pin on. I also set up a water table outside with a bunch of plastic dinosaurs floating inside. Water play is always a big hit with preschoolers. Our picnic table became the craft table. I cut large dinosaur shapes out of card stock and put out glue, sequins, plastic beads, and googly eyes for the kids to decorate. My favorite activity of all was “make the dinosaur hatch.” A couple of days before the party, I filled water balloons with plastic dinosaurs and water. I tied them off and froze them. I brought out these frozen “dinosaur eggs” and handed one to each child. I gave them each a medicine dropper, added food coloring to cups of water and had the kids make their dinosaur hatch. They peeled the balloon off of the “ice egg” (some needed a little help from parents with this part). Then they took the colored water and squirted it over their egg until their little plastic dinos hatched out. #CommissionsEarned
Once again, the dollar store came through for the “thank you for coming” gifts. I was able to buy dinosaur eggs with a mini plastic dinosaur surrounded by pink and blue slime. To make them coordinate with our theme, I covered the back with a rectangle of pink card stock and made a front cover with the little pink dinosaur image and the words, “thank you for coming to my party.” My 5 year old girl was absolutely thrilled with her pink dinosaur party, and so was I. You can find a similar dinosaur egg party favor here.
For more kid friendly birthday party ideas check out some of my other blogposts:
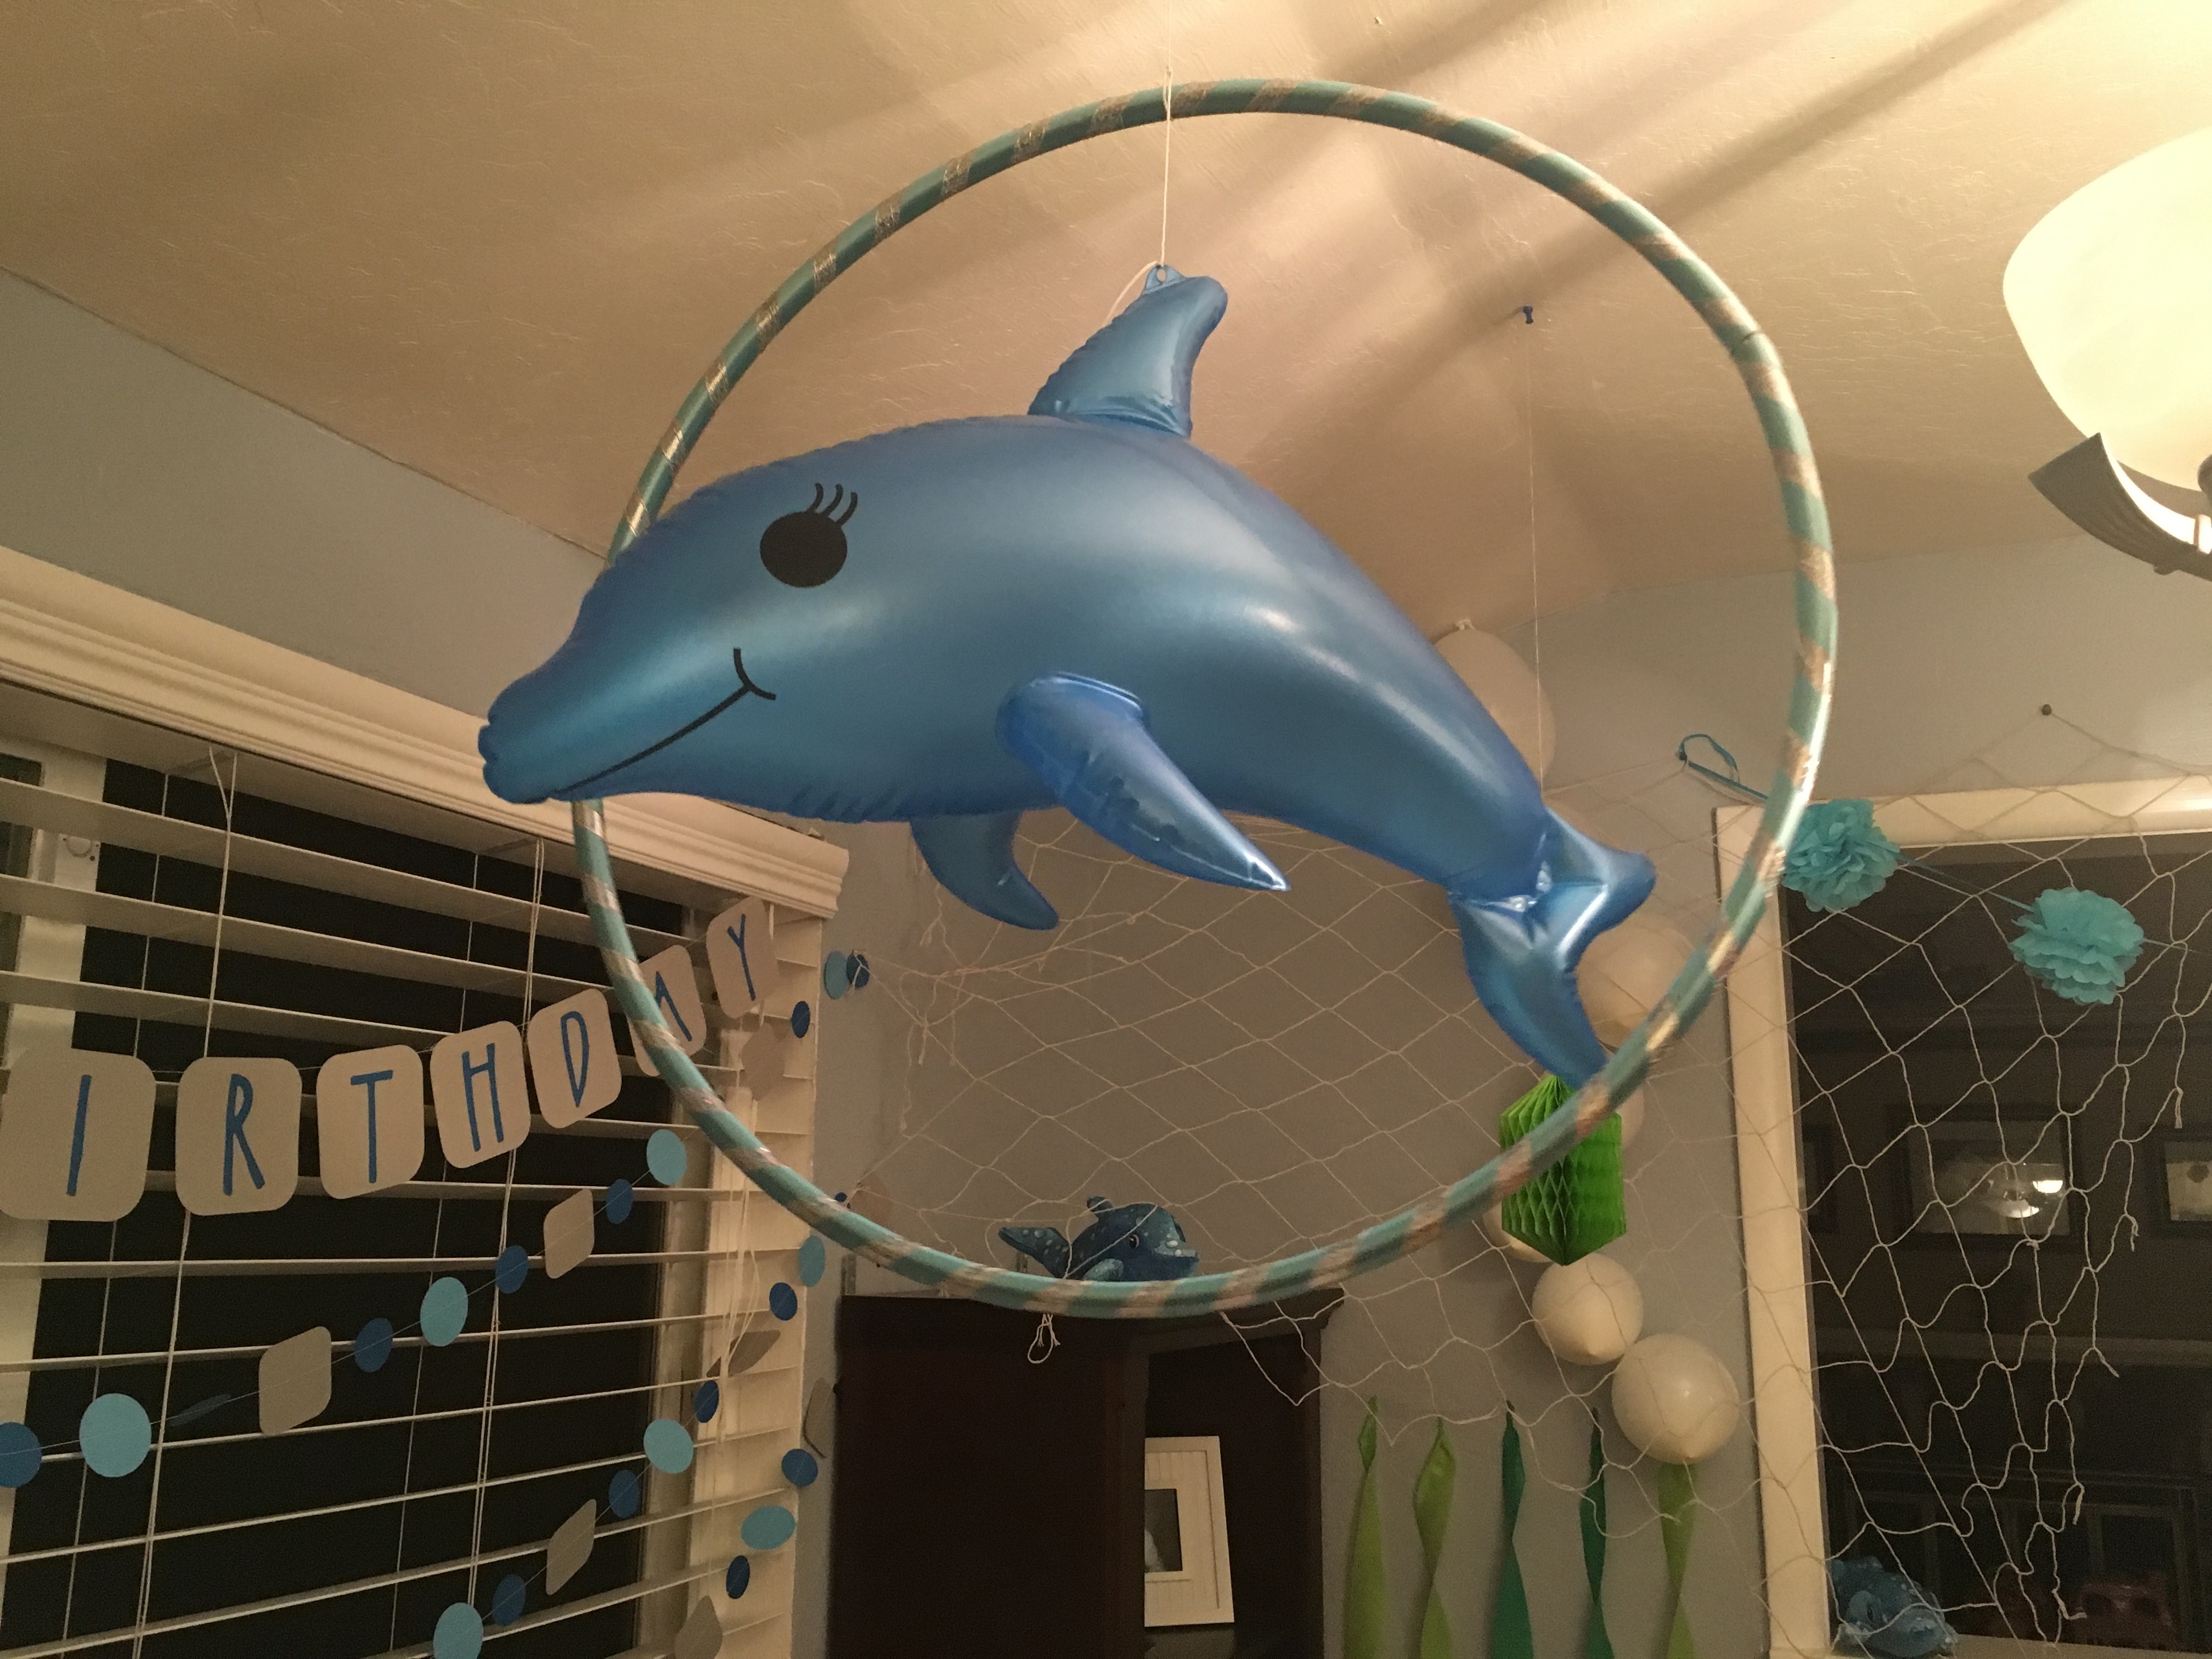
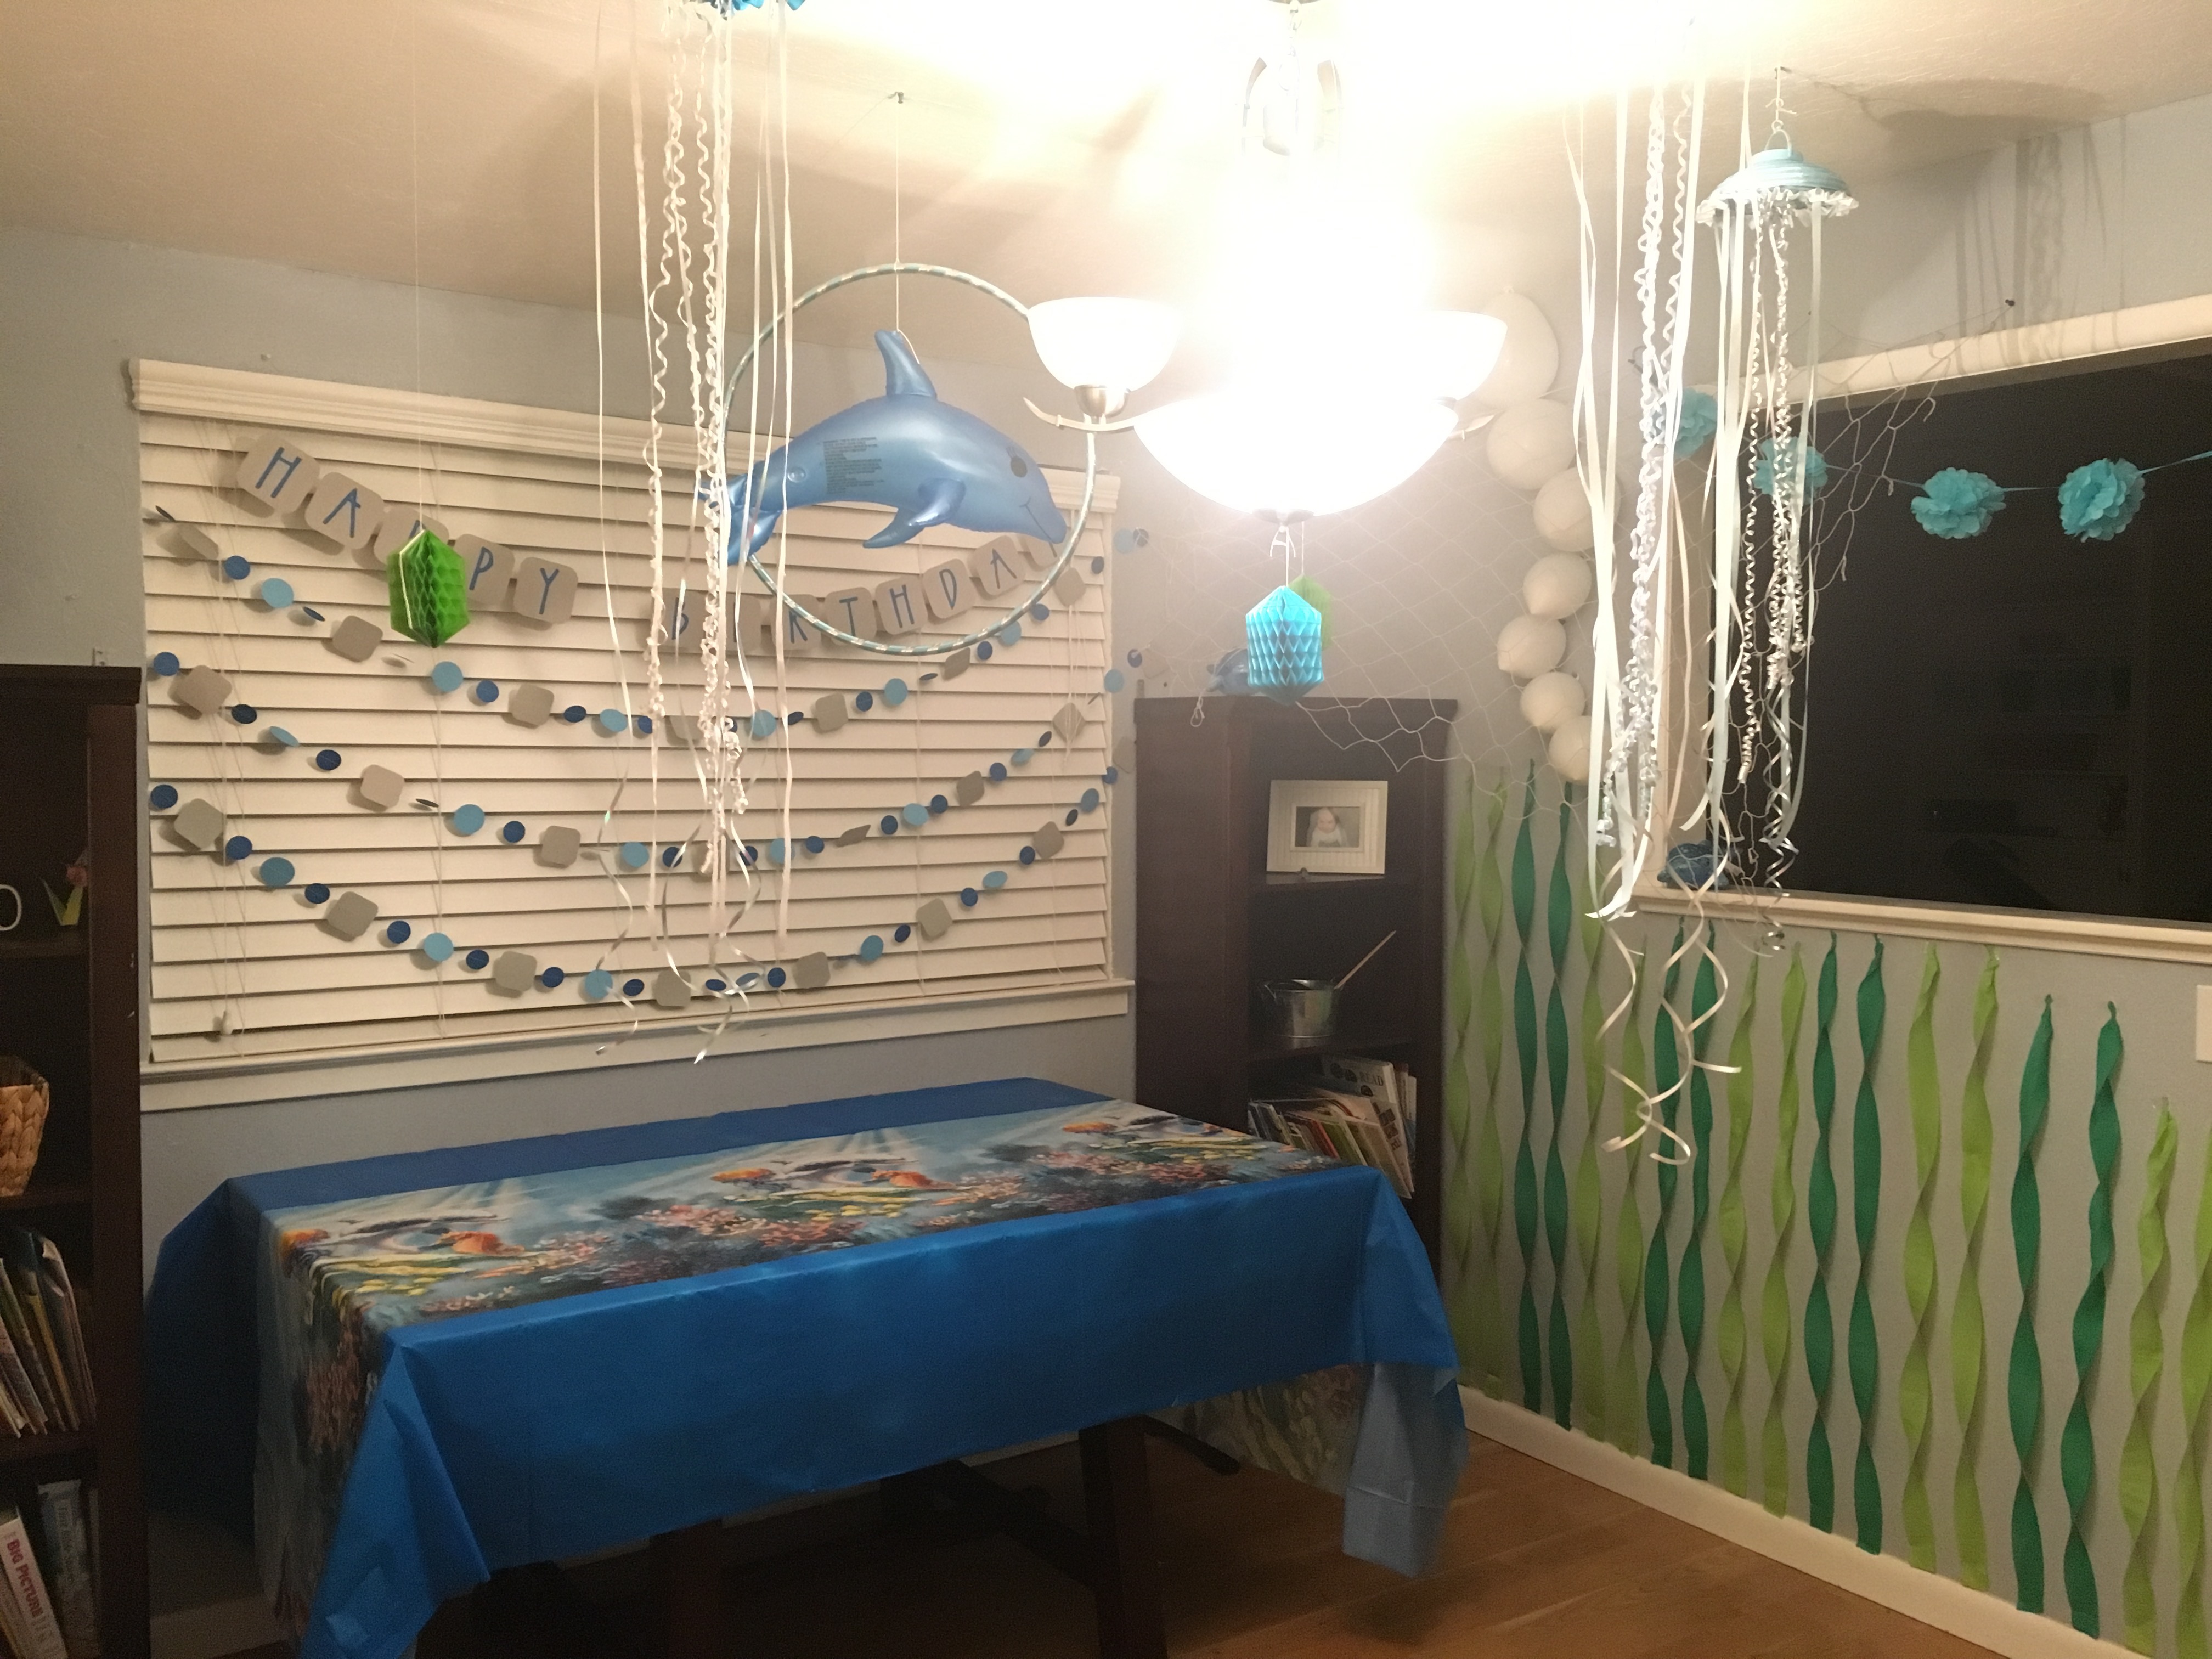
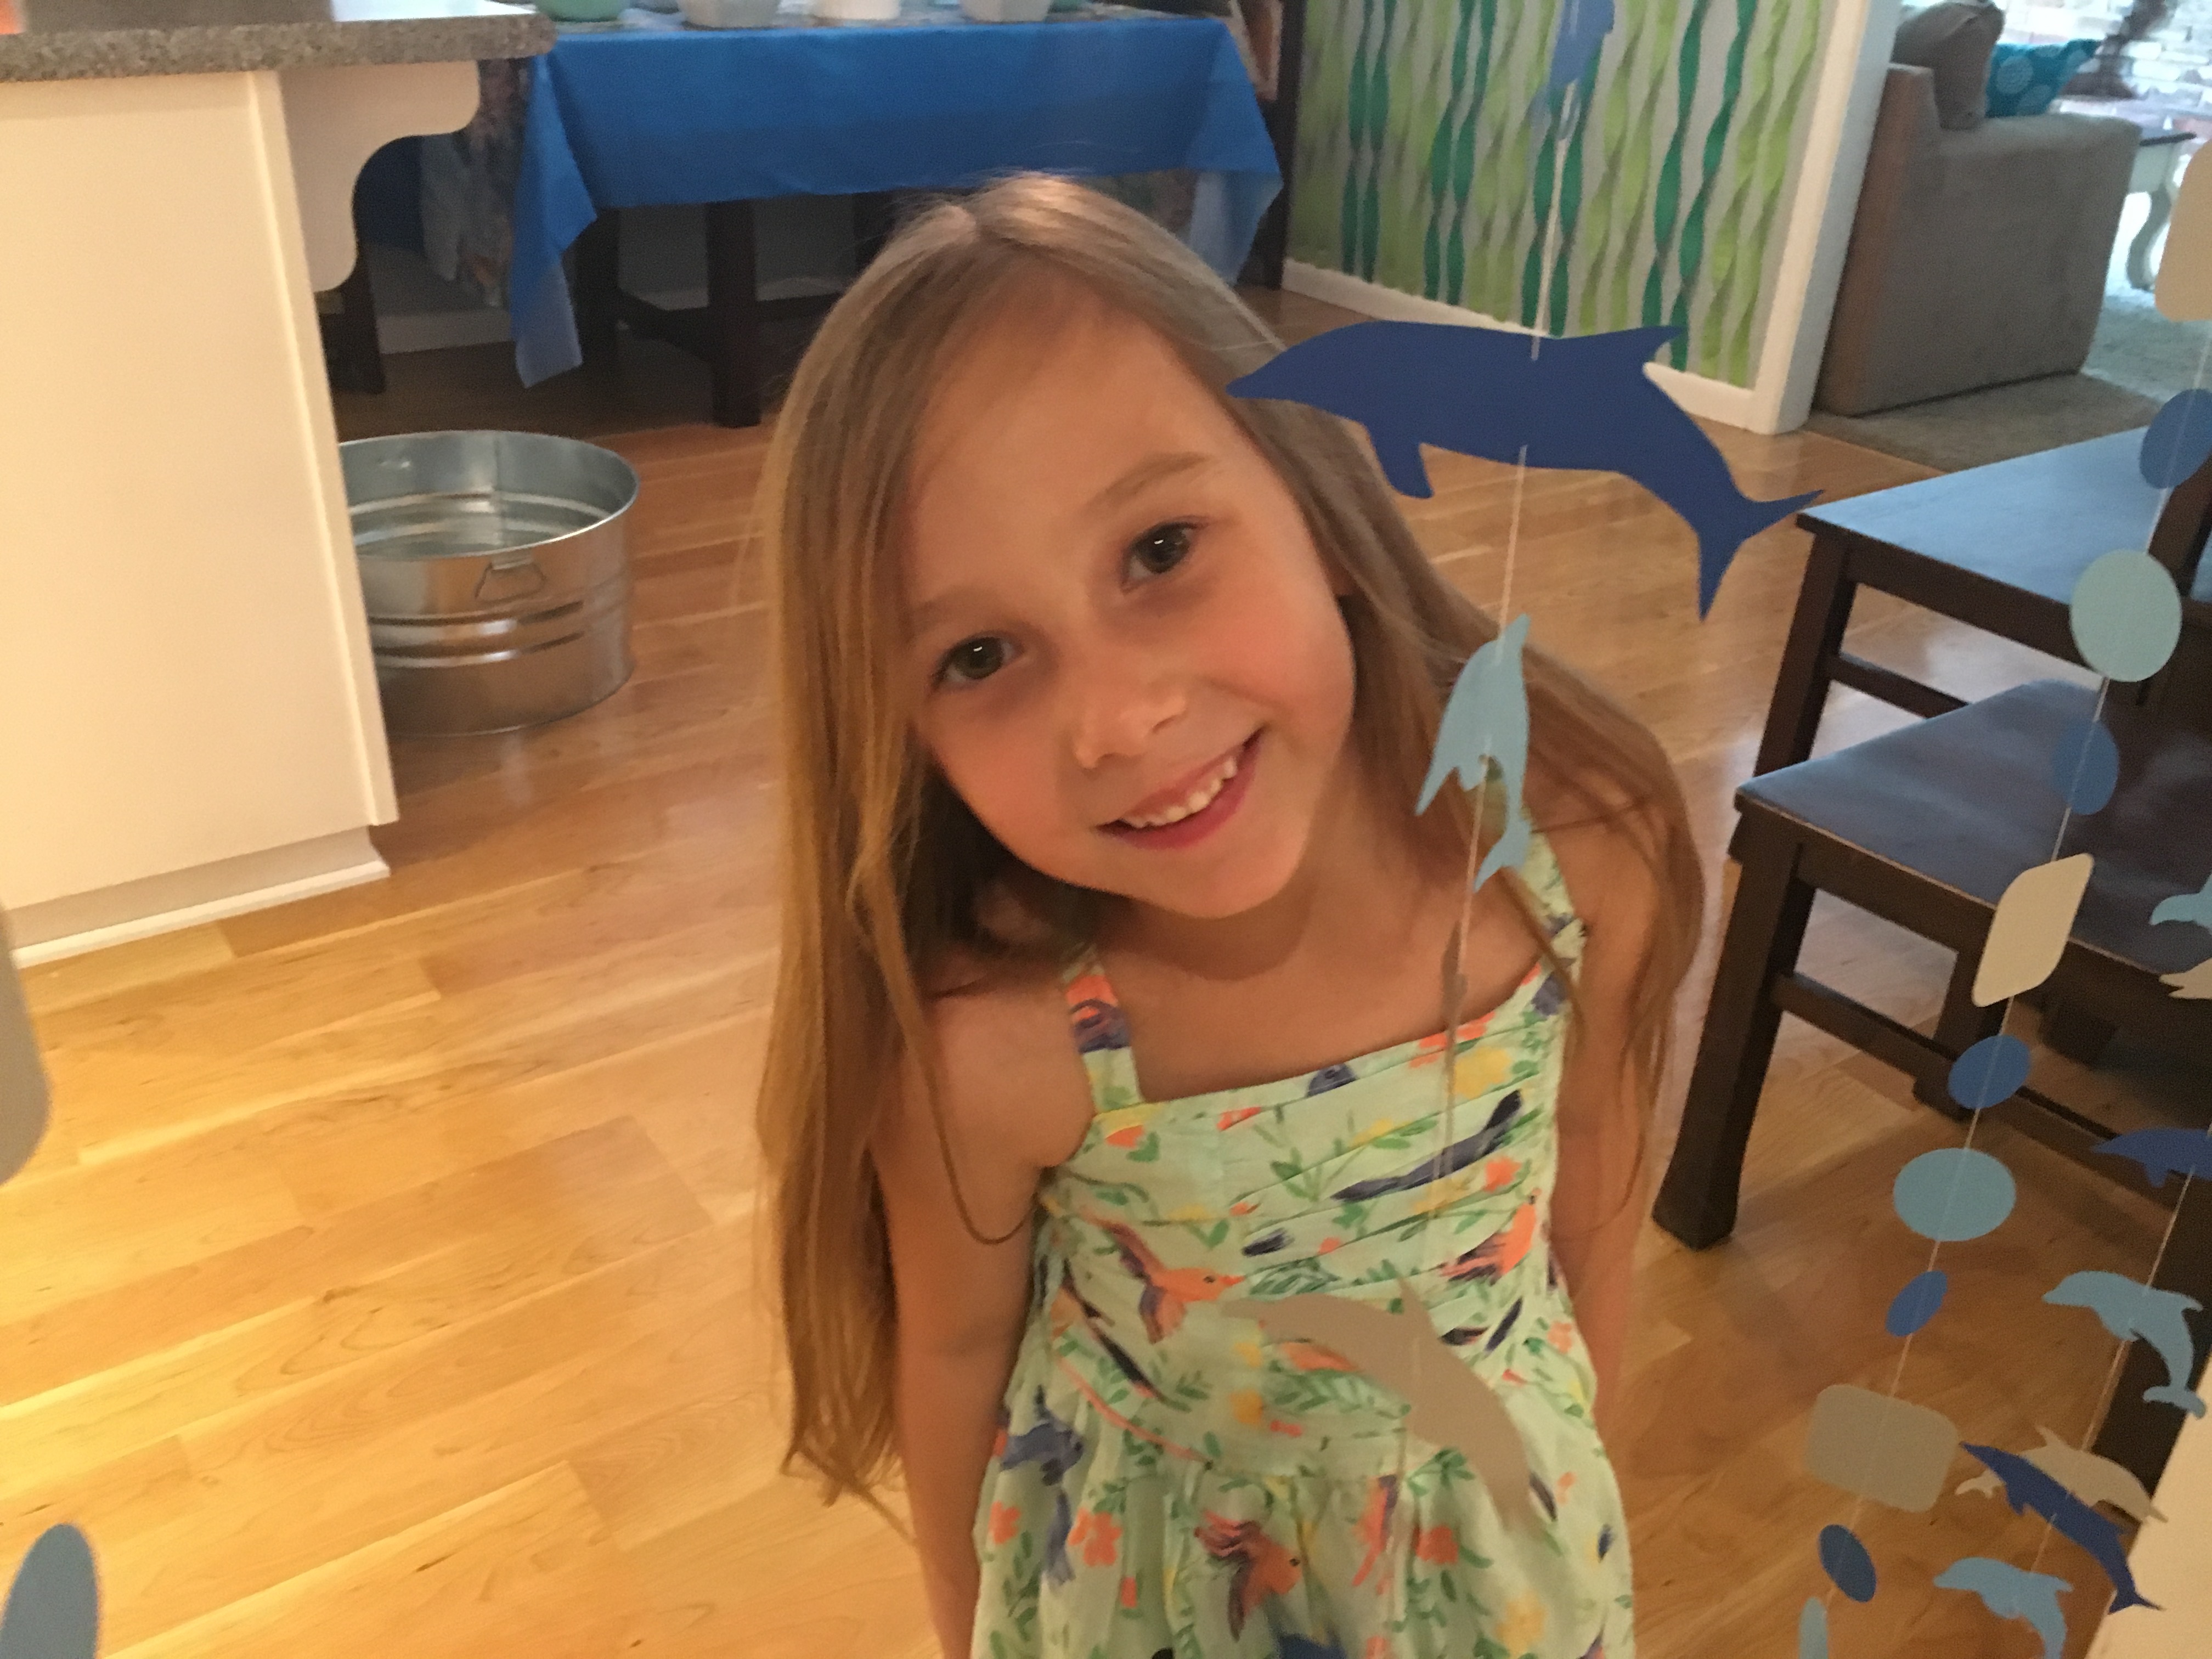
My daughter, Karis, fell in love with dolphins after watching the Dolphin Tale movies last year. The day after her 5th birthday party she declared that for her 6th birthday she wanted to have a dolphin party. This was so much fun to plan! With the help of the dollar store and Michael’s, I was able to create all of the under the sea decor for under $20. I used paper lanterns cut in half and ribbon to make 3 jellyfish. Crepe paper in two shades of green worked perfectly as seaweed. White balloons in various sizes and thumb tacked to the wall formed a line of bubbles. The net held several stuffed dolphins that my kids had won years ago at Circus Circus in Reno, NV. The hula hoop and blow up dolphin were the perfect addition. For the dolphin garlands I used card stock in several shades of blue and gray. I cut these dolphins out by hand and then sewed them with a regular needle and thread. These hanging dolphin garlands created a dramatic entry into our underwater experience. I reused some circle and square garlands left over from my son’s birthday party the previous year because they looked a bit like floating bubbles. I love when I get to reuse decorations from past events! I decided to do mini cupcakes and marshmallow pops for dessert, and to go along with our dolphin theme, I created mini dolphins out of Wilton’s bright white candy melts. I used Celebration Sixlets as pearls and Wilton’s white sugar pearl sprinkles as bubbles on the marshmallow pops. I lined my round of styrofoam with a blue and white polka dotted ribbon and pinned on a sparkly blue dolphin. I also glued a blue dolphin to a flat toothpick to place on top of the cupcakes.
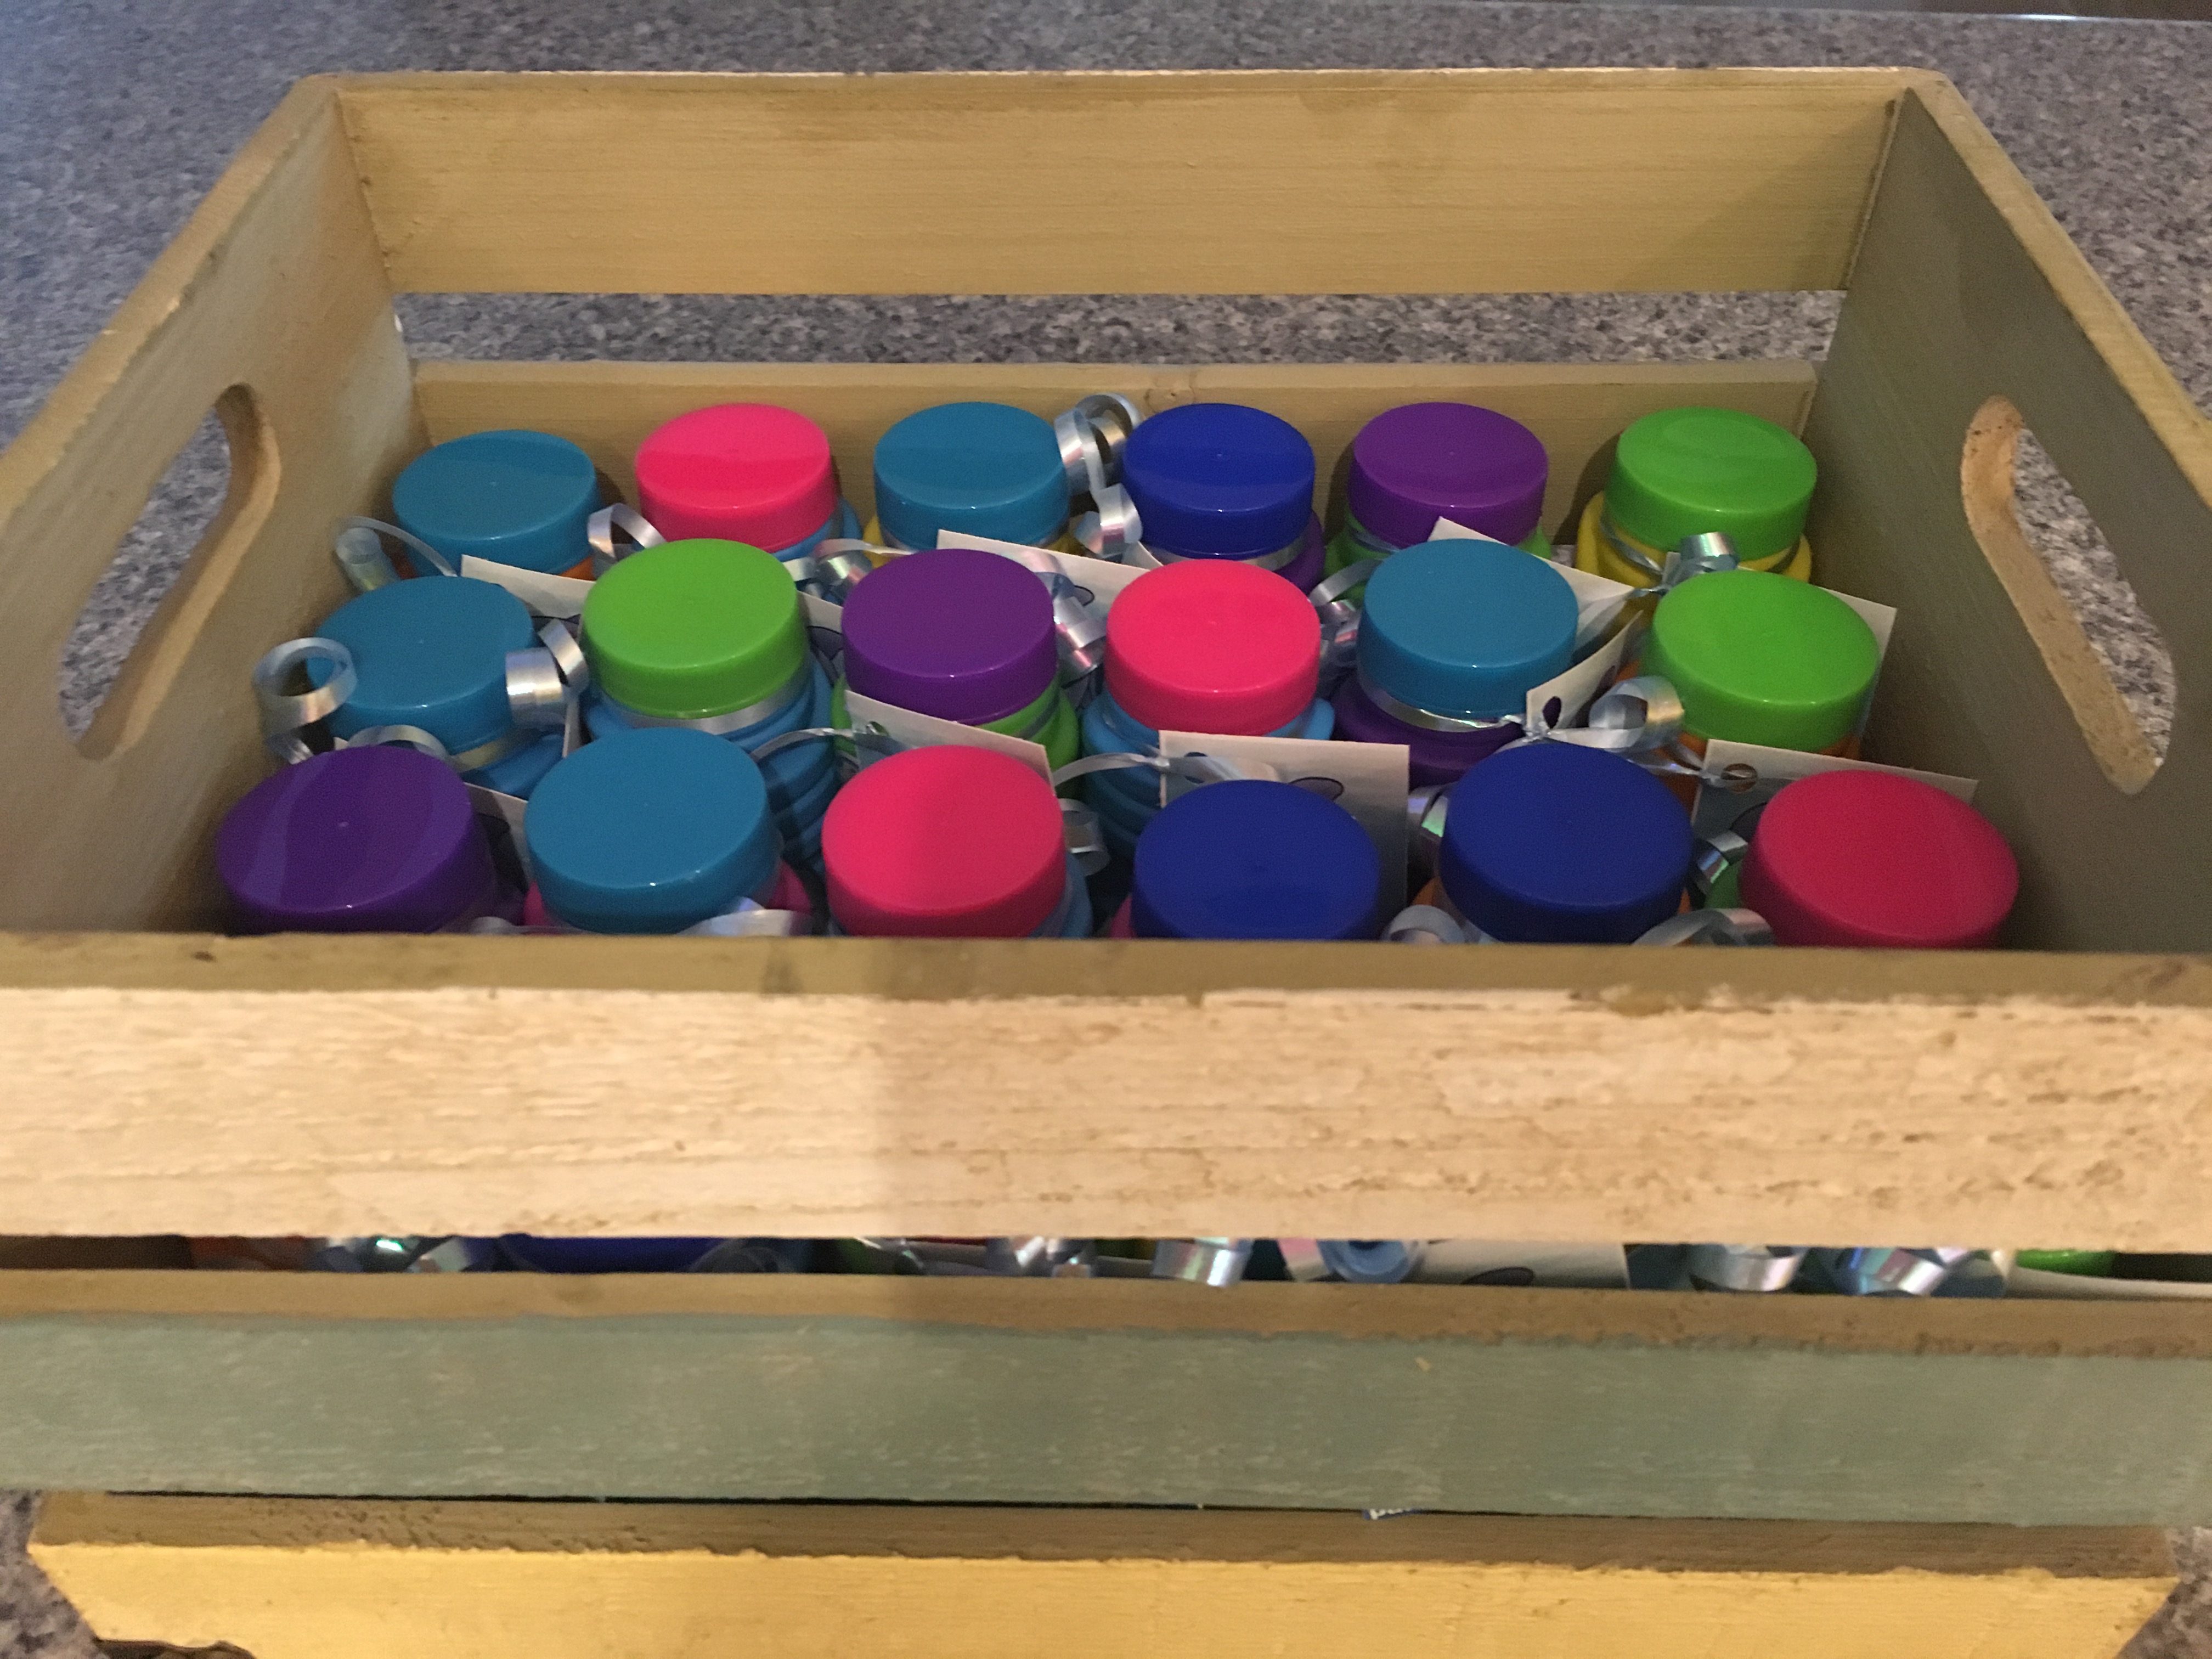
Because the party was in June, and because we have a pool, the main event for Karis’ party was swimming. I found 2 huge blow up dolphins for the kids to swim with, and although my daughter was hoping she would get to swim with a real dolphin, she was pretty happy with her two dolphin friends. The kids had a blast and my big 6 year old girl was all smiles! As the party was coming to an end, I brought out a crate of bubbles with a “thank you for coming to my party” note attached to each. I would have to say that Karis’ dolphin swim party was a huge success! #CommissionsEarned
For more fun birthday party ideas check out some of my other blogposts:


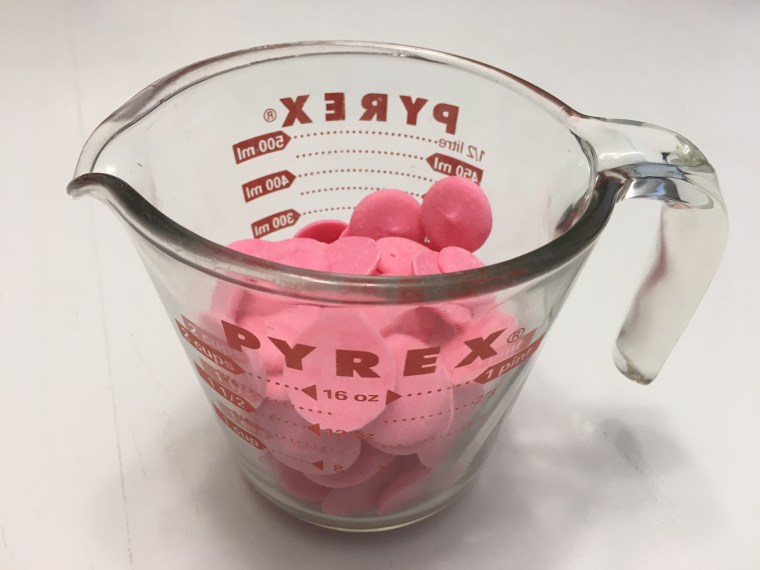


 I like to use mason jars to melt the candy in, but small bowls or coffee mugs work also. Just make sure whatever you use is microwaveable. It’s best to set everything up before melting so your all ready to begin dipping the marshmallows. Line your countertop with wax paper and push a lollipop stick into the center of each marshmallow. Get your candies and sprinkles all ready to go. Follow the directions on the back of the bag of candy melts. I have found it best to start with one minute in the microwave on 50% power. After that, stir, and then go an additional 30 seconds at a time until your candy is easy to stir and completely melted. *Do not over melt…sometimes as you stir, the candy will continue to melt, so give it a good stir each time.
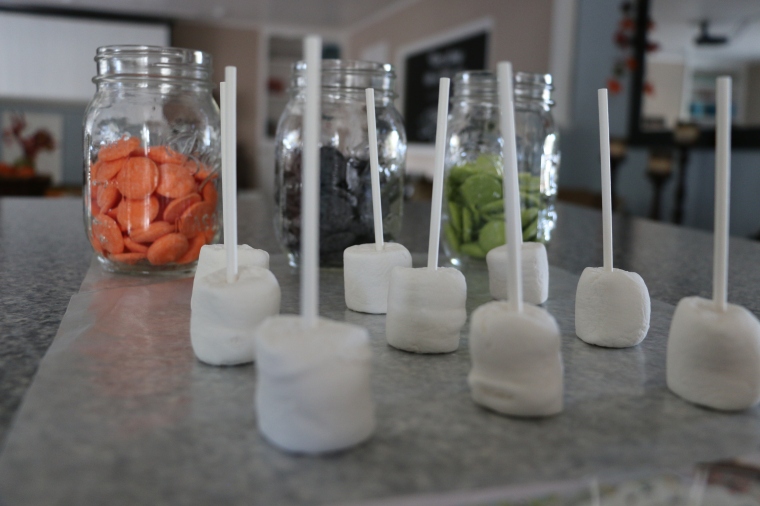
 Now comes the fun part! You are ready to dip and decorate! Enjoy my tutorial on making Halloween Marshmallow Pops for more helpful tips!