Bob Ross Paint Night

Almost a year ago, we celebrated our 20th wedding anniversary. If you would have told me in the year 2000, when we said “I do,” that our 20th anniversary would be spent in quarantine in the midst of a worldwide pandemic, I would have thought you were crazy. I always pictured us spending our 20th in a tropical location, just the two of us, but in those early days of Covid, with the world pretty much shut down, we found ourselves sheltering in place with our little family of 5. Grocery stores were open and you could order take out from a restaurant, but that was about it.

A few weeks before our 20th, we were scrolling through the TV trying to decide on something to watch as a family. We came across a video of Bob Ross painting and my kids were drawn in, watching him take a blank canvas and create a beautiful nature scene. I jokingly mentioned that sometime we should have a “Bob Ross Paint Night” and everyone seemed to like the idea. So as I was brainstorming quarantine anniversary options, that conversation came to mind and my wheels started turning.

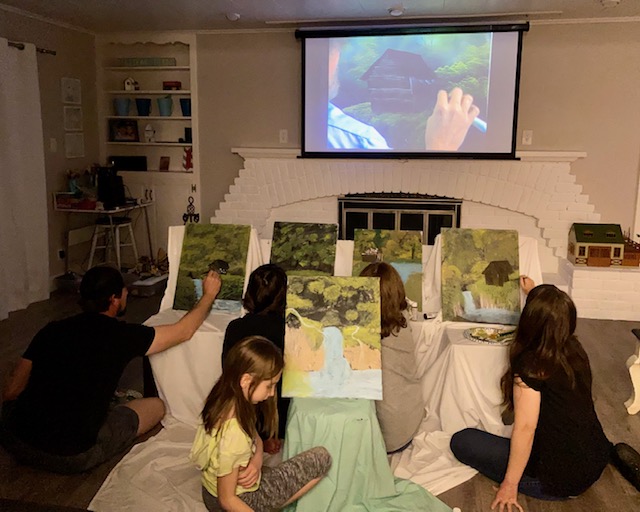
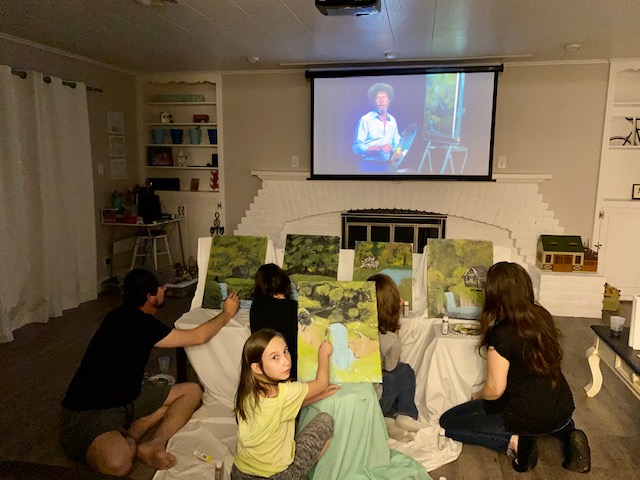
I knew that Michael’s craft store had a curbside pick-up option, so I ordered an acrylic paint set, brushes, and canvases. I grabbed a couple of old sheets to drape over chairs, turned our living room into a makeshift art studio, and we celebrated the big 2 0 pandemic style, at home, painting along with Bob Ross. #CommissionsEarned

To be completely honest, I expected our paintings to look like five big black, brown, and green blobs. And about thirty minutes in, that is exactly what our works of art looked like. But somewhere along the way, waterfalls began to form, tiny cabins took shape, and Bob Ross taught amateurs like us how to create something more beautiful than we imagined. When it was all said and done, I was pleasantly surprised by the outcome and pretty darn proud of my family! Every canvas was different, but each one actually looked like a forest with a waterfall and a cabin. Bob Ross turned out to be quite the teacher 🙂 Today, our paintings line the hallway and when I walk by them, they make me smile.

Next week we celebrate 21 years of marriage. 21 years, 3 children, 2 states, 3 cities, 9 houses, and more vehicles than I can count. We have weathered the ups and downs of life, including a worldwide pandemic. It has not been easy. We have had seasons of joy and seasons of heartache, but this quote on our bedroom wall sums up my thoughts as we approach 21 years. “We may not have it all together, but together, we have it all.” Cheesy, but true!

Adopt A Pet (Beanie Boo Cats & Dogs) Birthday Party

My daughter just turned 8, and this year we decided on an Adopt A Pet (Beanie Boo Cats & Dogs) theme for her birthday party.  I’m not sure what was more fun, preparing for the party, or the party itself.  My daughter and I spent so much quality time planning and crafting together in the months before.  Be sure to watch my video compilation (above) of the party.

Beanie Boos can be expensive so I started purchasing these little kittens and puppies early, taking advantage of the 60% off coupons from Michael’s as often as possible.  We picked out 6 kittens and 6 puppies and then I set out to find a fence and fake grass.  I used my Circut Expression 2 to make the “Adopt A Pet” banner and then did a little photo shoot to use as the cover of the invitations. #CommissionsEarned

IMG_2183

I wanted to plan a fun activity for the beginning of the party while the guests were arriving, so I created a super fun game of Beanie Boo Bingo.  I have included the pdf below if you want to print out this game to use for your child’s party.

IMG_2413

Beanie Boo Bingo pdf

Once all of the girls arrived, I let them choose their pet to adopt.  I was a little nervous about this part because each animal was different and I wasn’t sure if the girls would get their hearts set on one and be disappointed.  I asked them to think about 2 or 3 that they would love to adopt and then said we would draw numbers to see what order they would choose.  We let the birthday girl have the first choice and then went from there.  Thankfully it all worked out and everyone was happy with their pet.

fullsizeoutput_ed5nkITFz5mRmGvL0sK2hHf7wuo0Sv4uBQ%mQ+22BkOByMw

The girls got to sign an adoption certificate to make it official.

IMG_2370

Here is the link for you to use.    pet adoption certificate pdf

I purchased a dozen white gable boxes to use as pet houses, cut a hole in each for a door, and the girls got to decorate a house for their pet. This was such a fun activity and I love watching all of their creativity as they designed a sweet little space for their pet to live in. #CommissionsEarnedIMG_2424IMG_2425IMG_2426IMG_2491IMG_2492

I set up another station for the girls to make a collar for their pet using pipe cleaners and beads.  These Dollar Tree veggie trays were perfect for holding craft supplies.  I have used them over and over for several projects and they have held up really well.  Amazon has a wonderful assortment of pony beads and letter beads.  #CommissionsEarned

IMG_2458IMG_2496

I also made leashes and blankets for each of the pets.  Click the links to purchase paw print ribbon and gold rings and clips.  One spool of ribbon made 12 leashes.  1 yard of paw print fabric, 1/2 yard of puppy fabric, and 1/2 yard of kitty fabric made 12 small blankets about the size of a baby burp cloth. #CommissionsEarned

IMG_2391IMG_2450IMG_2453

We played a couple of fun games.  “Give The Dog A Bone” and “Pin The Tail On The Kitty.”  I used poster boards to draw a Kitten and Puppy.  Then I made three bone shaped bean bags, mounted the puppy on one of our corn hole pieces and cut a hole for the bean bags.  These old fashioned party games were so much fun!

IMG_2397IMG_2398IMG_2521IMG_2522IMG_2446shMGGGevT82awKz2f0dqwAIMG_0717

I kept the food pretty simple because we also had hot dogs and fruit for dinner.  I collected yogurt cups in the months leading up to the party, then used a sharpie to draw a “fish” on half of them and a “bone” on the other half.  I filled the cat dishes with Goldfish Crackers and the dog dishes with Scooby Doo bone shaped graham crackers.  I covered two pieces of styrofoam with pink wrapping paper to display them on.  The Dollar Tree was a goldmine for decorations and pet themed items.  I found the large black dog dishes there and filled one with pretzels (sticks) and the other two with Trader Joe’s chocolate Cat’s Cookies.  I also purchased three paw print jars from the Dollar Tree and filled them with candy, but you can find similar jars here.  #CommissionsEarned The pink and teal hanging paper lanterns were 2 for a dollar as well, making the table setting very affordable.  I have included a pdf of the cupcake toppers, activity signs, and “DIG IN” sign for you to print off from home.  (see below)

IMG_2476IMG_2535IMG_2536IMG_2479IMG_2480IMG_2520IMG_2474IMG_2470IMG_2421IMG_2465IMG_2410

IMG_2416

beanie boo cupcake toppers pdf

dig in party sign pdf

IMG_2366

cats & dogs party signs pdf

A month later, my girl is still saying that her Adopt A Pet party was the “funnest birthday party ever!”  I would definitely have to agree!

IMG_2486IMG_2483IMG_2488IMG_2517IMG_0713IMG_0705

Valentine Hearts Cake

Wilton’s Candy Melts are one of my favorite gems to use for fun holiday treats.  Last year I used them to make a batch of yummy Valentine Marshmallow Pops.  This year I picked up three bags from Michael’s in red, pink, and white to use for Valentine’s Day, and got to work creating these fun and festive swirly heart cake toppers for our family Valentine Cake.  I love how they turned out, and my family (kids especially) loved eating the oversized candy hearts!  Check out my simple tutorial to learn how to make these cuties using cookie cutters as templates.  I’m excited to try them for other holidays too.  Imagine green 4 Leaf Clovers for St. Patrick’s Day, pastel eggs for Easter, patriotic colored stars for the 4th of July.  The possibilities are endless!  You can use them to top a cake like I did, make smaller ones for cupcakes and cookies, or even top a cup of fruit with whipped cream for a healthier version.

For more Valentine Fun, check out these other links:

Valentine Words of Affirmation for Kids 

Valentine Craft: Cookie Cutters & Paint

Valentine Paper Garlands 

3 Simple St. Patrick’s Day Treats

If you are planning on making some St. Patrick’s Day treats, here are 3 simple options for you…  Pretzel Shamrocks, Shamrock Oreo Cookie Pops, and Shamrock Marshmallow Pops.  All of these treats use Wilton’s Candy Melts, which you can find at crafts stores like Michael’s and JoAnn Fabrics.  Watch my tutorial to learn how to make these tasty treats!

SHAMROCK TEMPLATE

IMG_6948fullsizeoutput_dcd9IMG_6936IMG_6940IMG_6946

Click on these links for more St. Patrick’s Day fun…

St. Patrick’s Day Treasure Hunt

Make a Rainbow of Color: Skittles Science Experiment

Rainbow Fruit Kabobs 

Valentine Marshmallow Pops

If you are looking for a cute and simple, no bake, Valentine Treat…look no further.  These Valentine Marshmallow Pops are quick and easy to make and they taste delicious!  They are perfect for taking to class parties or passing out to friends.  You can even hole punch a small Valentine card or paper heart on the top and bottom, and weave it through the top of the lollipop stick, for personalized treats.

One bag of Wilton’s candy melts makes about 26 pops and the decorating possibilities are endless.  Let your kids help you make these for a fun family activity and an opportunity for them to express their creativity.

For more helpful tips on making these adorable Valentine Pops, watch my tutorial!    Happy Valentine’s Day!

img_6032img_6035img_6033img_6034img_6038img_6037img_6042img_6056img_6058

Octagon (Geometric) Bulletin Board

I have had this huge stack of cork tiles in my son’s room for several years… just sitting there…  taking up space!  So this week, I finally decided to do something fun with them!  I created a geometric bulletin board for my 10 year old son’s bedroom wall and I am so happy with the way it turned out.  It was a bit tricky getting the right cut to create the octagons, but with a little help from my husband, (who measured and cut the template for me) I was on my way.  A couple of coats of paint and some command strips later, and these cork tiles became a really cool memo board for my son to pin up a “few of his favorite things.”

Watch my tutorial on how to create your own Octagon Memo Board.  This would be perfect in a bedroom, a dorm room, or an office.

Here are a couple of tips:

Use different textures of paint for contrast

Paint at least 2 coats on each octagon

Leave some octagons unpainted

Lay out your tiles on the ground and play around with different configurations before hanging them up

Use command strips to hang each tile on the wall

Also featured in this video is a collection of my son’s amazing origami creations, strung up across the top of the Octagon Bulletin Board.  He has spent hours making these incredible creations, one intricate fold after another.  I love seeing them all on display in his bedroom.  For those of you who love origami, check out MicahsToyReviews to learn how to make some origami creations of your own.

img_5750fullsizeoutput_d731img_5763img_5781img_5880img_5887fullsizeoutput_d860

Children’s Art Corner

My daughter loves art!  She will sit for hours drawing, writing stories, and coloring pictures.  I have several areas set up around our house with art supplies, but I recently decided to put together a more intentional art space for her.

Michael’s was having a huge sale one day, so I headed over (with my coupons of course) and picked up these metal A R T letters,  the chalkboard box for crayons, and the off white tray for paper.  The rest, I already had around my house.

These adorable chairs were made for me by my brother when I was a child.  They were in my childhood room, painted light pink, with dark pink carpet covering the seats.  My mom gave them to me several years ago and I repainted and recovered them for my daughter.  The wicker table belonged to my mom, who passed away a year and a half ago, so it means a lot for my daughter to have something so special to remind her of her sweet Grandma.

I bought the metal bucket years ago at the dollar store and it has held colored pencils in various locations around our house.  Now it has a permanent home.  I had used the mini white shutters last year for my Christmas mantle, but realized they were the perfect addition to this little art corner.  The finishing touch was this bright and cheerful pennant banner.  I had already cut the triangles for another project, so it only took me a few minutes to thread them through a piece of twine.

I absolutely love when I can use what I already have to create an inviting space for my children to enjoy.  This little art corner has already gotten a lot of use in our home and is the perfect setting for inspiration to take place!

Carmel Apple Teacher Gifts

Are you looking for a cute and simple Christmas gift to give to your children’s teachers?  Look no further.  For about $5 each, you can create these delicious caramel apple bundles.  I bought my caramel sauce at Trader Joes, hand picked the largest, most colorful red and green apples I could find, made my own gift tags from tan card stock, and purchased a package of bells and long clear bags at Michael’s.  I stacked the apples carefully on top of the caramel sauce and tied them off with a piece of twine.  And there you have it…a quick, easy, and inexpensive, but very festive Christmas gift for your children’s teachers. You can also add mini ornaments and ribbon if you want to invest a bit more money into these festive gifts.  #CommissionsEarned

For more fun Christmas ideas check out the following blogposts:

Floral Embroidered Christmas Tree

Glittery Christmas Silhouettes

Advent

Turn Dad Into A Snowman

Graham Cracker Gingerbread Houses