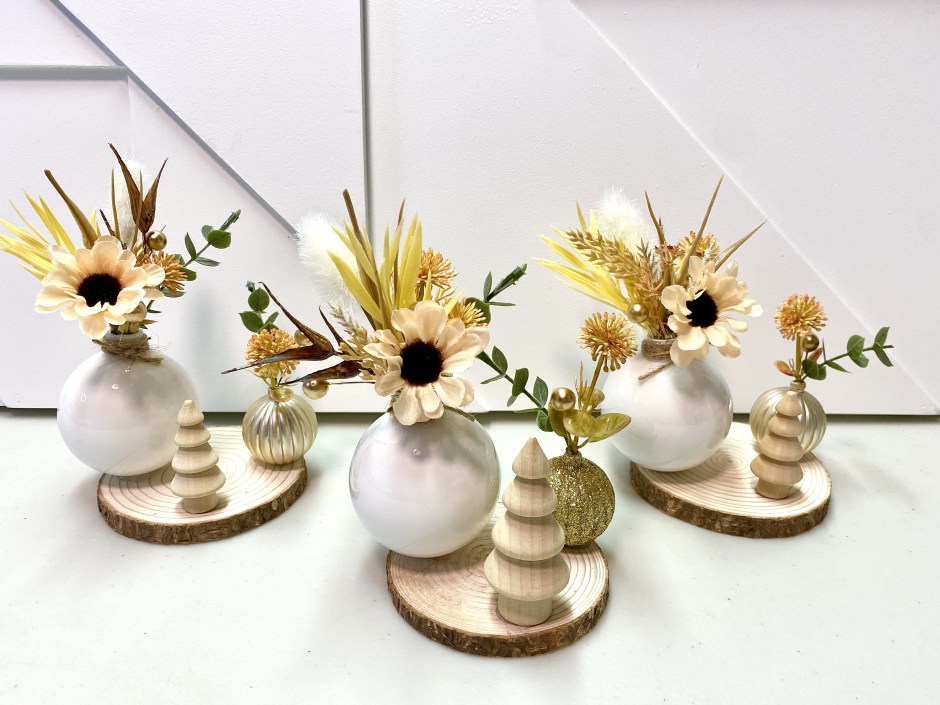
Wondering what to do with those leftover faux florals from Fall? How about using them to make these elegant natural Christmas centerpieces? You can’t go wrong with this easy DIY, whether you are making one to add to your own decor or several to put on each table for a holiday party. They would also make stunning centerpieces for a Christmas wedding.
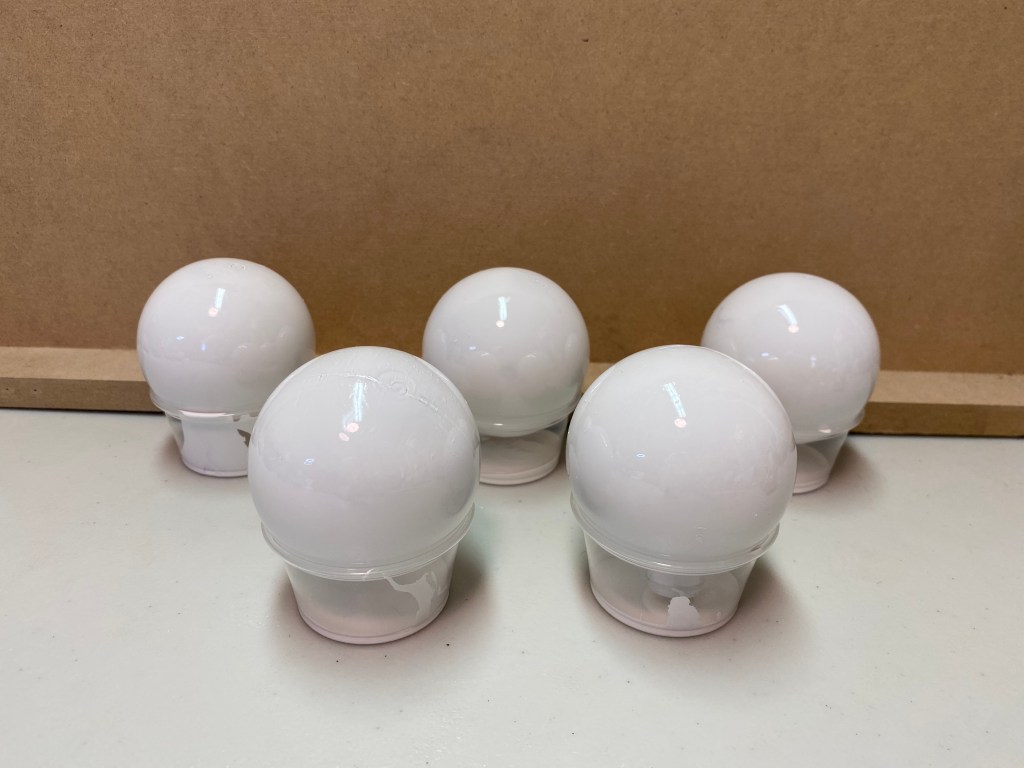
Start your project by pouring white acrylic paint into your clear plastic ornaments. Tip: Before adding the white paint, swish a bit of rubbing alcohol inside of each ornament and then pour out the excess. Let it dry before adding the white paint. This will help the paint adhere to the plastic. Believe me when I say that this step is important! I ruined several ornaments by skipping this step, and ended up with a blotchy paint job.
Once the alcohol has dried, pour a bit of paint into each ornament. Swirl is around so that the entire inside of the ornament is coated with white paint, then turn each ornament upside down to drain the excess paint out. I left my ornaments like this overnight, and then turned them right side up for another 24 hours to make sure that the paint was fully dry before moving onto the next step.
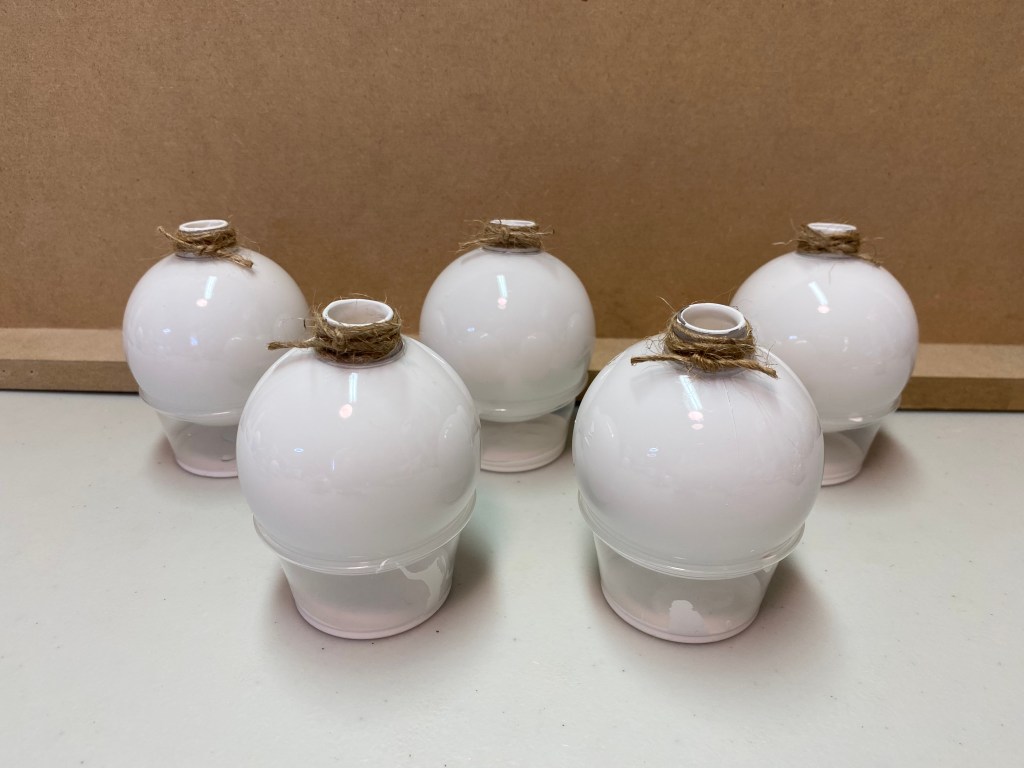
Once the paint is dry, cut a piece of twine to loop around the top of the ornaments. I added a dab of hot glue to the back to keep the twine in place and then tied each in a double knot. Trim the twine to your preferred length.
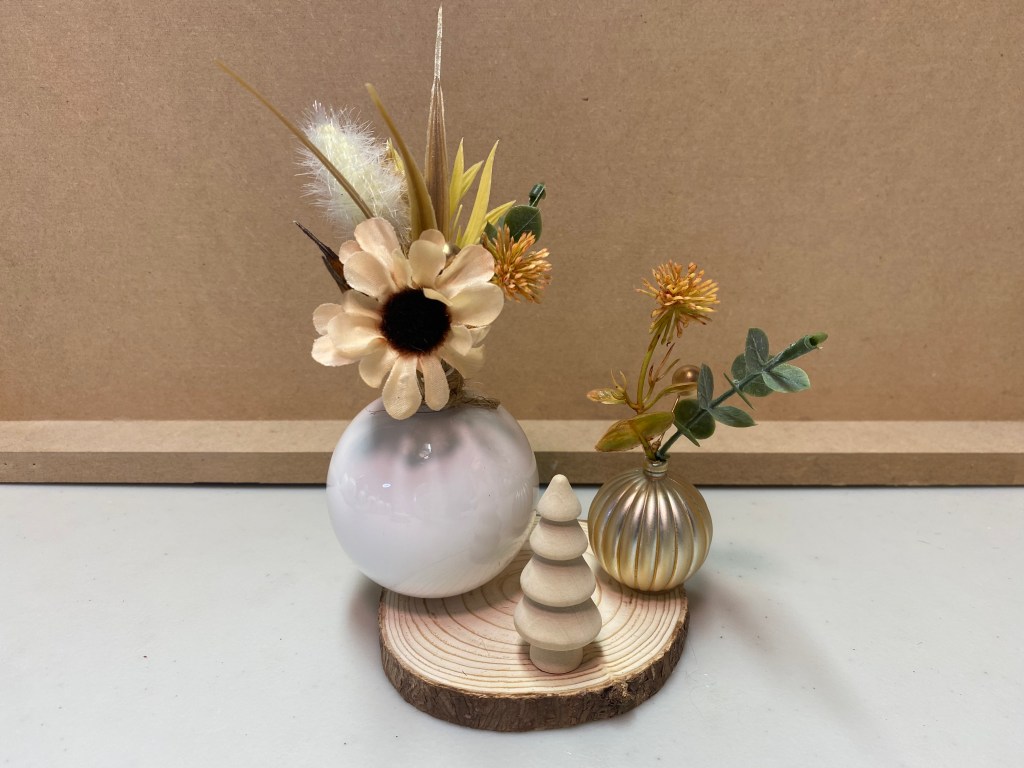
Use floral tape to secure the stems of the faux florals together to form a small bouquet. Make sure to wrap the stems tightly and to keep it small enough to fit inside the top hole of the ornament. Leave out 3 small pieces to place inside of the tiny gold ornament.
Now you just need to use your hot glue gun to secure everything in place. I put a tiny dab of glue on the stem of the gold ball that I added to the gold ornament before I slid it into place to hold those florals in the right place as well.
I’ve included a short video tutorial so that you can see, step by step, how I created these gorgeous Christmas centerpieces.
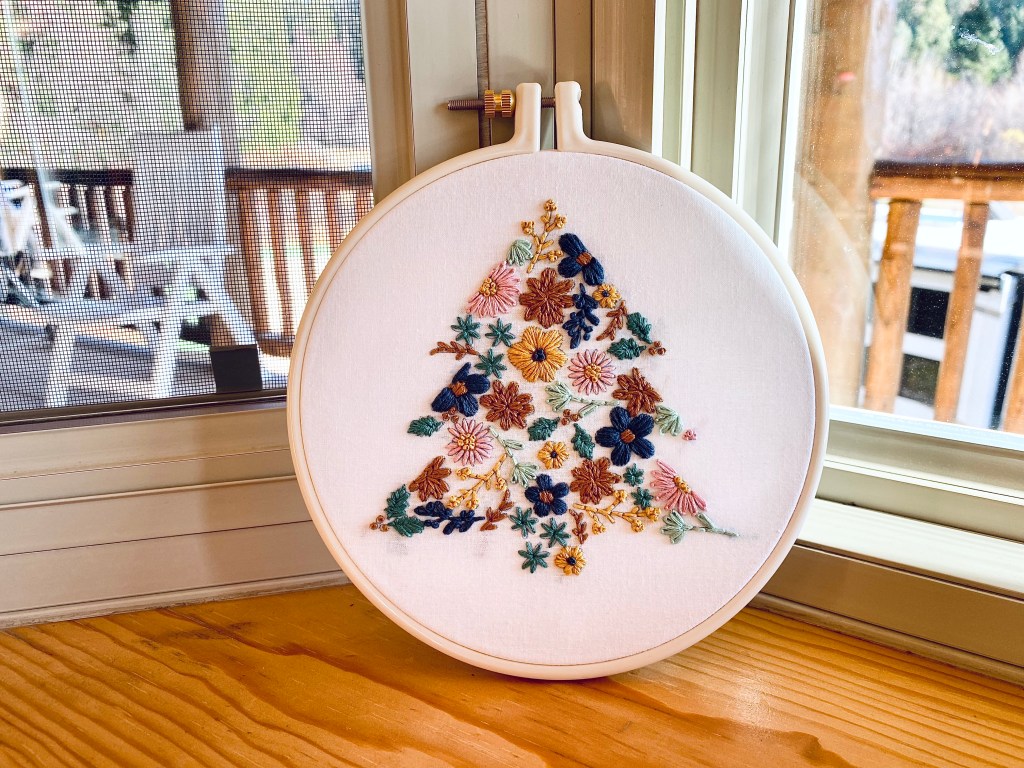
Let me know if you decide to make some for your home or for your holiday gathering. You could even change the colors and florals to coordinate with any color scheme. And if you missed my last blogpost, you can see a peek of my Floral Embroidered Christmas Tree in the last picture on this post. You’ll find the instant download PDF pattern and printable instructions in my new Etsy Shop, thistles and rainbows.
When I was in middle school, I took a home economics class and we spent some time learning how to do embroidery. It’s something that I dabbled in a bit over the years, but recently, I have fallen in love with it in a new way. I have been working on a collection of embroidered pieces to sell locally, and am now branching out to create my own embroidery patterns for my new Etsy Shop, Thistles and Rainbows. This is the first full pattern that I created from scratch and I’m super proud of myself!
I was standing in line at the grocery store a couple of weeks ago and I saw a display of candles in this color pallet. I snapped a quick picture and decided that I had to create something featuring this beautiful array. With Christmas just around the corner, I set out to make my floral Christmas tree embroidery design.
Recently, I had the privilege of spending the weekend in a cozy cabin in the woods with my daughter and her orchestra class for a music retreat. I knew I would be sitting for hours, listening to middle schoolers practice, so I brought my traced out tree pattern, needles, and embroidery thread. I stitched out every flower, leaf, twig, and holly berry to the sound of stringed instruments. They even played a medley of Christmas songs, so it could not have made for a better setting to indulge in one of my favorite past times. I am affectionately calling this pattern “cabin tree.”
If you love embroidery as much as I do, and are looking for a new pattern to add to your holiday collection, or if you have always wanted to try embroidery, but haven’t known where to start, this is the perfect pattern. You can find the PDF printable instant download for “cabin tree” in my Etsy shop. I have included the printable pattern in two different sizes, as well as a detailed set of instructions, tutorials, and tips for making this a great project for beginners, and yes, seasoned creatives will enjoy it just as much!
If you are new to embroidery and need some supplies to get started, here’s a great list:
And if you have come to this blog post because you purchased my Floral Christmas Tree pattern on Etsy, first of all, thank you for supporting my small business. In addition to the PDF pattern and instructions you purchased, I’ve included some short video tutorials to help you with the various stitches.
I hope that these short tutorials made it easy to learn some of the most commonly used embroidery stitches. Follow my Etsy Shop for other PDF patterns and printables and have a wonderful Christmas!
Christmas came and went, and while I had great intentions to add some new holiday posts to my blog, I was too busy enjoying all of the fun activities to get to the blogging part. I guess these little Hot Cocoa Mug Marshmallow Pops can be tucked away on a Pinterest board for next Christmas 🙂
The past couple of years, our church has done a drive-thru Christmas Caroling event. My friend asked me to make cookies to pass out, but festive mallow pops are more fun than baking cookies for me, so I set out to make some really cute and Christmassy pops. These little guys were a bit trickier to make than I expected, but I think they turned out pretty cute.
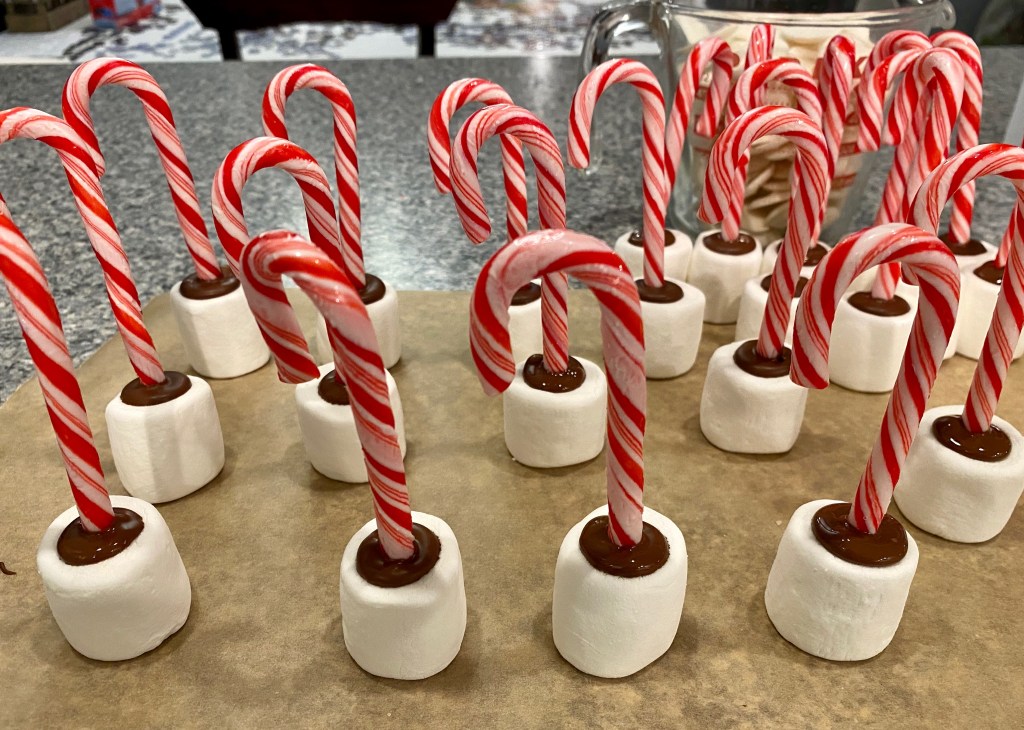
Here’s what you will need to make your own Hot Cocoa Pops: peppermint candy canes (the ones I used were in between the typical big and small size), Jet Puffed Marshmallows, pretzels (broken up to create handles), candy melts in milk chocolate and bright white, Kraft Mallow Bits, various holiday sprinkles, parchment paper, and a Wilton’s squeeze bottle. #CommissionsEarned
STEP 1: LAY EVERYTHING OUT ON PARCHMENT PAPER SO YOU HAVE AN EASY WORKSPACE
STEP 2: MELT A SMALL AMOUNT OF THE CHOCOLATE CANDY MELTS. DIP A CANDY CANE IN THE CHOCOLATE AND PUSH INTO THE CENTER OF THE MARSHMALLOW. REPEAT
STEP 3: MELT A SMALL AMOUNT OF THE WHITE CANDY MELTS. DIP THE ENDS OF THE BROKEN PRETZEL IN THE WHITE MELTED CANDY AND SECURE TO THE SIDE OF THE MARSHMALLOW. REPEAT.
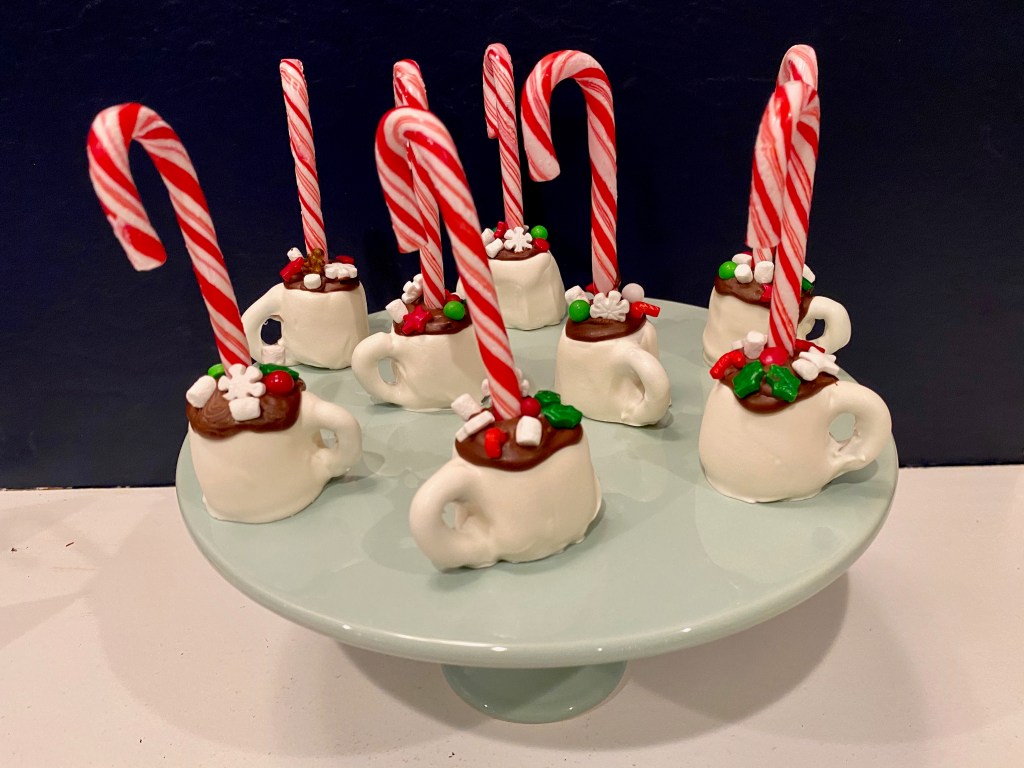
STEP 4: MELT THE REMAINDER OF THE WHITE CANDY MELTS. DIP EACH MARSHMALLOW, MAKING SURE TO COAT ALL THE WAY UP TO THE TOP OF THE MARSHMALLOW AND COVERING THE PRETZEL HANDLE. YOU MAY NEED TO WIPE OFF SOME OF THE DRIPS FROM THE BOTTOM BEFORE PLACING ON THE PARCHMENT PAPER TO DRY.
STEP 5: MELT THE REMAINDER OF THE MILK CHOCOLATE CANDY MELTS AND TRANSFER TO A SQUEEZE BOTTLE. WORKING QUICKLY, BEFORE THE CANDY MELTS SOLIDIFY, DRIZZLE MILK CHOCOLATE ALONG THE TOP OF EACH POP AND ADD A FEW FESTIVE SPRINKLES AND MALLOW BITS. THIS IS WHERE THE TRICKY PART COMES IN BECAUSE IT’S DIFFICULT TO ADD THE TOPPINGS AFTER THE CHOCOLATE HAS SET, SO YOU HAVE TO WORK FAST.
STEP 6: ENJOY!!!
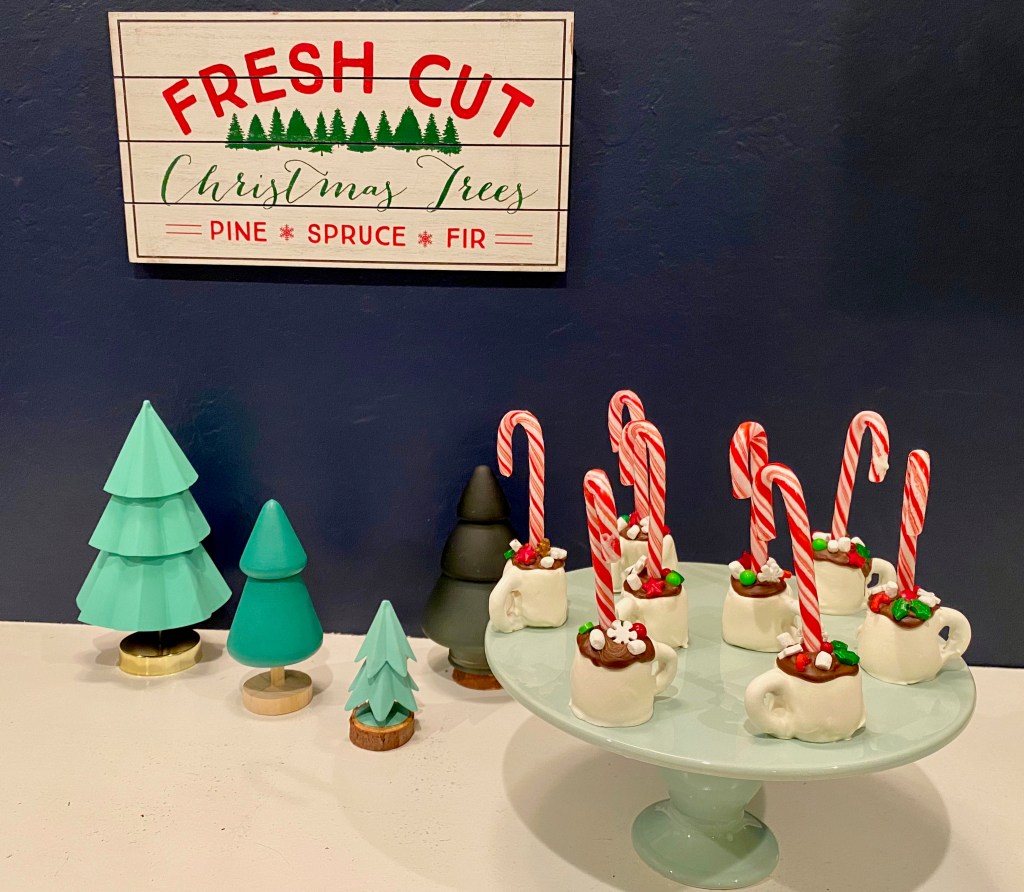
These little Christmassy Pops are perfect for your holiday party or for adding to your plate of Christmas treats. I used a pretty cake platter in mint green next to my display of mini Christmas trees for some photos and then sent them off to be handed out at the Drive-Thru caroling event. #CommissionsEarned
For more fun Christmas Ideas check out the following blogposts:
Each year, I try to incorporate some type of Christmas craft into our Advent activities. When my kids were younger, we would often take nature walks and collect all sorts of natural treasures. My kids are older now, and nature walks are a distant memory, but this remains one of my favorite DIY Christmas crafts that we made together.
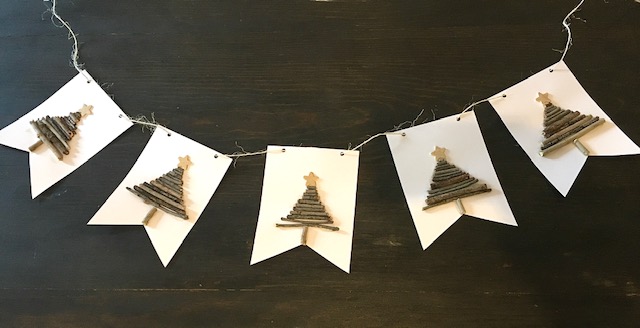
This simple and inexpensive Christmas Tree Banner will add a rustic touch to your holiday decor and kids will have so much fun collecting sticks and twigs to use for their creations. You will need to pre-cut white or off white card stock in rectangles or pendants and purchase some wooden stars, gold paint, twine, and glue. Before your nature walk, take a few minutes to paint your wooden stars with the gold paint. #CommissionsEarned
Bundle up, grab a bag, and go on a stick hunt. Look for sticks in a variety of lengths, but try to find ones in a similar width around. Once you get home, hand each child a piece of the pre-cut banner and let them sort through the sticks, breaking pieces off to for their Christmas Tree, and working their way from bottom to top, while leaving a bit of room for a star.
Glue the sticks in place, including a vertical twig for the trunk and add one of your gold stars to the top of each twig tree. Once all of your banner pieces have dried and you have hole punched the top, thread your twine through and find the perfect place to hang your rustic Christmas Tree Banner.
For more fun Christmas ideas check out the following blogposts:
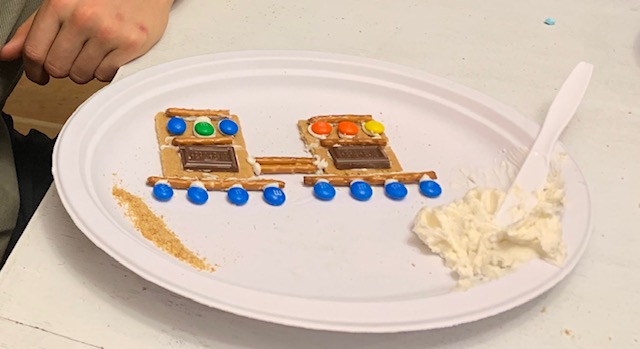
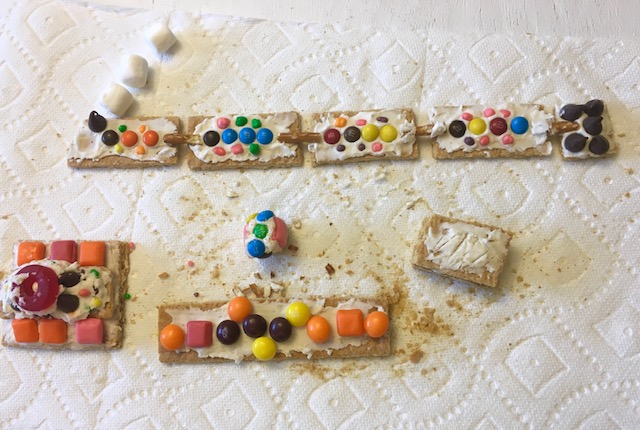
Traditions are my favorite! I love creating memorable experiences for my kids, and December is full of many anticipated events that we have done year after year. Watching The Polar Express and making graham cracker trains is one that my kids definitely look forward to. We always include this holiday tradition as one of our Advent activities.
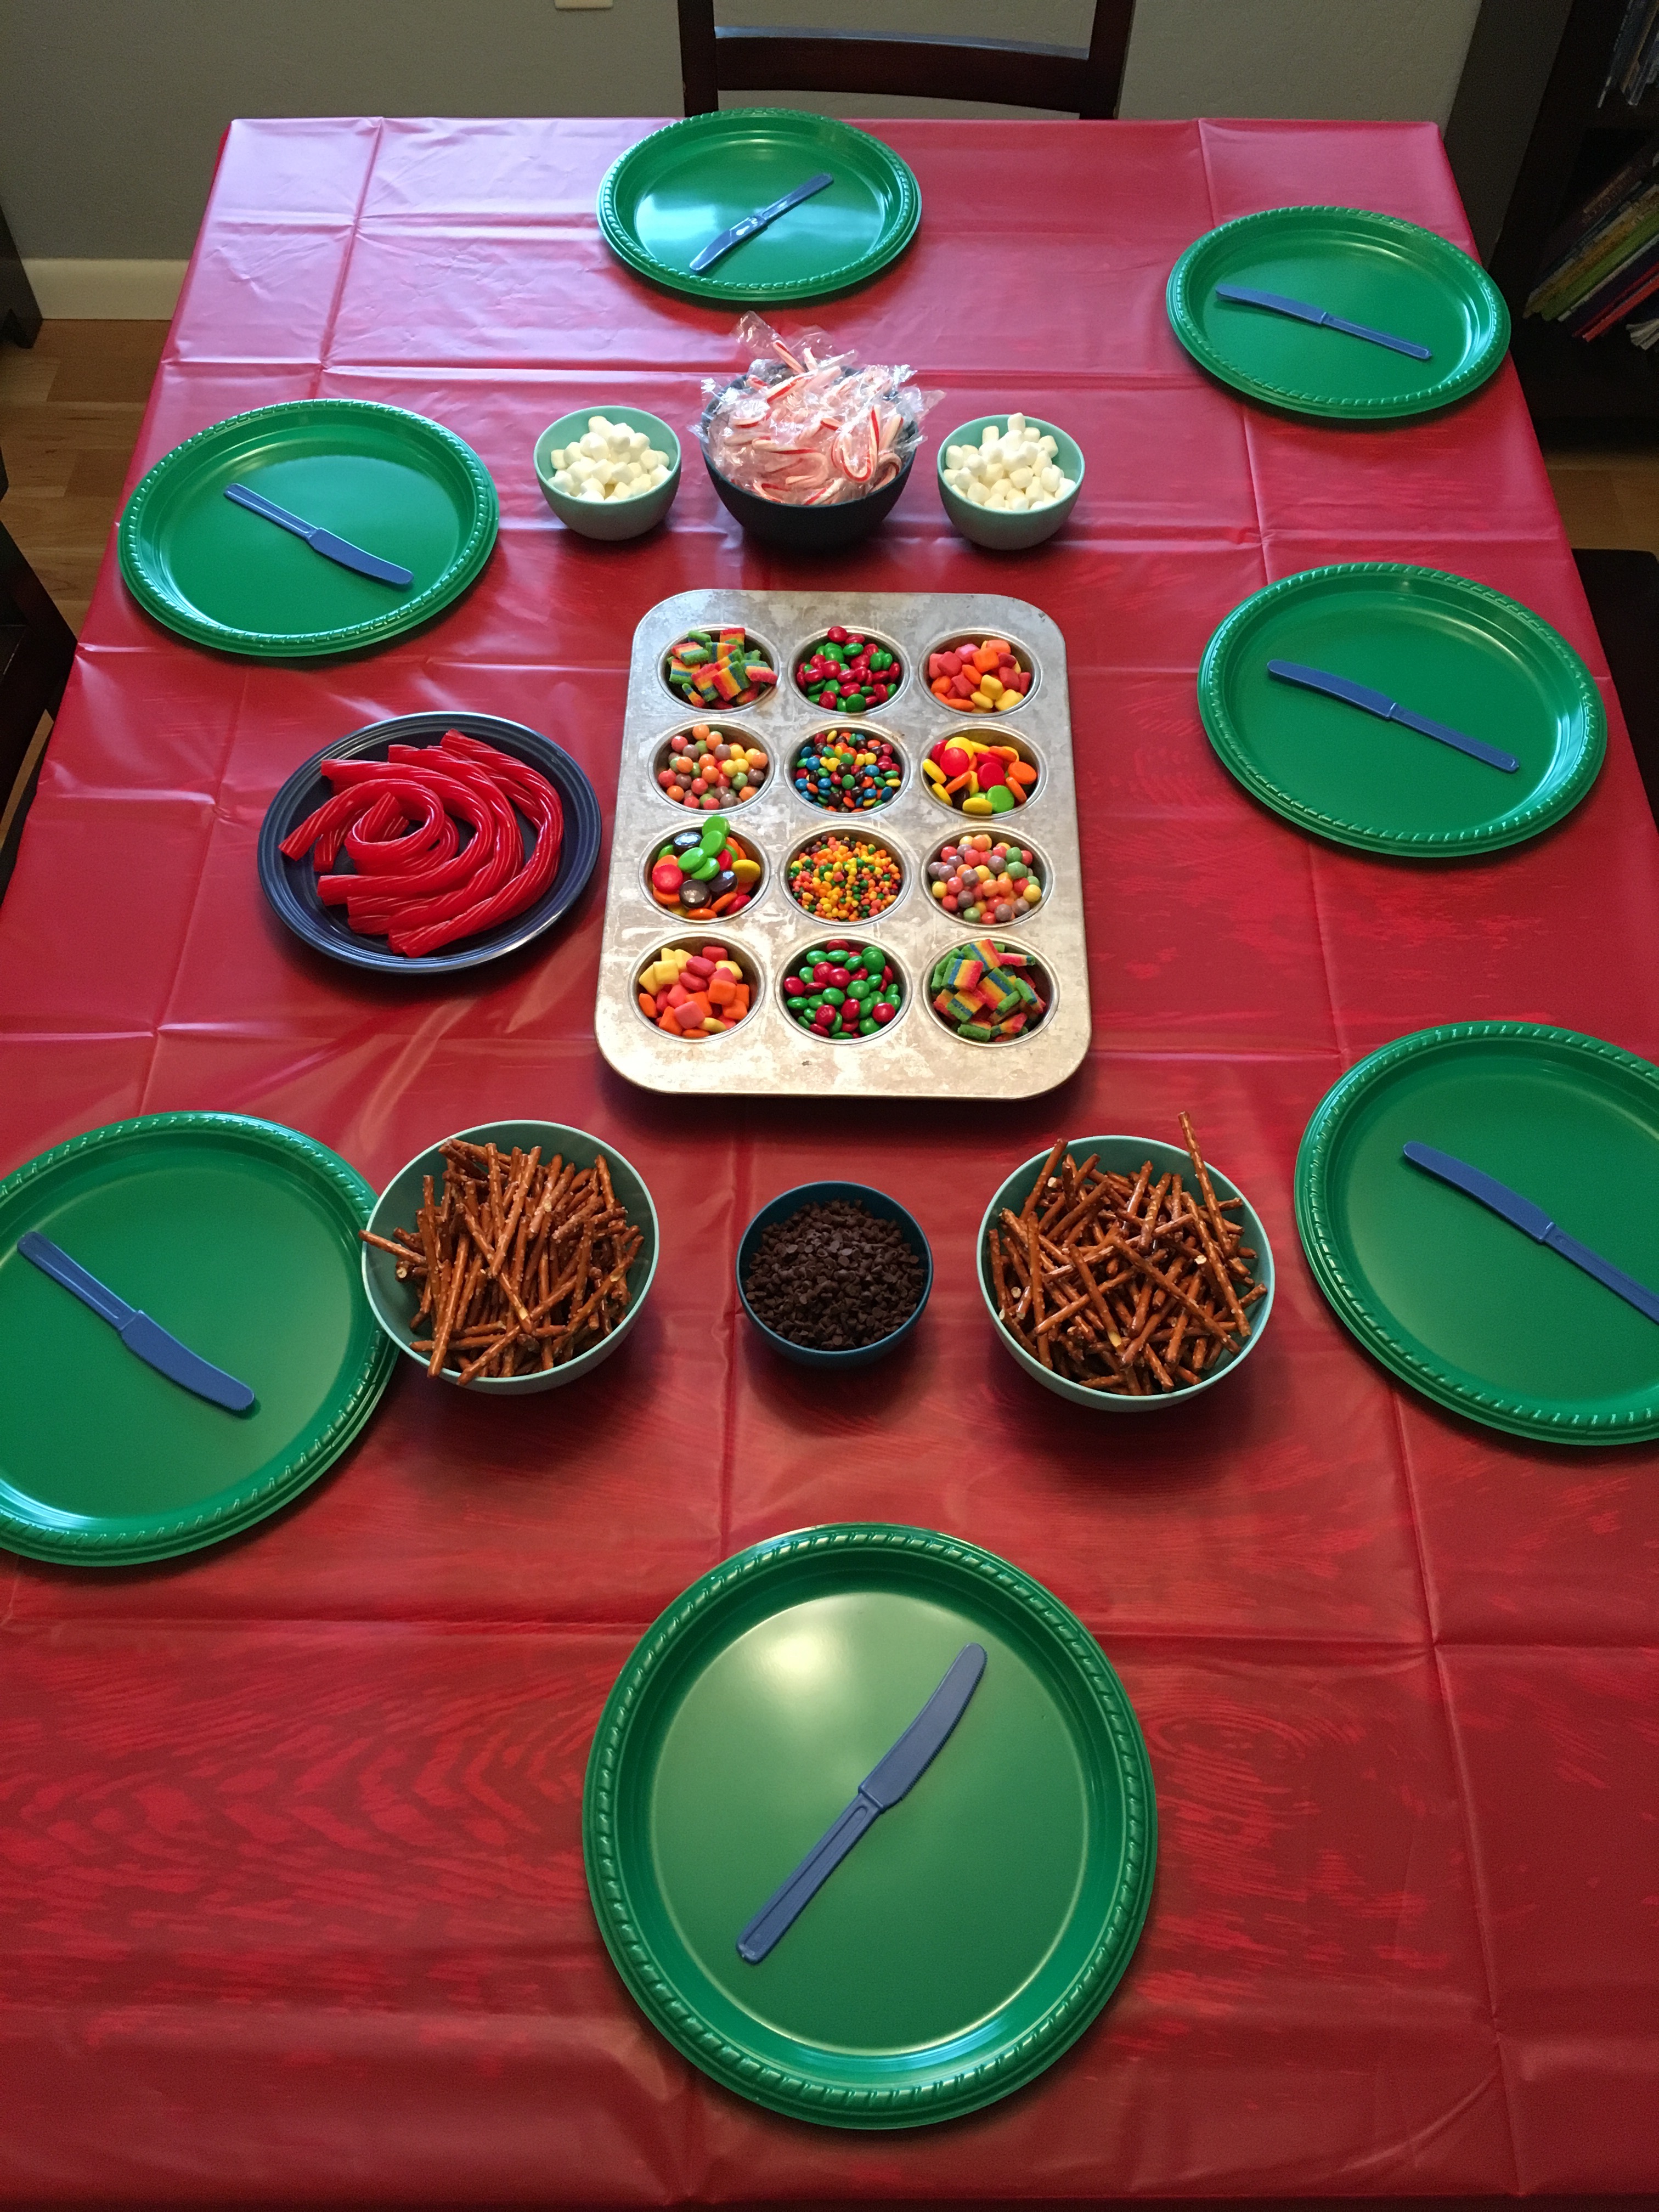
Each year, my kids invite a couple of friends to join them. I hit the candy aisle for mini M&M’s, Smarties, Gummy Lifesavers for wheels, mini Starbursts for windows, Nerds, Candy Canes, mini marshmallows and whatever else looks fun and festive. I get a couple of boxes of graham crackers and some vanilla frosting and have the table ready when friends arrive. I have found that muffin tins make the perfect holder for a variety of sweet treats. #CommissionsEarned
I tell the kids to create their train, but to hold off on eating until we start the movie. I love watching all of their creative ideas come to life. Some of their trains are simple and others make complex box cars with hidden compartments filled with candy. I like to include a few “healthier” snacks to put out with the movie as well, so that they are not leaving my house in the midst of a sugar crash.
I usually plan for about an hour for train making and two hours for the movie. Once the trains are complete, we throw on The Polar Express, which honestly is one of my all time favorite Christmas movies. I am pretty relaxed about kids eating in my living room, so I let everyone get comfy and enjoy their tasty creations while they watch.
For more fun Christmas ideas check out my other holiday blogposts:
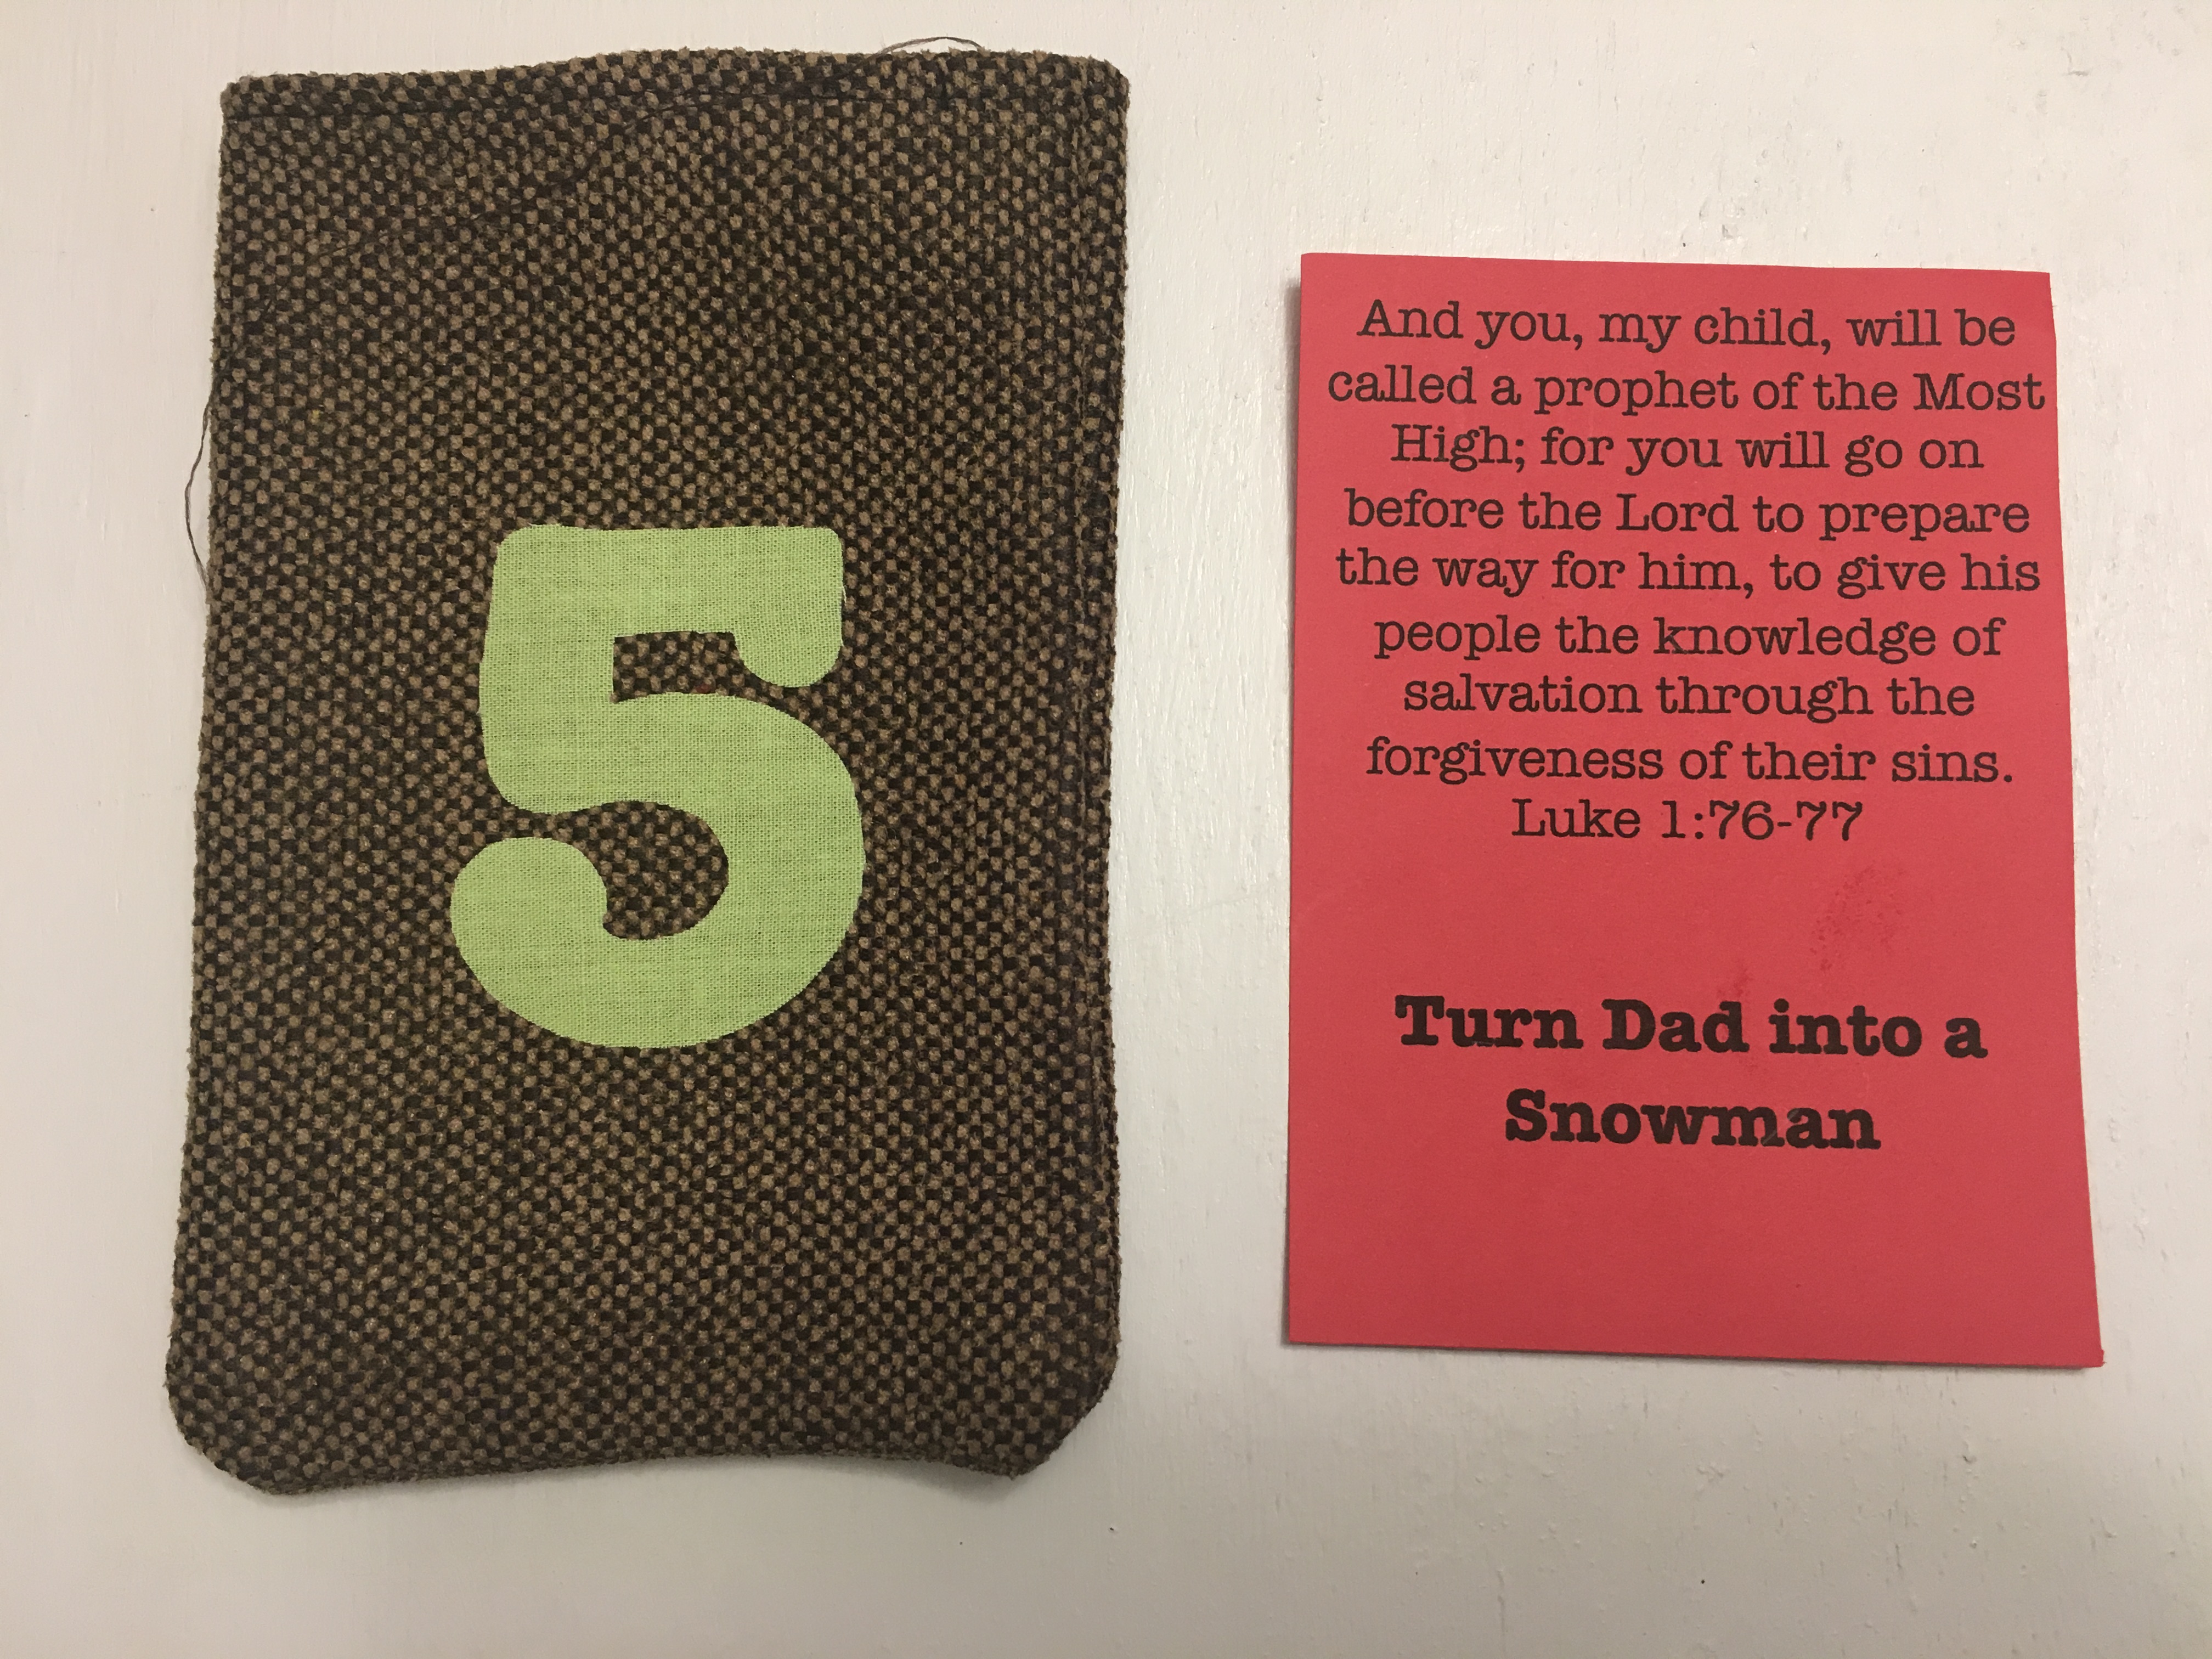
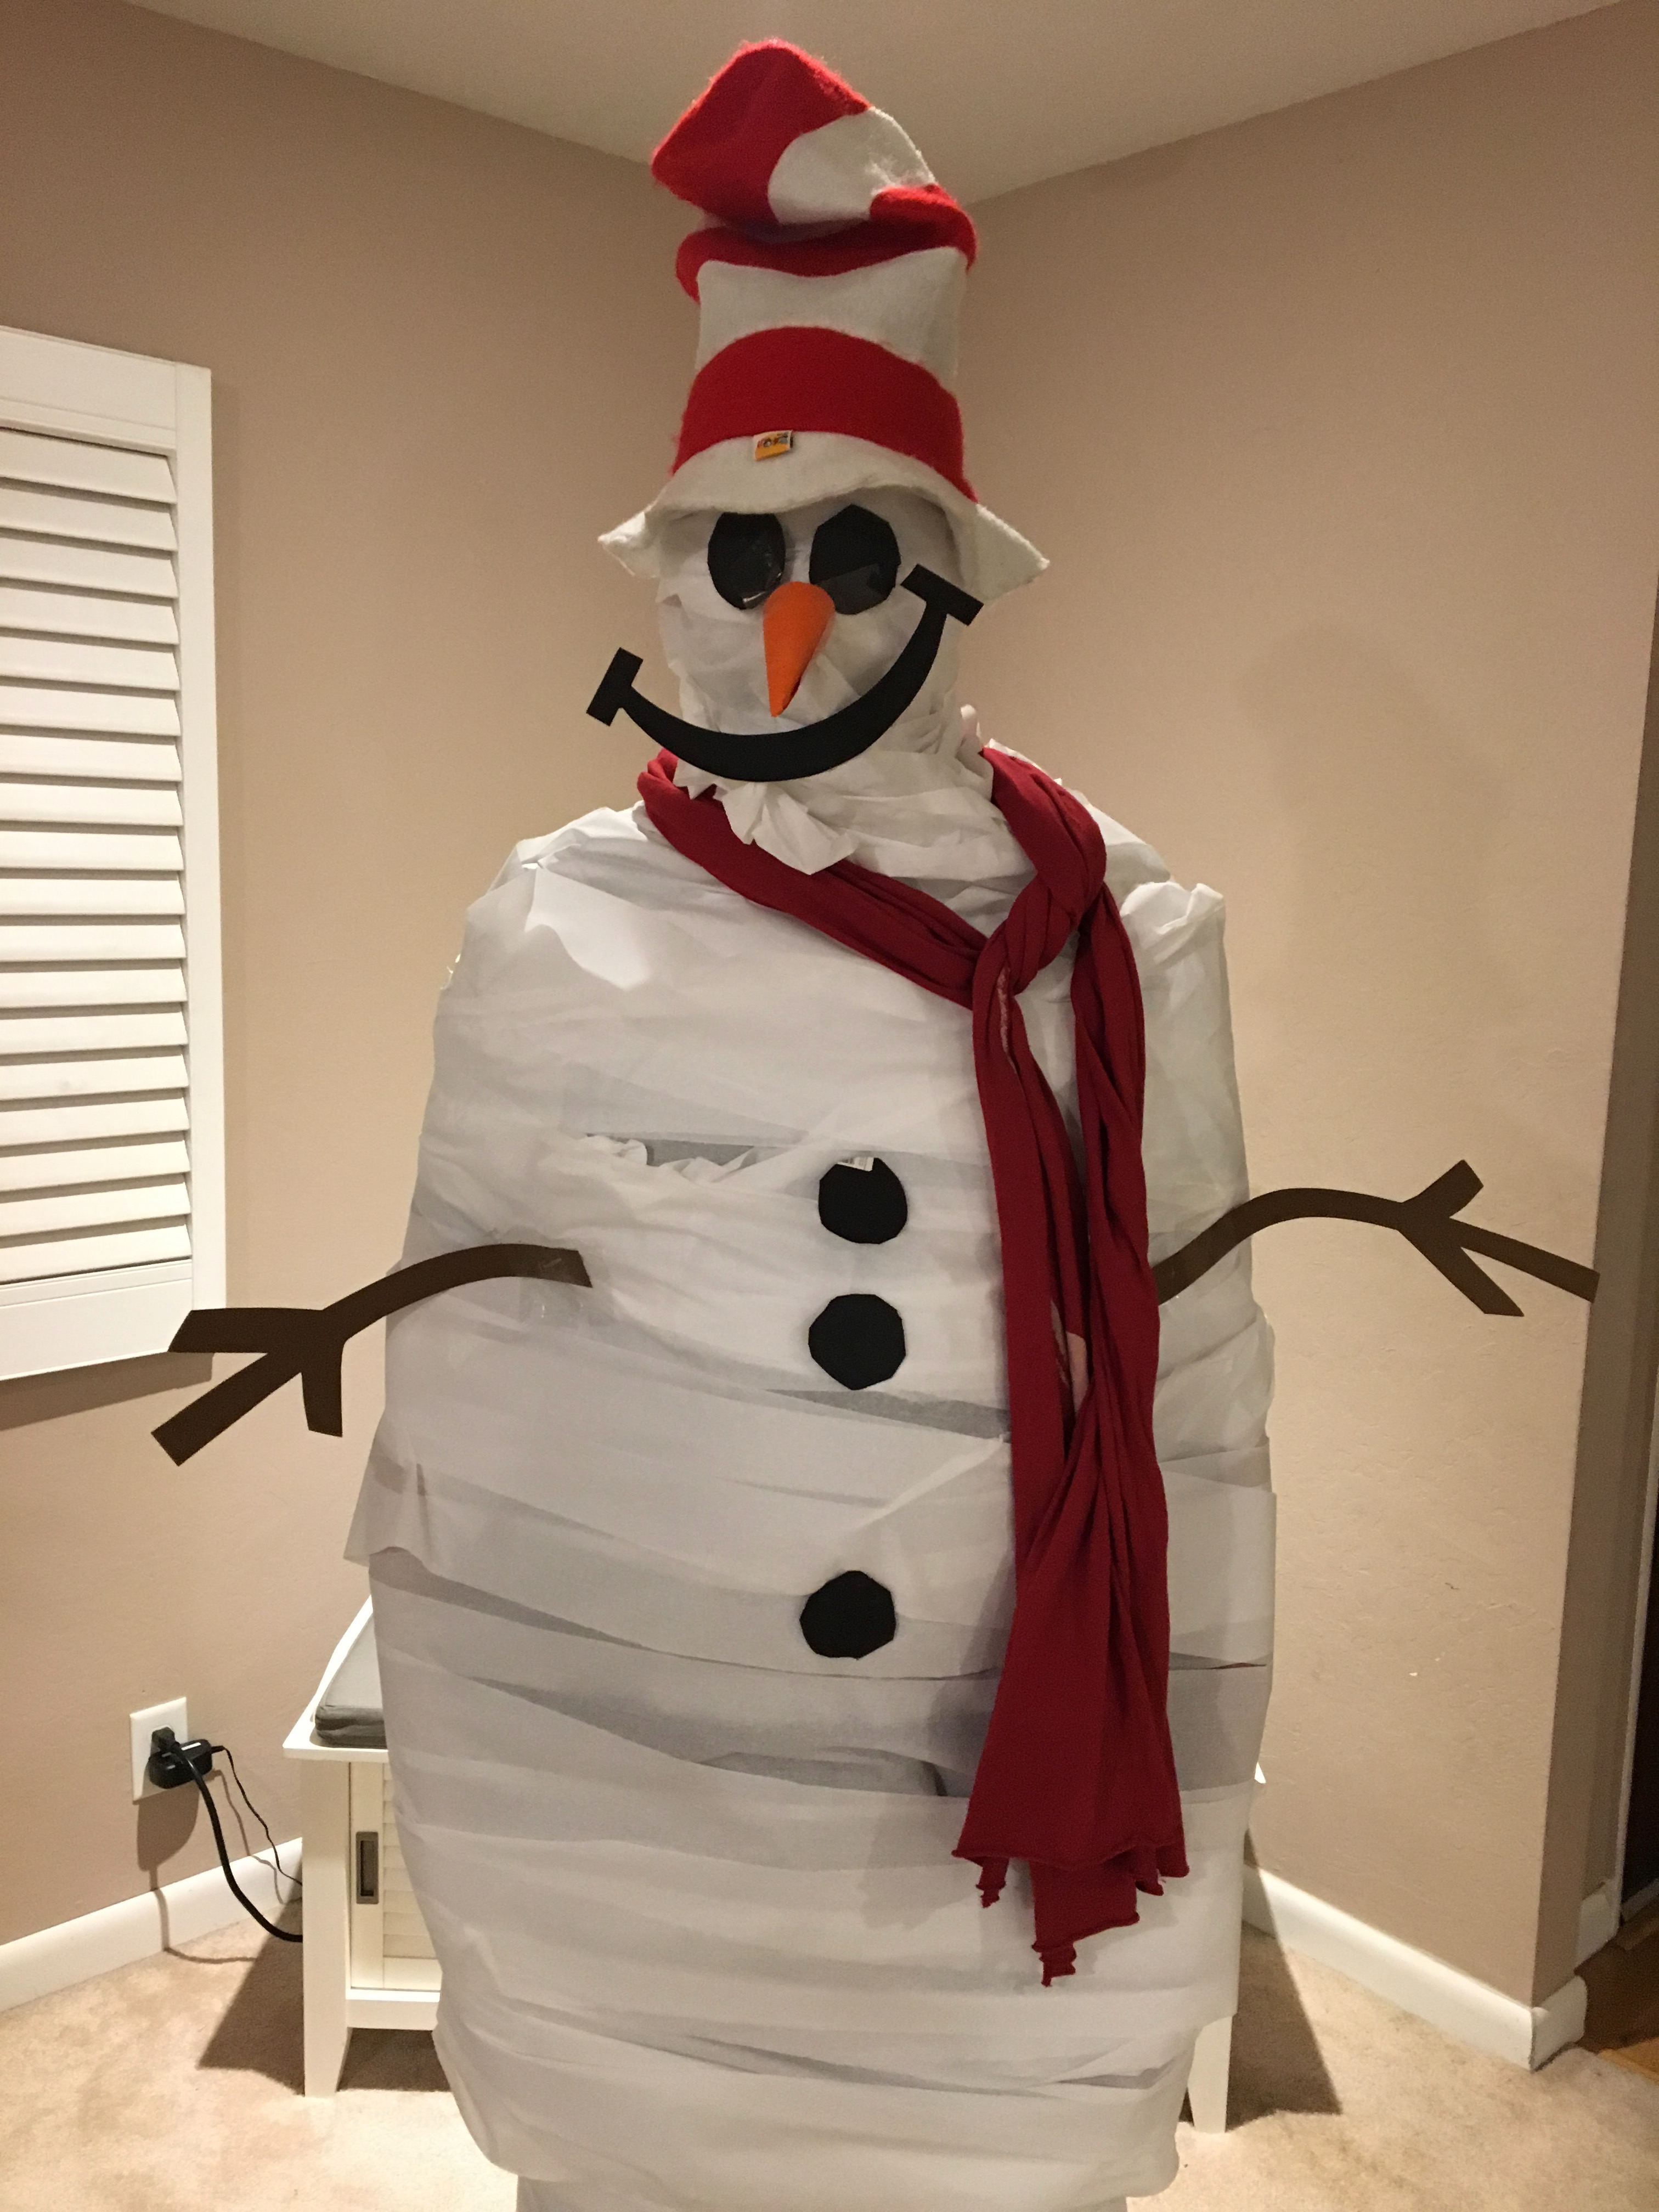
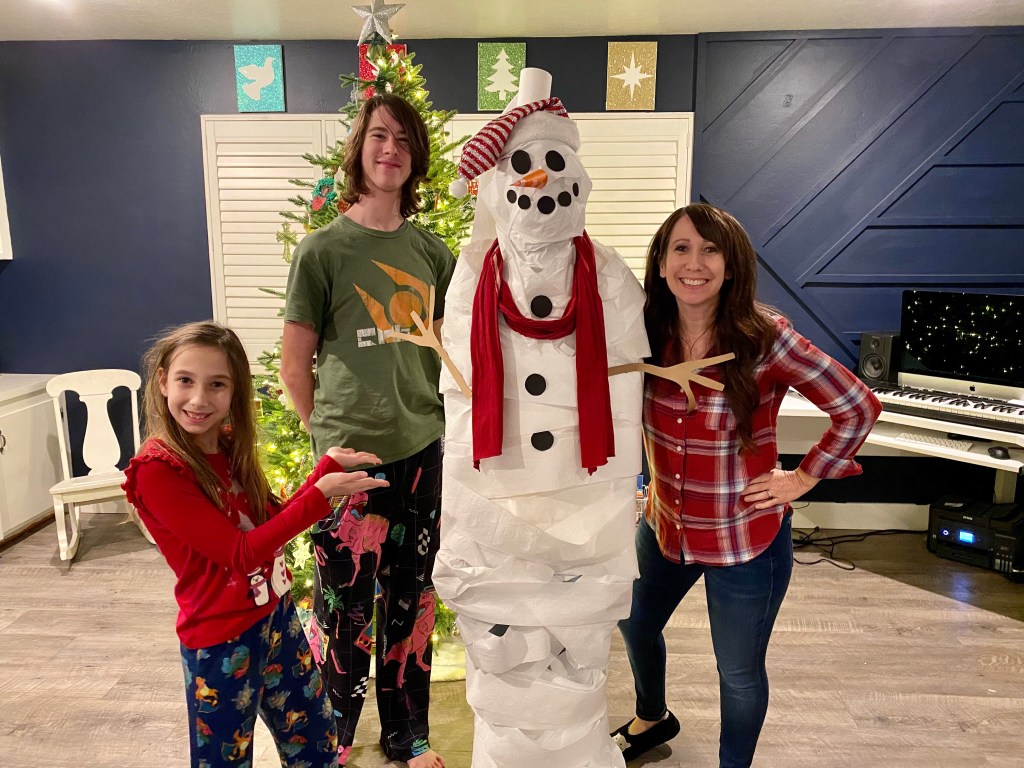
Turning Dad into a snowman has become one of the most anticipated Advent activities for our children. We started this tradition 3 years ago and it’s always sure to bring out tons of laughter and joy for all of us! The kids squealed with delight this morning, when they opened the Advent bag and read that this was the day to make a Dad “snowman!”
The best part of this activity, besides the crazy amount of laughter, is that it is free! Just gather what you have around the house. We used a couple of rolls of toilet paper, some scrapes of cardstock for the eyes, coal buttons, nose, mouth, and arms. I grabbed a scarf out of my closet and a hat out of the kid’s dress up box. Have some scotch tape handy and you are ready to go.
Last year, by accident, my husband got some toilet paper in his mouth, which made for a hilarious few minutes of giggles for the kids. So of course, this year, there was the expectation that he would make this happen once again. He did not disappoint! Make sure to watch our video to the very end to see the grand finale!
Over the last several years, we have switched things up a bit. So far all but one of us has been the snowman. The kids were delighted the year that they opened the advent bag and found the card that said “turn MOM into a snowman!” From that point on, every year we have chosen a different person to be the snowman. Here are a few pics of this silly tradition.
For more Christmas Fun check out the following blogposts:
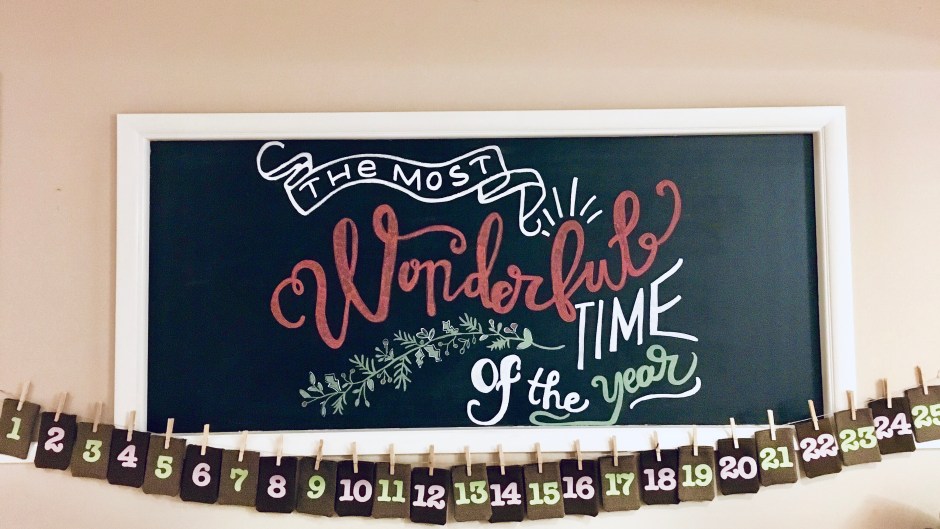
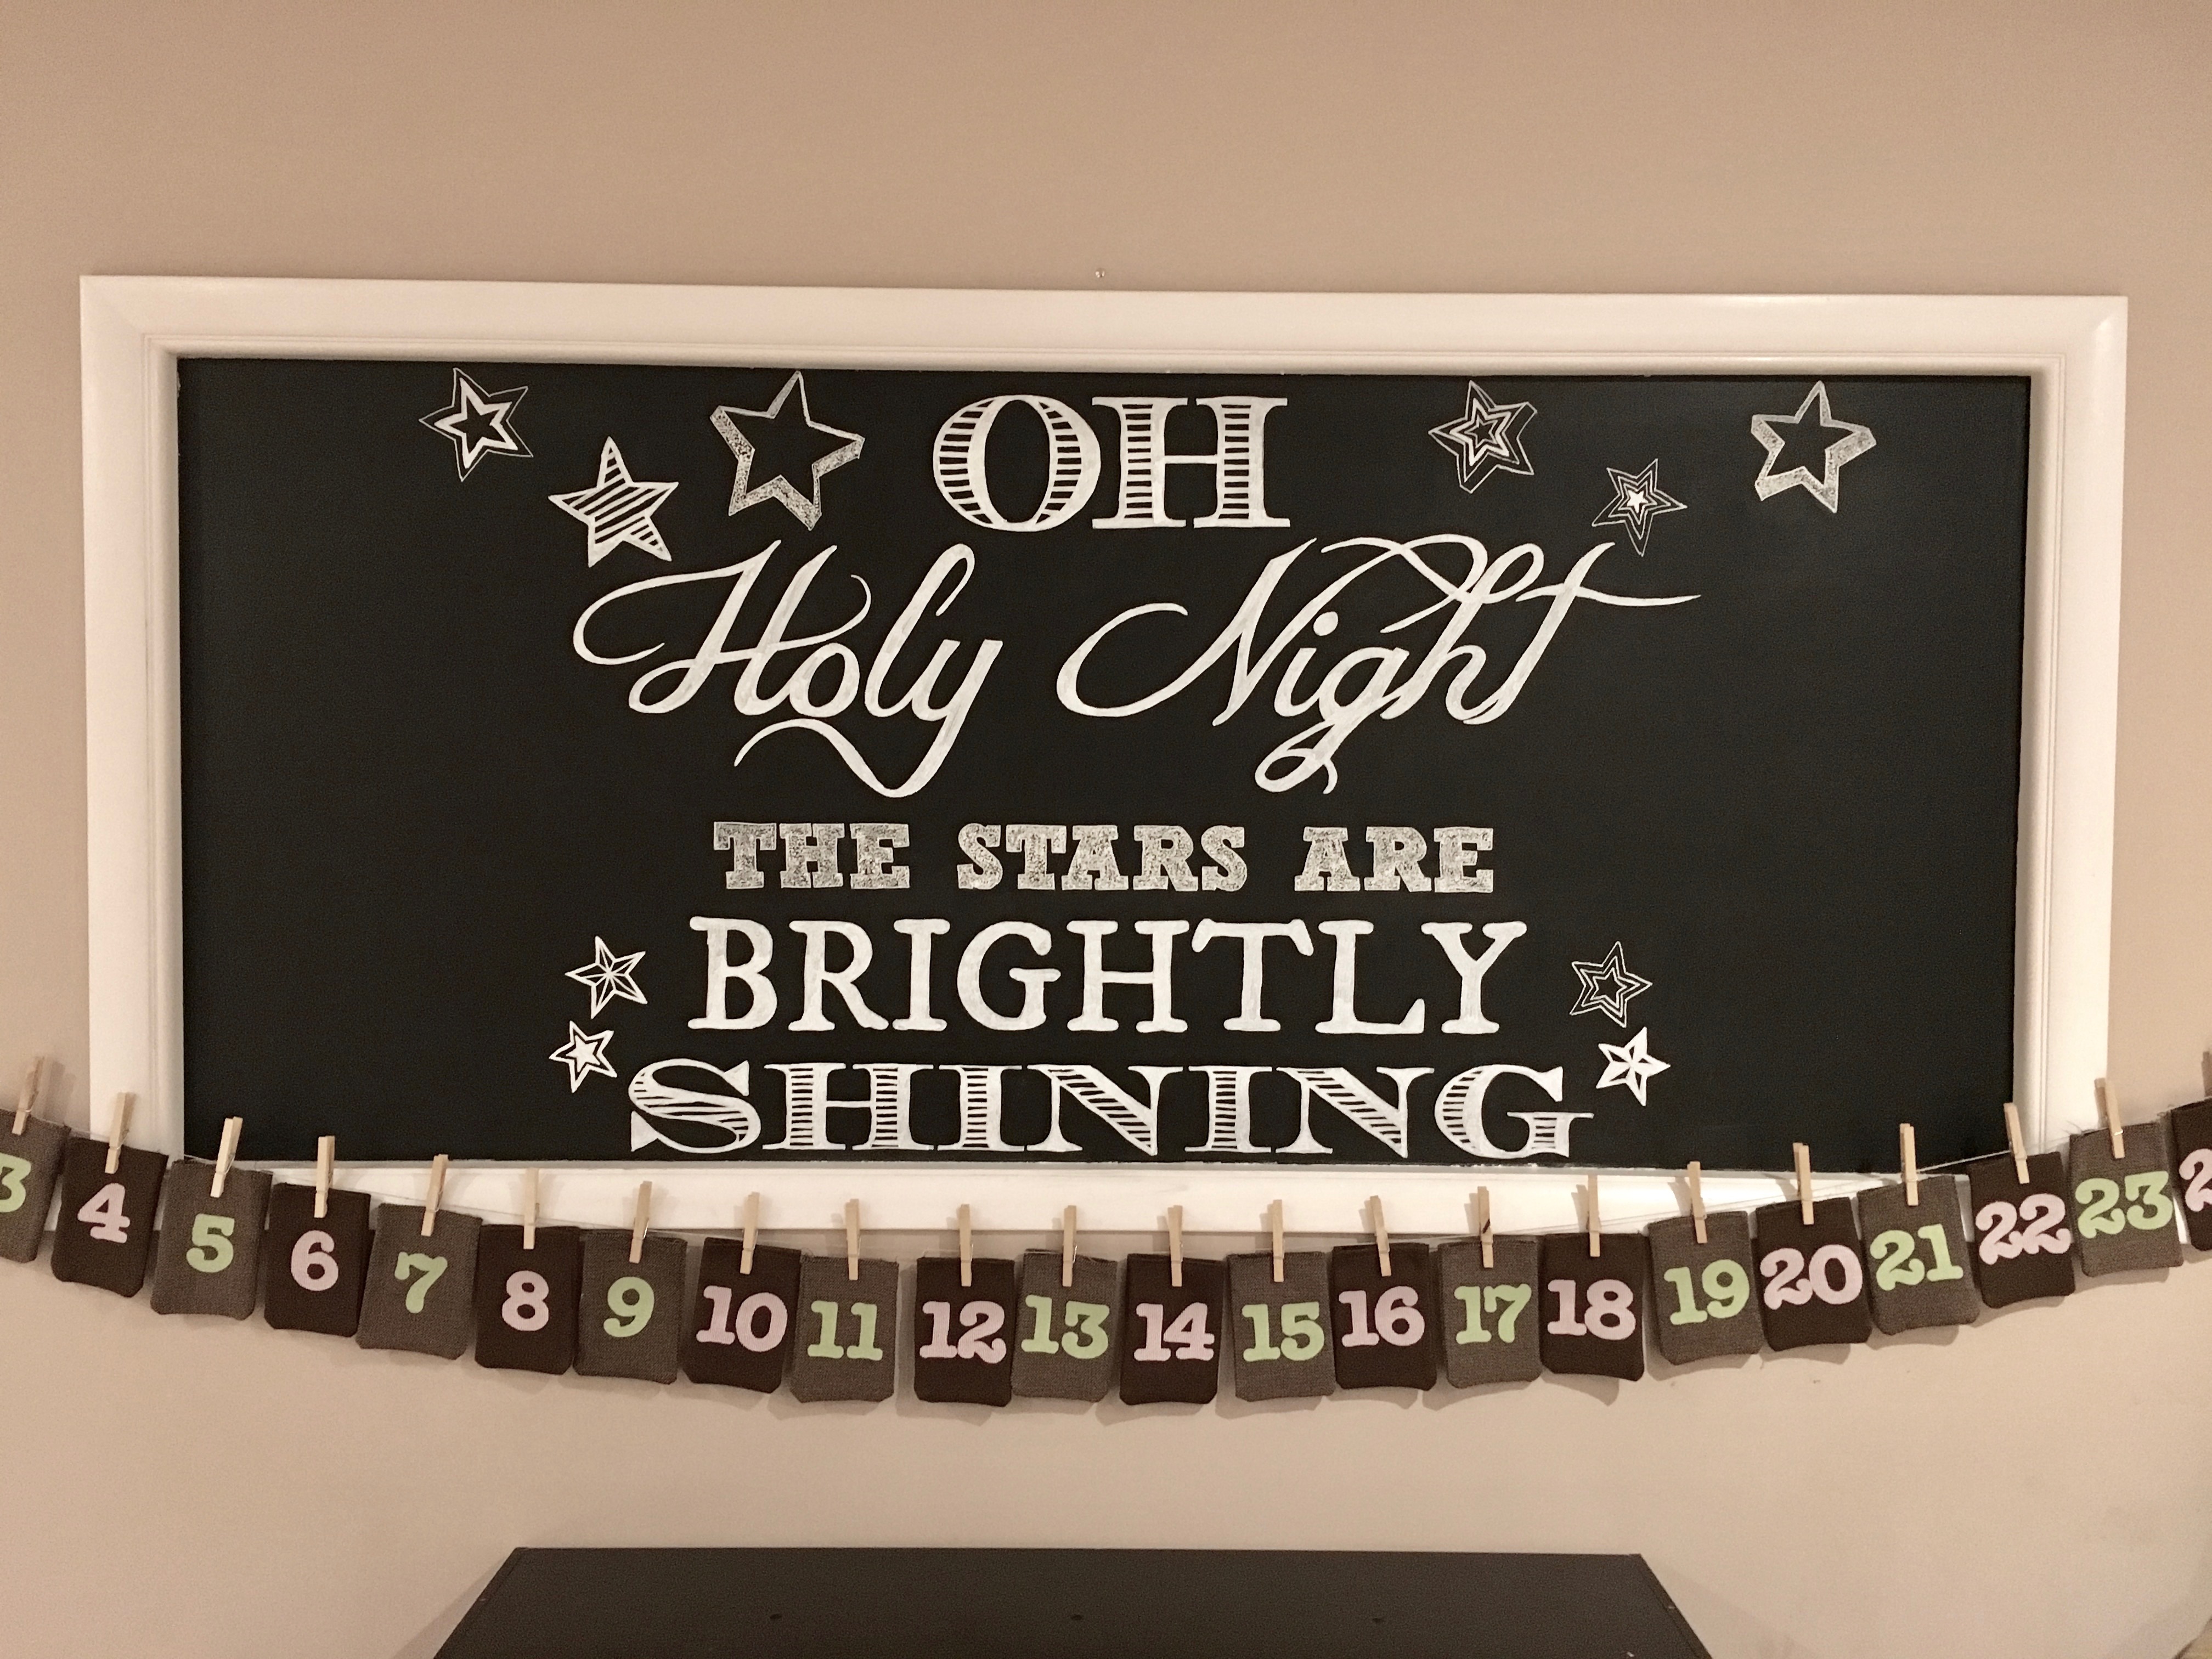
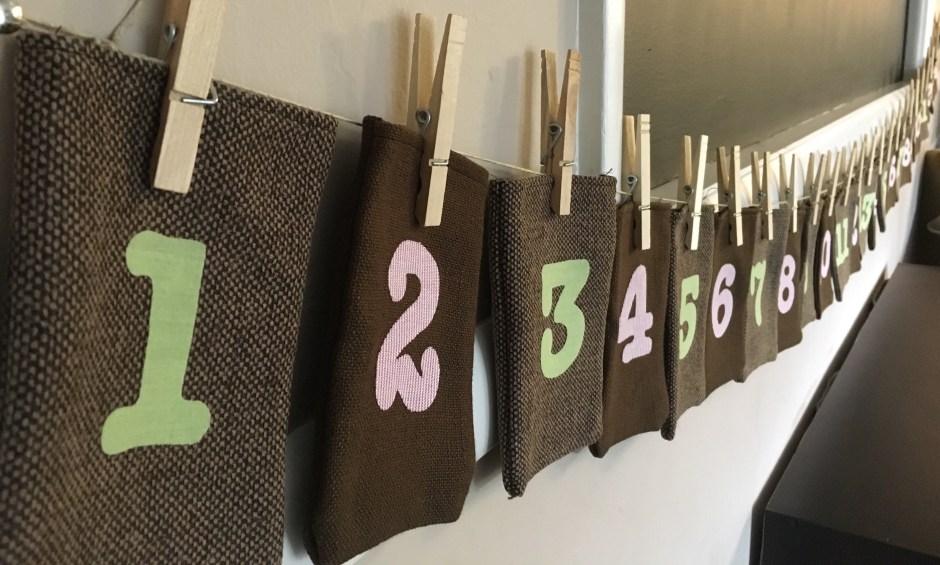
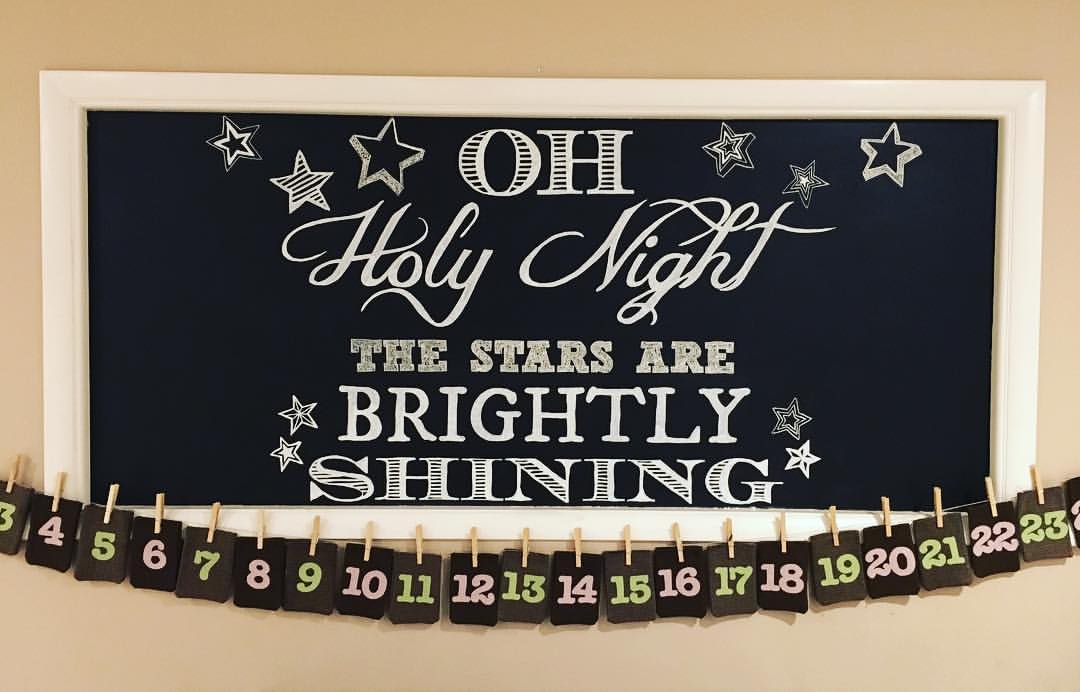
Every year, in the month of December, we spent time focusing on preparing our hearts to celebrate the birth of our Savior, Jesus Christ. One tangible way we do this as a family is by doing Advent Activities. Each day, December 1-25, our kids open the Advent Bag that corresponds with that day. Each bag contains a card with a Bible verse and a family activity printed on it.
I’ve included a video tutorial on how I made my Advent Bags. They are simple to make and have held up for over 5 years. My kids get so excited when they see them hung up across a wall of our house each December.
I’ve also given you a list of the Bible verses that we use, as well as our Advent activities for this year. Just an FYI, some of our activities may not be in the order I have posted. I try to plan ahead, but adjust as necessary depending on how life goes. Follow my blog this month for more detailed blog posts on some of our crafts and family activities.
ADVENT BIBLE VERSES
Therefore the Lord himself will give you a sign: The virgin will be with child and will give birth to a son, and will call him Immanuel. Isaiah 7:14
Give thanks to the Lord for He is good; His love endures forever. Psalm 118:29
My sheep listen to my voice; I know them and they follow me. I give them eternal life and they shall never perish; no one can snatch them out of my hand. John 10:27-28
But the angel said to him: “Do not be afraid, Zecharaiah; your prayer has been heard. Your wife Elizabeth will bear you a son, and you are to give him the name John.” Luke 1:13
And you, my child, will be called a prophet of the Most High; for you will go on before the Lord to prepare the way for him, to give his people the knowledge of salvation through the forgiveness of their sins. Luke 1:76-77
But the angel said to her, “Do not be afraid, Mary, you have found favor with God. You will be with child and give birth to a son, and you are to give him the name Jesus. He will be great and will be called the Son of the Most High.” Luke 1: 30-32
And everyone went to his own town to register. Luke 2:3
And Mary said: “My soul glorifies the Lord and my spirit rejoices in God my Savior.” Luke 1:46-47
She will give birth to a son, and you are to give him the name Jesus because he will save his people from their sins. Matthew 1:21
The Word became flesh and made his dwelling among us. We have seen his glory, the glory of the One and only, who came from the Father, full of grace and truth. John 1:14
She wrapped him in cloths and placed him in a manger, because there was no room for them in the inn. Luke 2:7
On the eighth day, when it was time to circumcise him, he was named Jesus, the name the angel had given him before he had been conceived. Luke 2:21
The shepherds returned, glorifying and praising God for all the things they had heard and seen, which were just as they had been told. Luke 2:20
After Jesus was born in Bethlehem in Judea, during the time of king Herod, Magi from the east came to Jerusalem and asked, “Where is the one who has been born king of the Jews? We saw his star in the east and have come to worship him.” Matthew 2:1-2
On coming to the house, they saw the child with his mother Mary, and they bowed down and worshiped him. Matthew 2:11a
Then they opened their treasures and presented him with gifts of gold and of incense and of myrrh. Matthew 2:11b
When they had gone, an angel of the Lord appeared to Joseph in a dream. “Get up,” he said, “take the child and his mother and escape to Egypt. Stay there until I tell you, for Herod is going to search for the child to kill him.” Matthew 2:13
For to us a child is born, to us a son is given, and the government shall be on his shoulders. And he will be called Wonderful Counselor, Might God, Everlasting Father, Prince of Peace. Isaiah 9:6
And this is the testimony: God has given us eternal life, and this life is in his Son. 1 John 5:11
And live a life of love, just as Christ loved us and gave himself up for us as a fragrant offering and sacrifice to God. Ephesians 5:2
Jesus answered, “I am the way and the truth and the life. No one comes to the Father except through me.” John 14:6
Your word is truth. John 17:17
For God so loved the world that he gave his one and only Son, that whoever believes in him shall not perish but have eternal life. John 3:16
Jesus is the Son of God. Acts 9:20
This is how God showed his love among us: he sent his one and only Son into the world that we might live through him. 1 John 4:9
I absolutely love chalkboards! They are so versatile and you can change them anytime to create a new look in your home. You can add quotes and drawings to go with seasons and holidays. The possibilities with a blank chalkboard are endless!
When we moved into our home over a year ago, there was an odd roll up door in the living room. It seems like the previous owners had used it as a sort of bar to serve drinks, but we didn’t quite know what to do with it. We have talked about closing it off, but haven’t gotten around to it. A couple of weeks ago, while sitting in my living room, I was struck with inspiration. I saw the frame around the roll up door and thought, “I wonder what it would look like if I turned this into a giant chalkboard?”
A few coats of chalkboard paint later and project complete! I am happy to report that it turned out even better than I expected! I used Rust-oleum ChalkBoard Paint and it took 3 coats of paint to cover the area thoroughly. I let each coat dry for at least an hour before adding another, and one 30 oz. can of paint did the trick. I purchased a white chalk marker and found a quote on that I love. I used our projector on my new chalkboard to get the quote just right and then traced it with the chalk pen. I filled in some of the lighter areas with a regular piece of white chalk to create some contrast of texture and I absolutely love it!!! This is definitely a great addition to the decor in our living room. #CommissionsEarned
Update: over the years, I have transformed our chalkboard many times over and have included several pics (above) of various quotes. I have found that it helps to paint a new coat of chalkboard paint over the blank board each time I do a new quote because sometimes the outline of the previous quote shows through a bit as you can see in “Find Joy In The Journey.”
For more fun DIY projects check out some of my recent blogposts:
Are you looking for a cute and simple Christmas gift to give to your children’s teachers? Look no further. For about $5 each, you can create these delicious caramel apple bundles. I bought my caramel sauce at Trader Joes, hand picked the largest, most colorful red and green apples I could find, made my own gift tags from tan card stock, and purchased a package of bells and long clear bags at Michael’s. I stacked the apples carefully on top of the caramel sauce and tied them off with a piece of twine. And there you have it…a quick, easy, and inexpensive, but very festive Christmas gift for your children’s teachers. You can also add mini ornaments and ribbon if you want to invest a bit more money into these festive gifts. #CommissionsEarned
For more fun Christmas ideas check out the following blogposts:
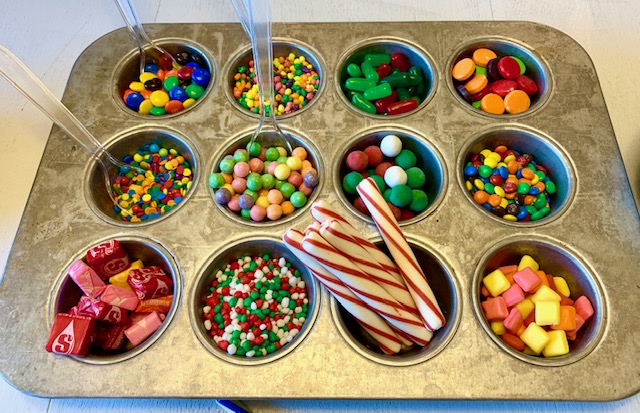
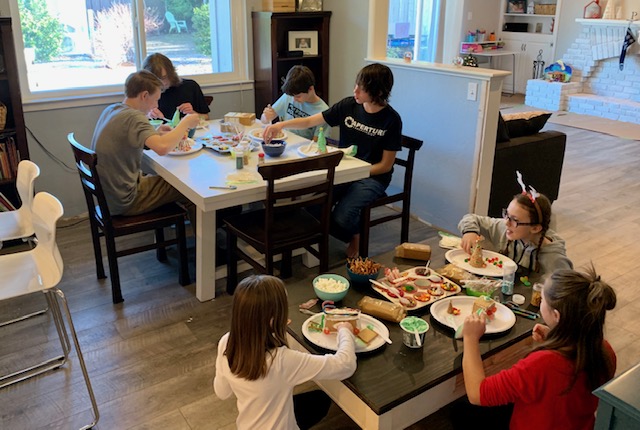
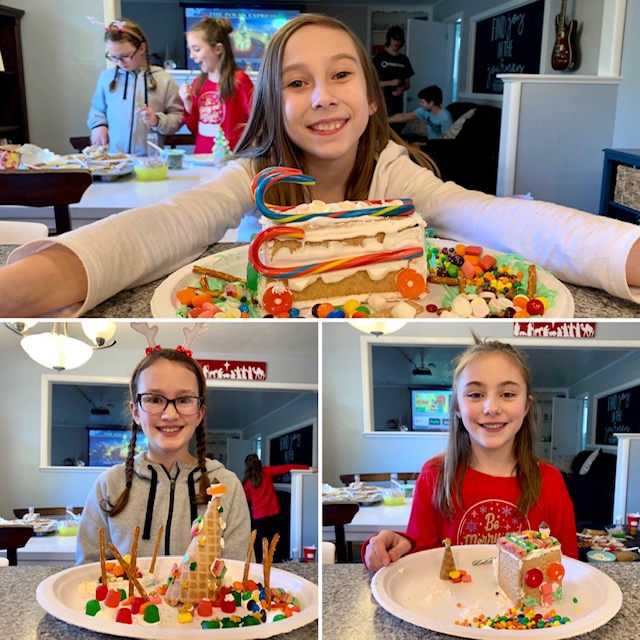
When my oldest son was in preschool, we started this tradition. Every year during Christmas Break, my kids get to invite a couple of friends over to make graham cracker gingerbread houses. We have carried on this tradition for 10 years now and it is definitely one we all look forward to. A muffin tray makes the perfect holder for the various small candies used to decorate these tiny edible houses. Royal frosting is a must, as it hardens quickly and acts like glue to hold the sides of your houses together. Stick pretzels can be used to create a log cabin or a fence. It’s helpful to give each child a baggie full of frosting with one corner snipped off for cleaner lines. Because this is a messy experience, I like to put a cheap plastic table cloth on my table for easy clean up. It’s also important to buy heavy duty plastic or thick paper plates to build your houses on. To secure the houses, it’s best to “glue” the base to the plate with some royal frosting. I always invite parents to stay and hang out while the kids work on their house’s. Not only does it make for good company, but there are extra hands to hold graham crackers in place and spread frosting for little ones who need the help. I love to see how each child comes up with a completely different and unique design for their graham cracker gingerbread house. I imagine that we will continue this tradition for years to come!


 Every year, in the month of December, we spent time focusing on preparing our hearts to celebrate the birth of our Savior, Jesus Christ. One tangible way we do this as a family is by doing Advent Activities. Each day, December 1-25, our kids open the Advent Bag that corresponds with that day. Each bag contains a card with a Bible verse and a family activity printed on it.