Axolotl Tote Bag

Recently, I picked up a set of blank tote bags to make some library book bags with my Cricut Maker 3. These totes are quite sturdy and they come in 26 different colors, so I definitely will be ordering more in the future. I also decided to purchase a year-long subscription to Cricut Design Space, and I have not been disappointed! The variety of fonts and images is beyond amazing.

My daughter loves axolotls, so this little pink cutie reading a book was the perfect choice for my girl. I found a gorgeous set of heat transfer vinyl on Amazon in boho colors. #commissionsearned. Full disclosure, as beautiful as these colors are, you definitely get what you pay for. This HTV was difficult to weed and I would only recommend it for projects with larger cuts. The more intricate ones were a bit of a pain, even with using the “more pressure” setting on my Cricut. But the colors kind of made it worth it.

For those of you who are new to using Design Space and to layering heat transfer vinyl, here is the step-by-step guide for how I made this fun tote.

Search “axolotl” in Design Space.

If you have not purchased a subscription, this image will cost $0.99. It’s free with a subscription.

This image has an empty alt attribute; its file name is screen-shot-2023-10-01-at-10.15.47-am.png

Click on the image and then click on “add to canvas”

You can now size your image to fit your tote bag. You can easily add this to a t-shirt or sweatshirt as well.

I decided to add a bit of contrast with an oval behind the image. Go to shapes and choose
“circle.”

Now you will see a circle added to your canvas.

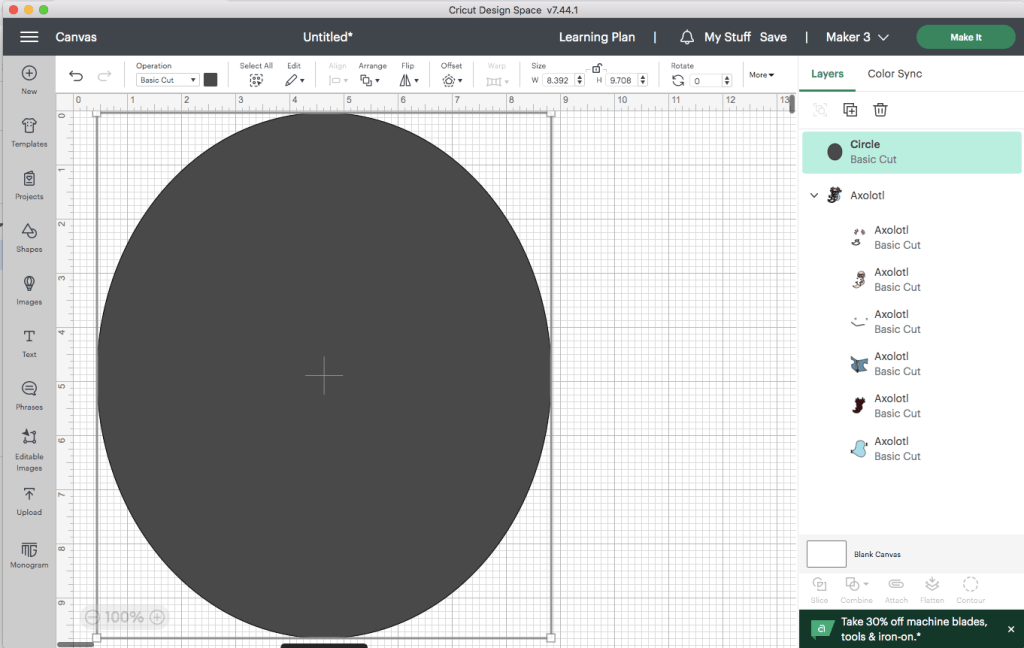
Go to “size” at the top tool bar and hit the unlock button. Now you can make your circle into an oval that covers your image.

You need to change the position of your oval so that it is behind your image. Go to “arrange” and click “send to back.”

Now you can change the color of the oval. I wanted mine to be the same color as the book that the axolotl is holding.

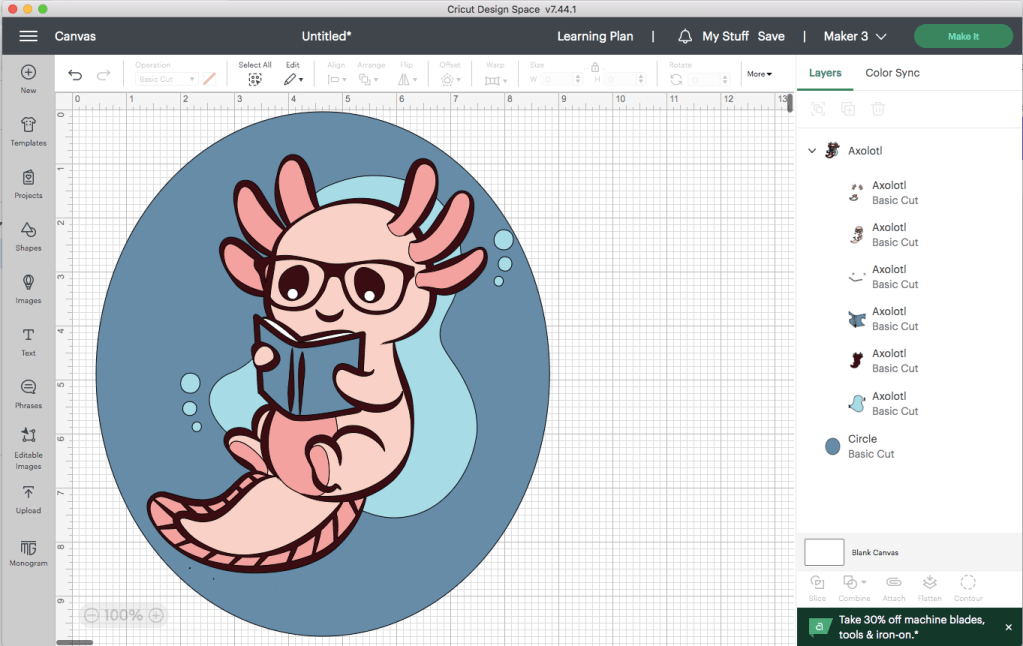
Make sure that your entire image is the size that you want to put on your tote bag.

Click “Make It.” I chose “on mat.”

Be sure to click “mirror” on every mat. This step is super important. And don’t forget that you will want your HTV to be shiny side down on the mat.

You can cut each color separately, but I have a little time-saving trick that I like to use. I move several colors onto one mat.

Click on the 3 dots to the left of your object.

Move the objects to the mat of your choosing.

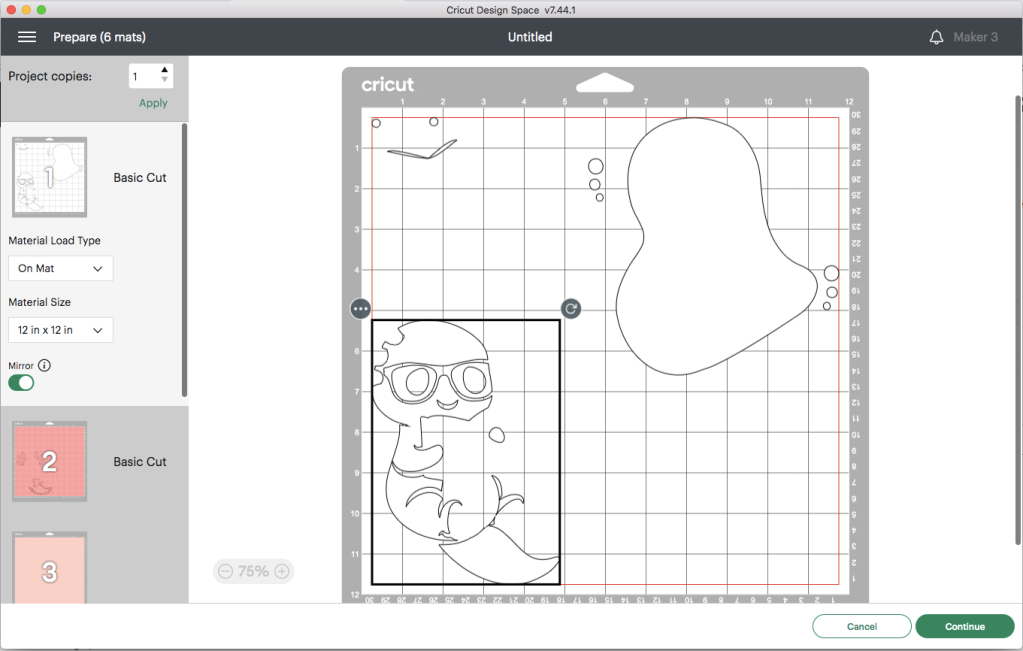
As you can see, I was able to get 3 cuts on one mat. I used the grid to figure out the size of each color of HTV and where to place it on the mat. This saves a lot of time loading and unloading mats. Just be sure to put the right color in the right spot and remember to mirror your image.

You will be asked to select the type of material. I chose “everyday iron-on.” Make sure you have the fine tip blade loaded into your Cricut and now you are ready to go.

After all of your pieces are cut, you can weed each one and begin the process of adding the layers to your tote. I purchased the HTVRONT heat press and it made it so easy to layer the vinyl. I also got an inexpensive heat press mat that is the perfect size for totes and tees. #commissionsearned

One thing I like to do is to layer all of the pieces on each other before I use the heat press, just so that I get the placement right. Then, I peel them apart and layer, one at a time, starting with the back layer. In this case, my first layer was the blue oval.

You only want to heat each layer for about 12-15 seconds, and don’t forget to put a teflon sheet or a piece of parchment paper between your heat press and your HTV. Be sure to check the recommended heat setting and time for the vinyl you are using. Each brand varies slightly. You also need to know if your HTV is hot peel or cold peel.

This is the fun part…seeing your design come to life. In just a few moments, your tote will be finished and ready for your next trip to the library.

For more axolotl fun, check out my daughter’s DIY Axolotl Halloween costume from a couple of years ago.

New Year’s Eve Countdown Bags for Kids & Tweens

“Countdown Bags” are one of my favorite ways to ring in a new year. I started doing this when my 3 kids were little, and over the years, I have adapted this tradition in a variety of ways. This year my husband had to work until 9pm and my teenage boys made plans to play Airsoft with friends, so it was just going to be my girl and I counting down for most of the evening. I wanted to make it really fun for her, so I let her invite a couple of friends over and got to work creating a memorable tween friendly event.

I am learning that 11 year old girls love to be silly and have fun with planned activities, but also like to have a good amount of unstructured time when they get together, so I planned the night to incorporate both. I purchased a pack of shimmery silver lunch sized bags and filled them with a variety of fun things that they could do on the hour, every hour, from 4:00 pm – midnight. I bought some glittery card stock in a couple of different colors and I created clocks to glue on the front of each bag. #CommissionsEarned

I filled the bags ahead of time, and since some of the items were too large to fit in the bags, I wrapped them and included times to correlate with the bags that they went with.

The girls arrived at 4:00 and we kicked off the night with “photo booth fun!” I already had a large piece of black material that I had used for a variety of party backdrops. I also kept some props and decorations from our 2020 New Year’s Eve celebration, so I reused them and added a string of white Christmas lights as a border. The girls took a few fun shots and then went off to giggle and chat about all the things. #CommissionsEarned

At 5:00 they opened the next bag. This one had them wondering, because there was a huge ball hanging over the countdown bags, wrapped in black plastic. They had guessed that it might be a disco ball and were shocked to find that it was really light. They opened it to find a beach ball with questions written all over it in sharpie. This game turned out to be so much fun and they came back to playing it several times throughout the night.

Somewhere between 5:00-6:00 the girls ate dinner, which was just a super easy Papa Murphy’s take and bake pizza and some fruit. Then at 6:00 they opened the next bag. I planned ahead for a game of “Whiteboard Pictionary” by printing off a list of fun and easy prompts. I folded each one and put them all in a mason jar and include a whiteboard marker in the bag. This is another game that didn’t take the entire hour, so it left a good amount of downtime for whatever the girls wanted to do.

7:00 was probably my favorite because I am such a crafty girl at heart. I purchased 3 plain canvas tote bags and I already had a variety of paintbrushes and acrylic paints from previous projects. I found some fun “create your own tote bag” inspiration on Pinterest and grabbed a roll of painters tape so the girls could try some of the geometric tote bag ideas. I would have to say, that they turned out pretty cute! #CommissionsEarned

The girls were so curious to find out what 8:00 was all about because they noticed at the beginning of the night that there was a large mass of “something” taped to the ceiling under a black plastic table cloth. They finally got to rip into the plastic and a bunch of balloons cascaded down on them. The object of the balloon game is to pop the balloons one at a time and do whatever activity is found on the piece of paper hidden inside. Some of the tasks I included were: leapfrog across the room, dance an Irish jig, make a 3 person pyramid, and run outside and yell Happy New Year 5 times as loud as you can.

At 9:00 the girls opened an extra little package in front of the countdown bag that was too large to fit inside. It was a small wooden movie clapboard and I included a couple of chalk pens as well. They had already been doing TikTok dances throughout the night, but this hour was dedicated time to do just that. #CommissionsEarned

By 10:00 these girls were showing no signs of slowing down, so I planned to tire them out with glow in the dark balloon games. I taped off three sections in the middle of my living room with some of the painters tape so each girl had her own zone. Then I brought out 15 balloons I had blown up earlier in the day with glow sticks inside. You can also purchase glow balloons on Amazon. We put all of the balloons in the middle and turned the lights out. I played music on my phone while the girls tried to keep all of the balloons out of their section. When the music stopped they had to freeze. I would also switch the light on and the winner was the one with the least amount of balloons in their zone. After each game, they rotated spots. I think they played about 7 rounds with lots of squeals and giggles before taking a snack break of rice crispy treats and s’mores dip. #CommissionsEarned

I wanted to do something exciting at the 11:00 hour, so I bought 3 cans of silly string and sent the girls outside for an EPIC SILLY STRING BATTLE!!! This may have only taken a few minutes, but it was hilarious to watch and was so much fun! #CommissionsEarned

Our 12:00 HAPPY NEW YEAR bag was filled with poppers and horns, so I let the girls open this one at 11:45. We also busted out the Martinelli’s Sparkling Apple Cider and some “fancy glasses!” and got ready to ring in the New Year. We ran outside at 20 seconds to midnight with poppers and horns ready to go, counted down to 2022, yelled HAPPY NEW YEAR for all of neighborhood to hear, popped our poppers, and then came back inside to toast to a new year. #CommissionsEarned

For another fun New Year’s Eve idea check out my previous blogpost:

New Year’s Eve