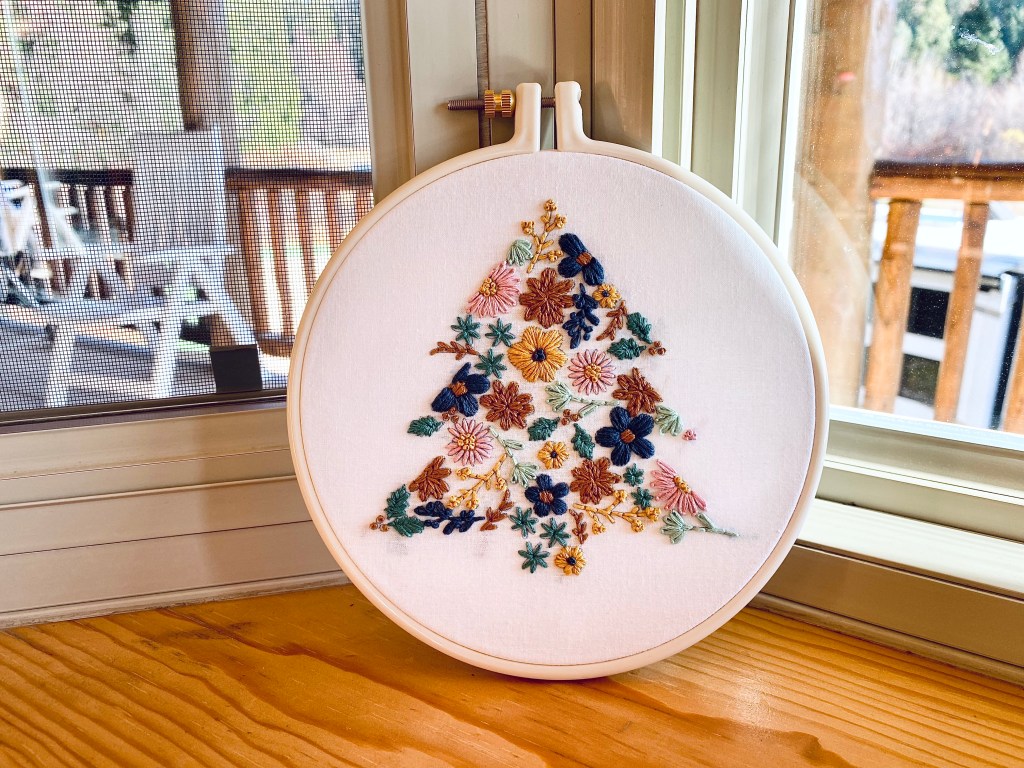
When I was in middle school, I took a home economics class and we spent some time learning how to do embroidery. It’s something that I dabbled in a bit over the years, but recently, I have fallen in love with it in a new way. I have been working on a collection of embroidered pieces to sell locally, and am now branching out to create my own embroidery patterns for my new Etsy Shop, Thistles and Rainbows. This is the first full pattern that I created from scratch and I’m super proud of myself!
I was standing in line at the grocery store a couple of weeks ago and I saw a display of candles in this color pallet. I snapped a quick picture and decided that I had to create something featuring this beautiful array. With Christmas just around the corner, I set out to make my floral Christmas tree embroidery design.

Recently, I had the privilege of spending the weekend in a cozy cabin in the woods with my daughter and her orchestra class for a music retreat. I knew I would be sitting for hours, listening to middle schoolers practice, so I brought my traced out tree pattern, needles, and embroidery thread. I stitched out every flower, leaf, twig, and holly berry to the sound of stringed instruments. They even played a medley of Christmas songs, so it could not have made for a better setting to indulge in one of my favorite past times. I am affectionately calling this pattern “cabin tree.”


If you love embroidery as much as I do, and are looking for a new pattern to add to your holiday collection, or if you have always wanted to try embroidery, but haven’t known where to start, this is the perfect pattern. You can find the PDF printable instant download for “cabin tree” in my Etsy shop. I have included the printable pattern in two different sizes, as well as a detailed set of instructions, tutorials, and tips for making this a great project for beginners, and yes, seasoned creatives will enjoy it just as much!


If you are new to embroidery and need some supplies to get started, here’s a great list:
#commissionsearned
And if you have come to this blog post because you purchased my Floral Christmas Tree pattern on Etsy, first of all, thank you for supporting my small business. In addition to the PDF pattern and instructions you purchased, I’ve included some short video tutorials to help you with the various stitches.
I hope that these short tutorials made it easy to learn some of the most commonly used embroidery stitches. Follow my Etsy Shop for other PDF patterns and printables and have a wonderful Christmas!